
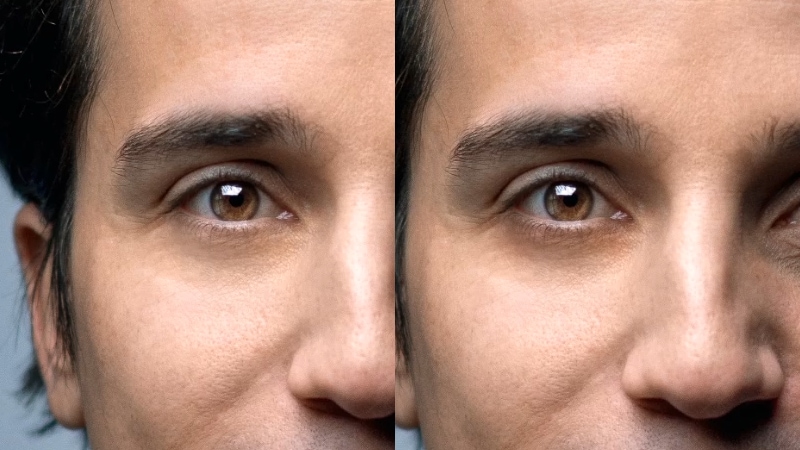
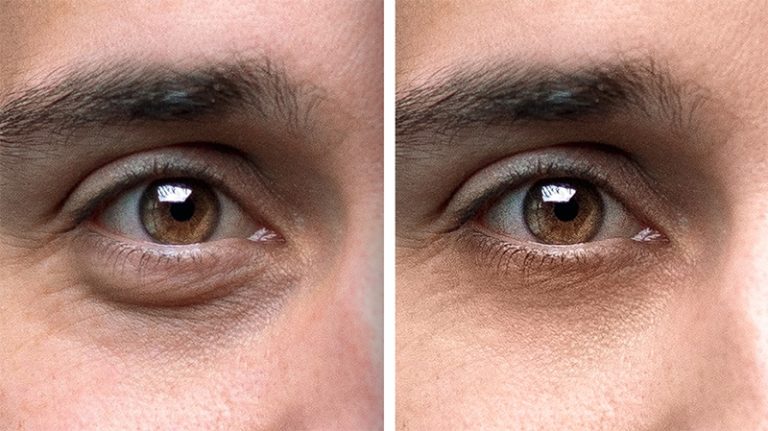
Eye bags is a common problem that many photographers face and it’s mostly amplified by the lighting setup when the image was taken, if the light is harsh and coming from the top, it will cause harsh shadows under the eyes
in this tutorial, you will learn exactly how to fix it, mostly by using dodging and burning (which is the key to how to remove eye bags in Photoshop IMO) and other techniques
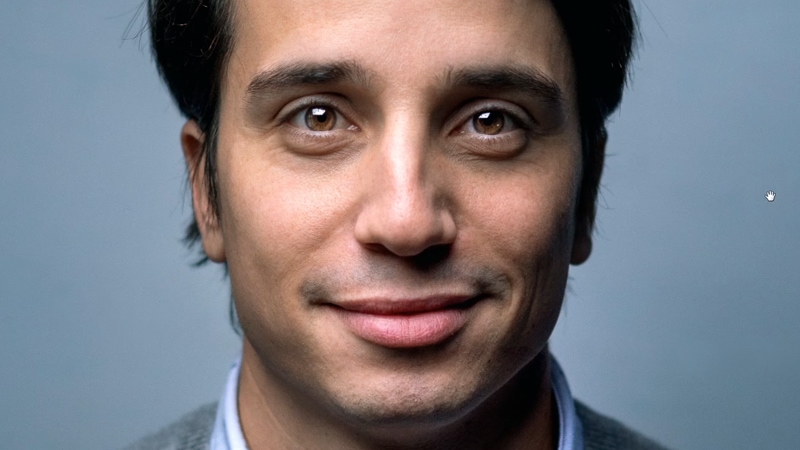
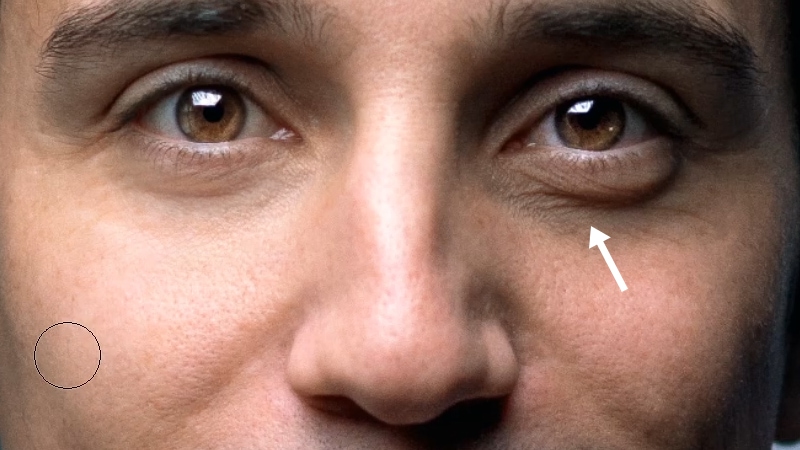
And especially for the example of today’s tutorial image, we have this portrait and as you can see, we have some harsh shadows under the eyes, and we’re going to need to remove that using dodging and burning.
1 – Remove the eye shadows using dodging and burning
So there are many ways to do dodging and burning, but let’s keep this tutorial simple and we’re going to be doing this with a curves adjustment layer.
So you’re going to add the curves adjustment layer at the top, and then increase the brightness, and then invert the layer mask by alt/optn clicking on the thumbnail
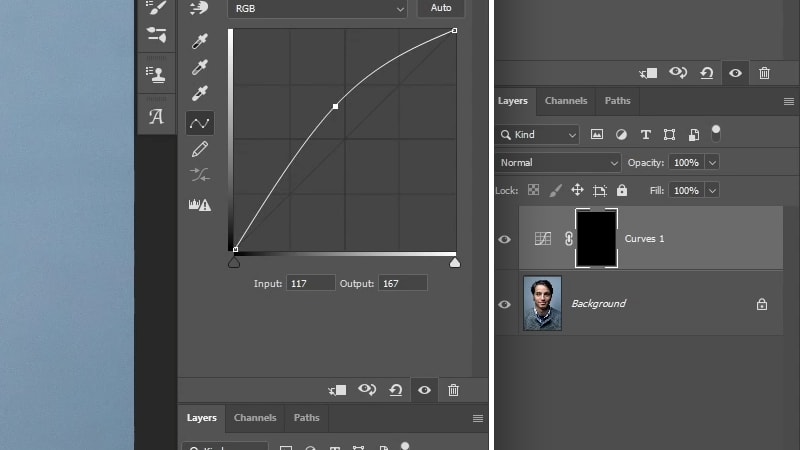
then we will use the brush tool to reveal the curves adjustment layer in the shadows.
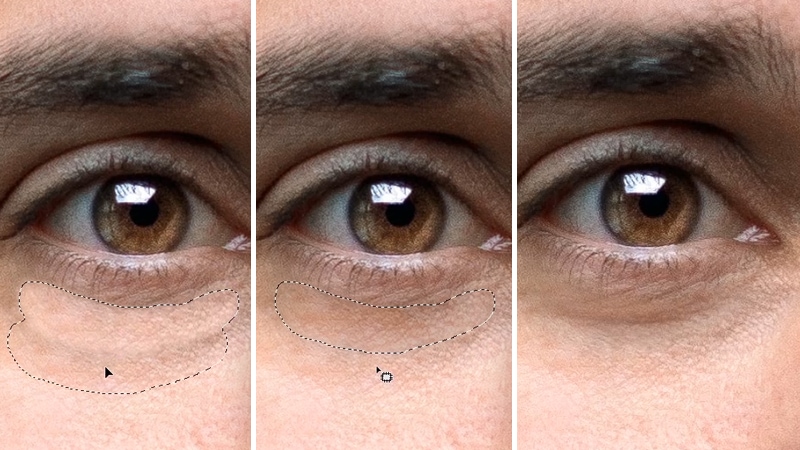
So let’s take the brush tool, You want to make sure the opacity and the flow are low, So I’m going to choose 30% flow and opacity.
then take a small brush size and start painting on the shadows underneath the eye to remove it
the Curves adjustment layer will also saturate the image, So to fix it you can change the blending mode to “luminosity”, this way it is only affecting the luminosity.
now keep on dodging the dark areas. And the goal here is to flatten the area under the eye so that the eye bags become less visible.
Here is a before and after, and just by doing this for a few minutes, The eye bag is now less visible and the area underneath the eye is looking much better.
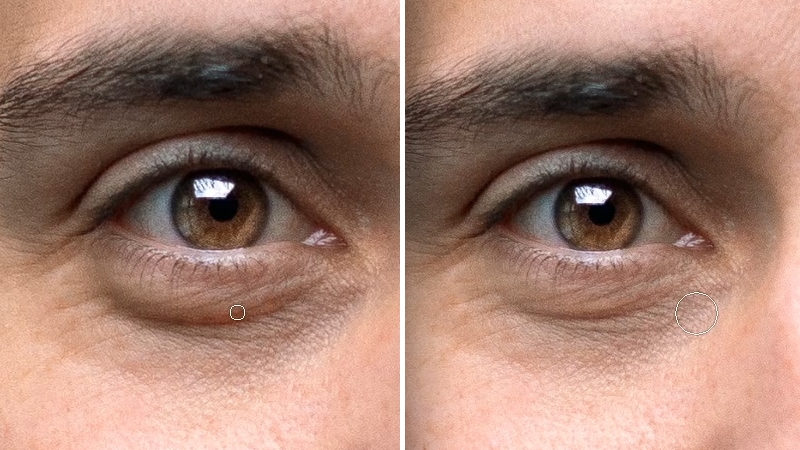
It’s also very important to not overdo this. So it’s best that you zoom out every once in a while to see the before and after and make sure it still looks realistic
Now that the shadows removed, and in this case, we also need to dodge the dark areas under the eyes to flatten it a little bit and even out the lighting underneath the eyes with the cheeks. So this time don’t follow the direction of the shadows, instead, start painting the opposite way. And this will blend the light a little bit better.
if you feel like you overdid an area, you can simply switch to black by clicking on X , And now by painting with the black, you’re going to bring back that area where it was.
So here’s before and after dodging burning, And as you can see, it makes a massive difference to reduce eye bags.
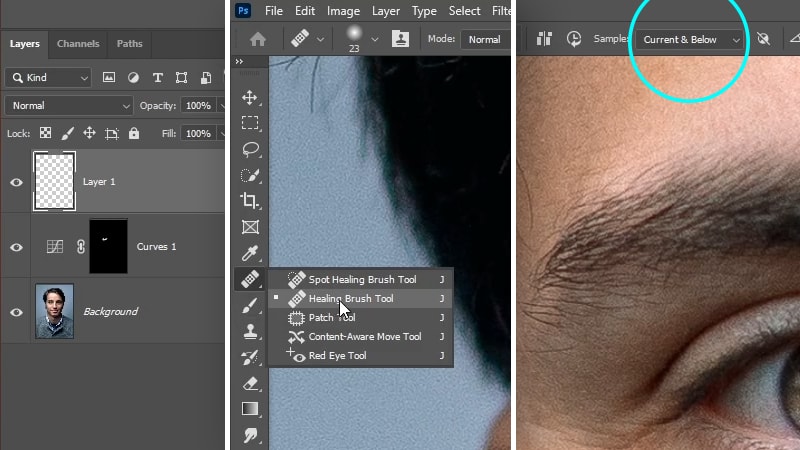
2 – Remove the creases using the healing brush tool
Ok, now that we reduced the shadows (and we’re going to remove the eye bags in multiple steps), we need to remove under eye lines or creases, and it’s going to be hard to remove them with dodging and burning, So here is what you need to do:
create a new layer on top, and then take the healing brush tool, Make sure the sample is set to “current and below”
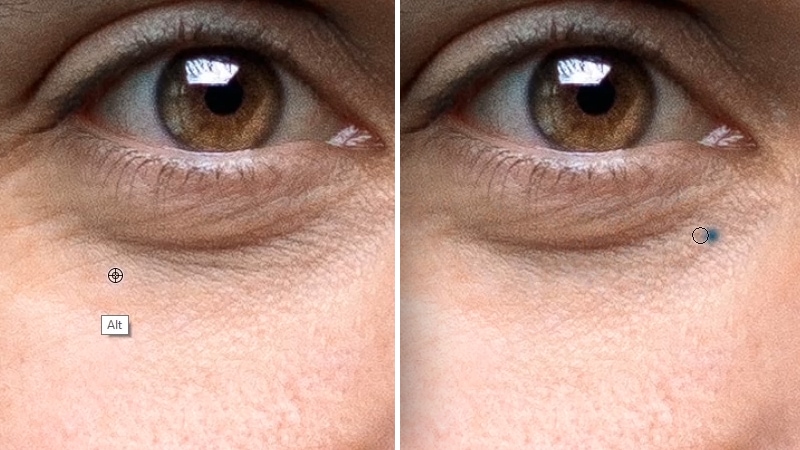
and now with a small brush size, use alt or option to sample from a texture near that crease. And then just paint on top of it to remove that grease, and just remove the small creases
When you have the creases removed, now we need to remove the big crease under the eye, And for that, take the patch tool, which is underneath the healing brush tool, and the patch tool is destructive, So we’re going to need to create a stamp visible at the top by clicking on ctrl + alt + shift + E , and then you’re just going to make a selection around that area.
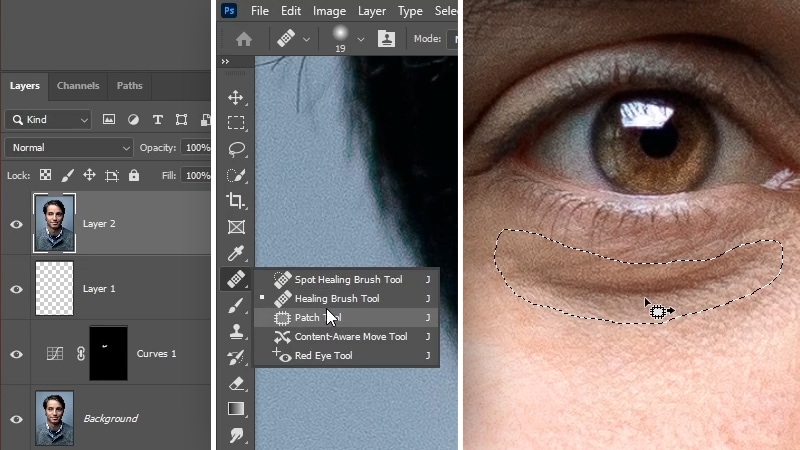
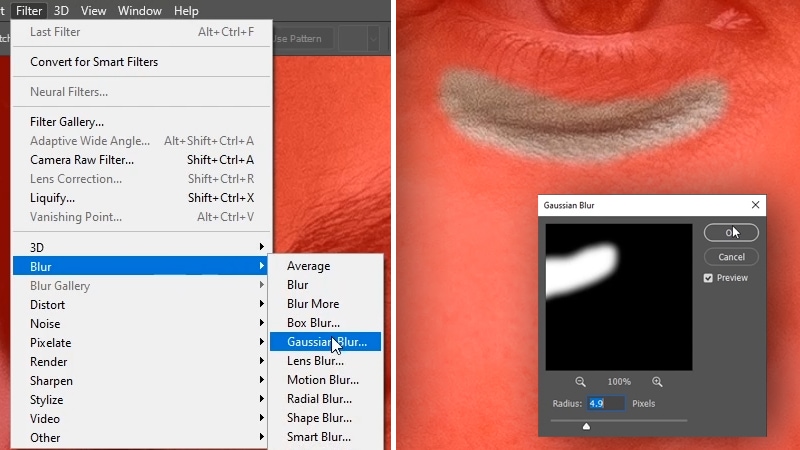
now go ahead and feather the selection, so we don’t have rough edges, first, click on Q to enter the quick mask mode so you can see the feathered edges a little bit better, then go to filter > blur > Gaussian blur, and increase the radius until I get the edges feathered like so
Click ok, and go back to the normal selection by clicking on Q again, And then you’re just going to drag the area that you selected to the bottom to sample from the texture underneath it.
You can click on ctrl/cmd + H to hide the election. And if you don’t like the first result, you can just undo that and drag it to another area to get a better result.
This obviously doesn’t look realistic, So I’m going to drop the opacity of this layer to 50%.
3 – Fix the color and blotchiness of the skin under the eyes
the next thing we need to fix is the discoloration under the eyes.
you can see that there’s a greenish color underneath the eye, and also some red blotchiness in the skin overall
What you can do to fix that is to create another layer on top, and then I’m going to change the blending mode to color.
Now, with the color blending mode, take the brush tool, and then you’re going to sample a color from the skin that you think is the natural color, using alt or option
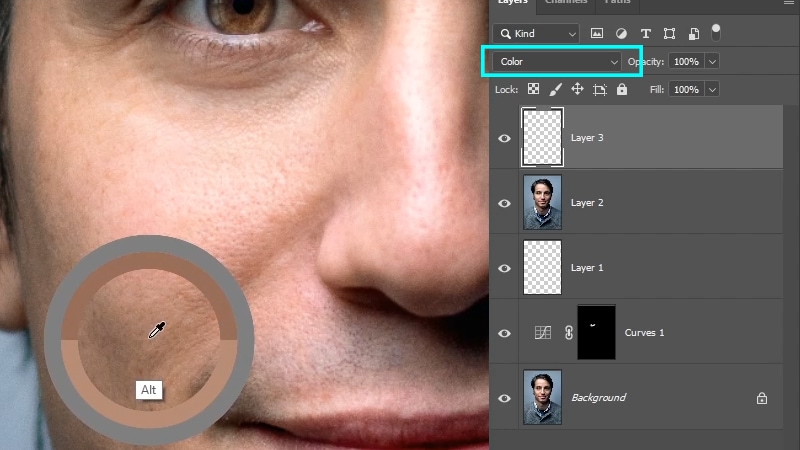
Now we can fix the color by sampling the color and then painting on top of any area that has blotchiness, you will see the color starting to change and you will have a more uniform color of the skin.
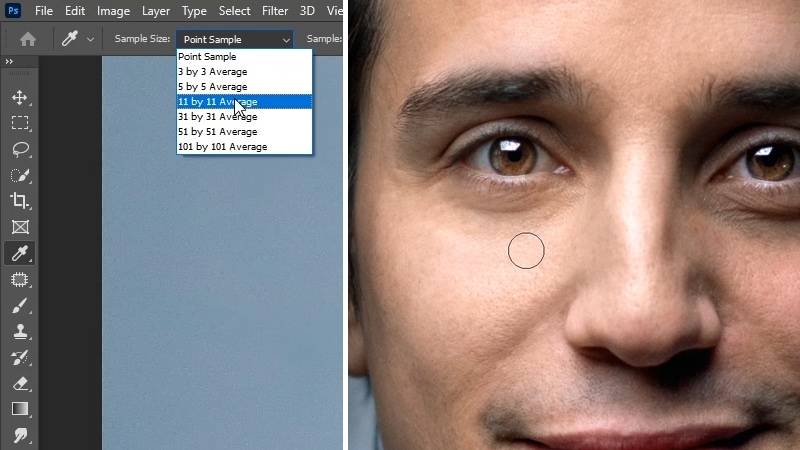
Another important thing to do is if you click on I to switch to the eyedropper tool, make sure your sample size is 5 by 5 or 11 by 11 so that you pick an average color from the skin.
now continue painting that color on the skin and remove all the blotchiness under the eyes and in the cheeks, and here a before and after of my result

Okay, in my case this image needed another round of dodging and burning to eliminate the inconsistency of the shadows. So i added another curves adjustment layer on top, and this time i took a smaller brush size, and worked on dodging the smaller dark areas under the eyes,
So the more time you spent on dodging and burning, the better results you can get. So make sure to take your time doing this so that you get the best results.

the issue that I started to see is that it’s beginning to look flat and unrealistic, and if this happens to you, you can fix it with another curves adjustment layer, but this time this adjustment layer is going to be an overall dodging and burning, to darken the area under the eyes and bring back it’s shape, So this time you are going to darken the image instead, invert my layer mask. And paint with a bigger brush size.
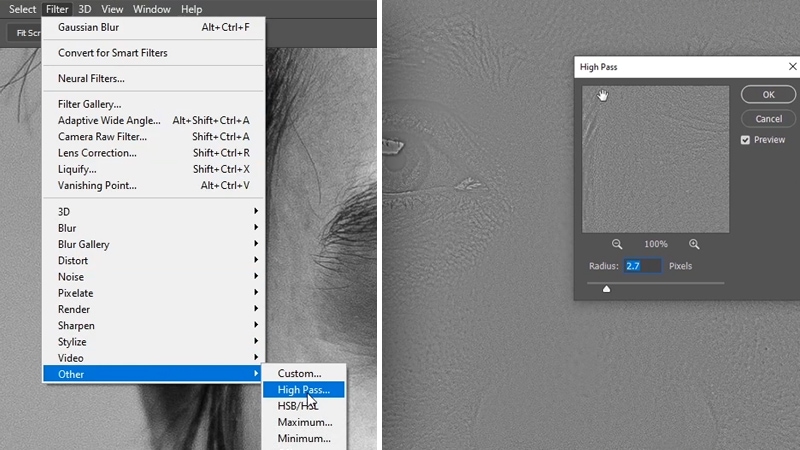
4 – Restore texture under the eyes with the high pass filter
So that’s it for dodging and burning, the last thing I want to do now is to bring back some of the texture that we lost underneath the eye, and we can do that by copying some texture from another area of the skin
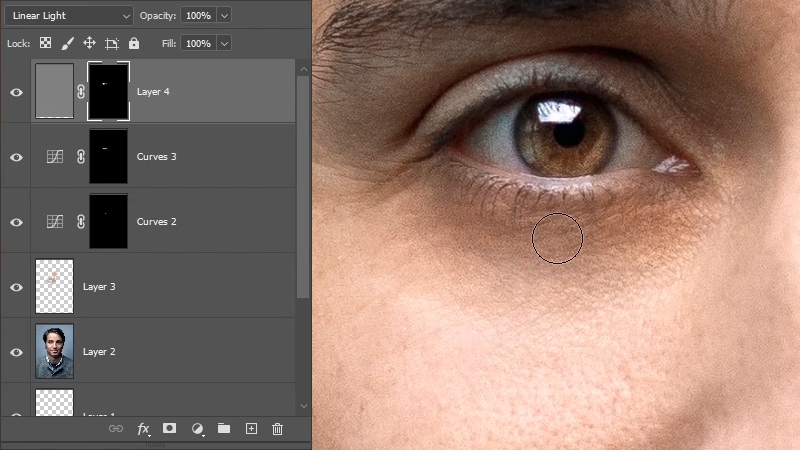
So let’s create another stamp visible at the top, then click on ctrl/cmd + shift + u to desaturate it, and then add a high pass filter by going to filter > other > high pass, and add a small value like 1px (depending on your image size) and click ok, and then change the blending mode of the layer to “linear light“
We don’t need this layer to be visible everywhere, so add an inverted layer mask to it, By holding alt or option, and Now you can reveal this layer using the brush tool in the area underneath the eye,
just to bring back that texture We have lost before.
if you don’t like the current texture, you can always choose another one from a different area of the skin by moving the image with the Move tool.
first, you need to unlink the layer by clicking on the chain icon, and then you can move the texture freely

And that’s it, the eye bags are now removed.
let’s look at the before and after,
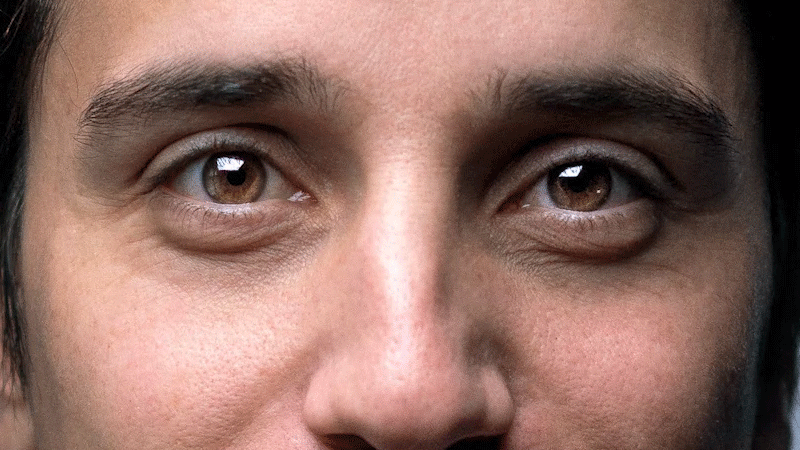
As you can see, that is a massive difference. We got rid of the eye bag and the image is still looking realistic because we did the dodging and burning properly, We removed the creases under the eyes using the healing brush tool and the patch tool.
And then we brought back that shadow by doing some dodging and burning on top of everything. And lastly, we did some sharpening.
I hope you enjoy this tutorial, That’s how to remove eye bags in Photoshop.
If you learned something new today, let me know. What do you think in the comments down below, make sure to subscribe to my youtube channel and also enable the notification bell So you don’t miss out on new tutorials.
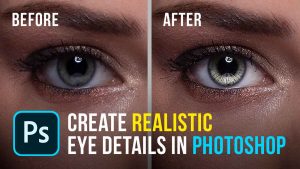
You can check out my other tutorial where i show you How to add highly realistic details to the eyes using the “flame filter”
I hope you guys enjoyed this tutorial, and I’ll see you in my next one. ✌


4 thoughts on “4 Simple Steps To Easily Remove Eye Bags in Photoshop”
Wow. Excellent work. Thank you for sharing for all of us learners!!
Thank you for your comment! I’m glad to hear that you found the blog post helpful for your learning, I appreciate your support and feedback.
Hi!
Thank you for this tuturial! Learned a lot! And the result is very natuarl.
you are welcome Helena, I’m glad my content is helpful