Luminar Ai was a great software and such a time saver for many people with features like sky replacement, portrait bokeh, retouching, and more, and with the introduction of their new software Luminar Neo, they introduced many new improvements as well as new features
today, I’m going to show you the best 6 Luminar Neo features that will make your photo editing workflow so much faster and easier.
Whether you are an existing user of Luminar Ai or completely new to Skylum Software, this video will give you a better look at Luminar Neo and help you decide if it is for you.
Starting with the first feature in this list which is “portrait Bokeh”.
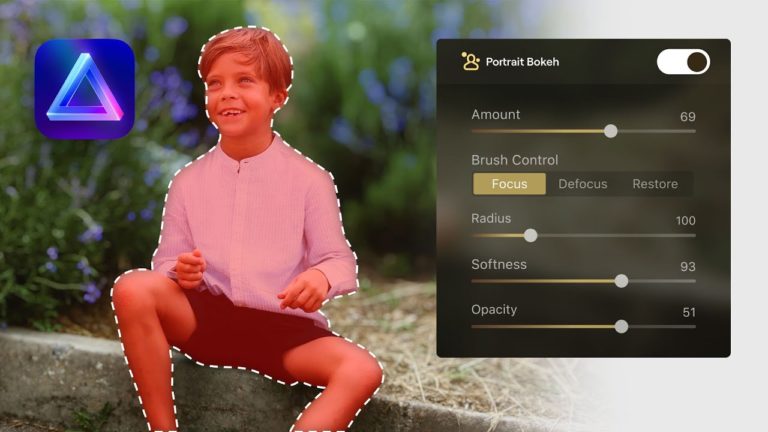
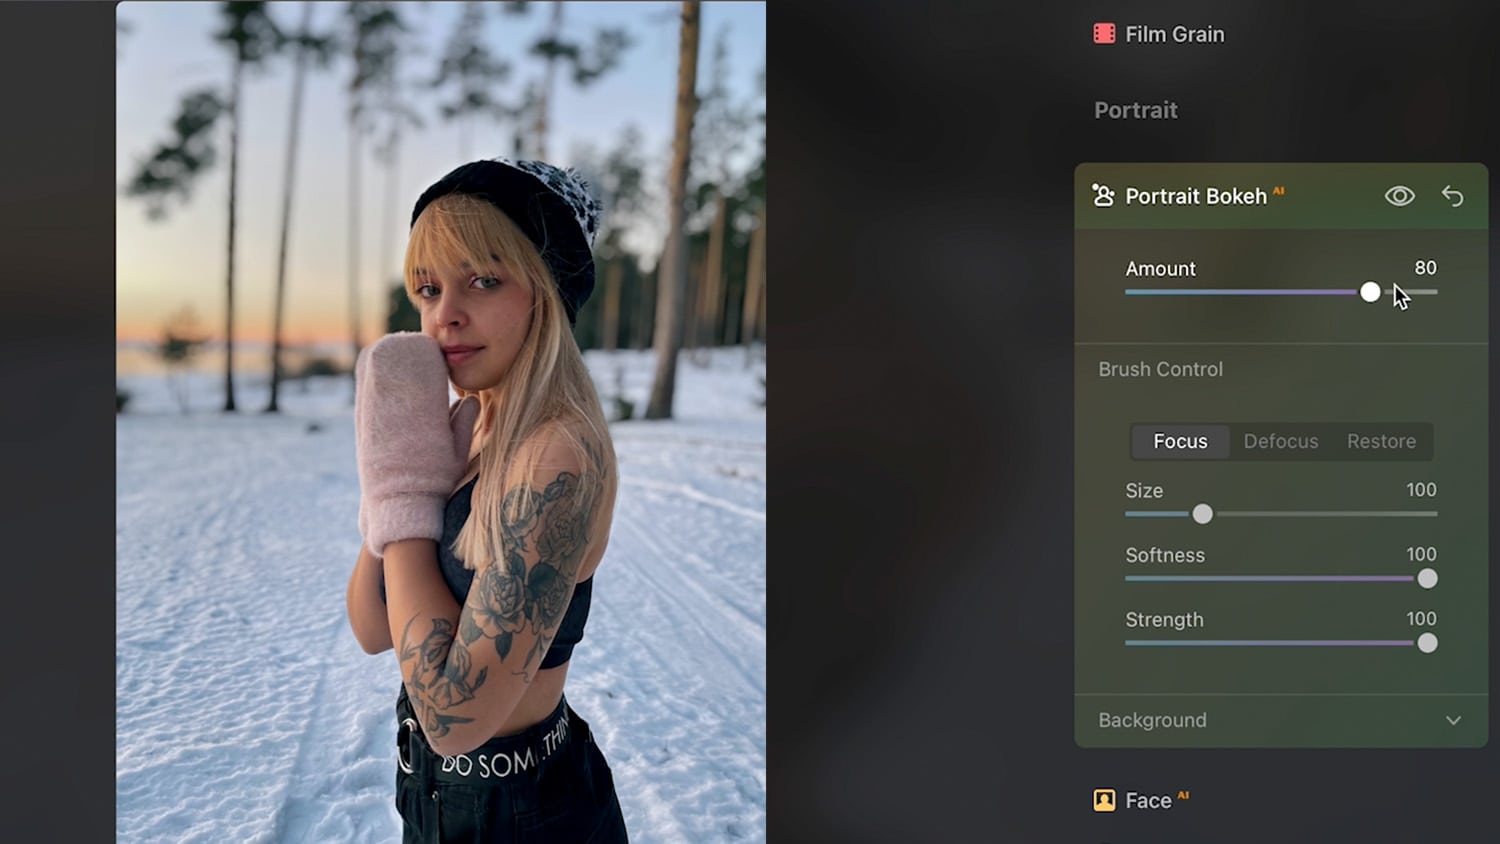
1 Portrait Bokeh
Portrait Bokeh is a feature that’s been in Luminar Ai for quite some time, and it’s also available in Luminar Neo, you can find it under the portrait section, click on it to expand it, and then all you have to do is to increase the amount to blur the background.
As you can see the subject was automatically masked out and the background is blurred.
you can also do some changes to the background by expanding the background section, and from there, you can control the depth of the blur by decreasing the “Depth Correction” slider, and as you can see, the blur depth is now much closer to the foreground.
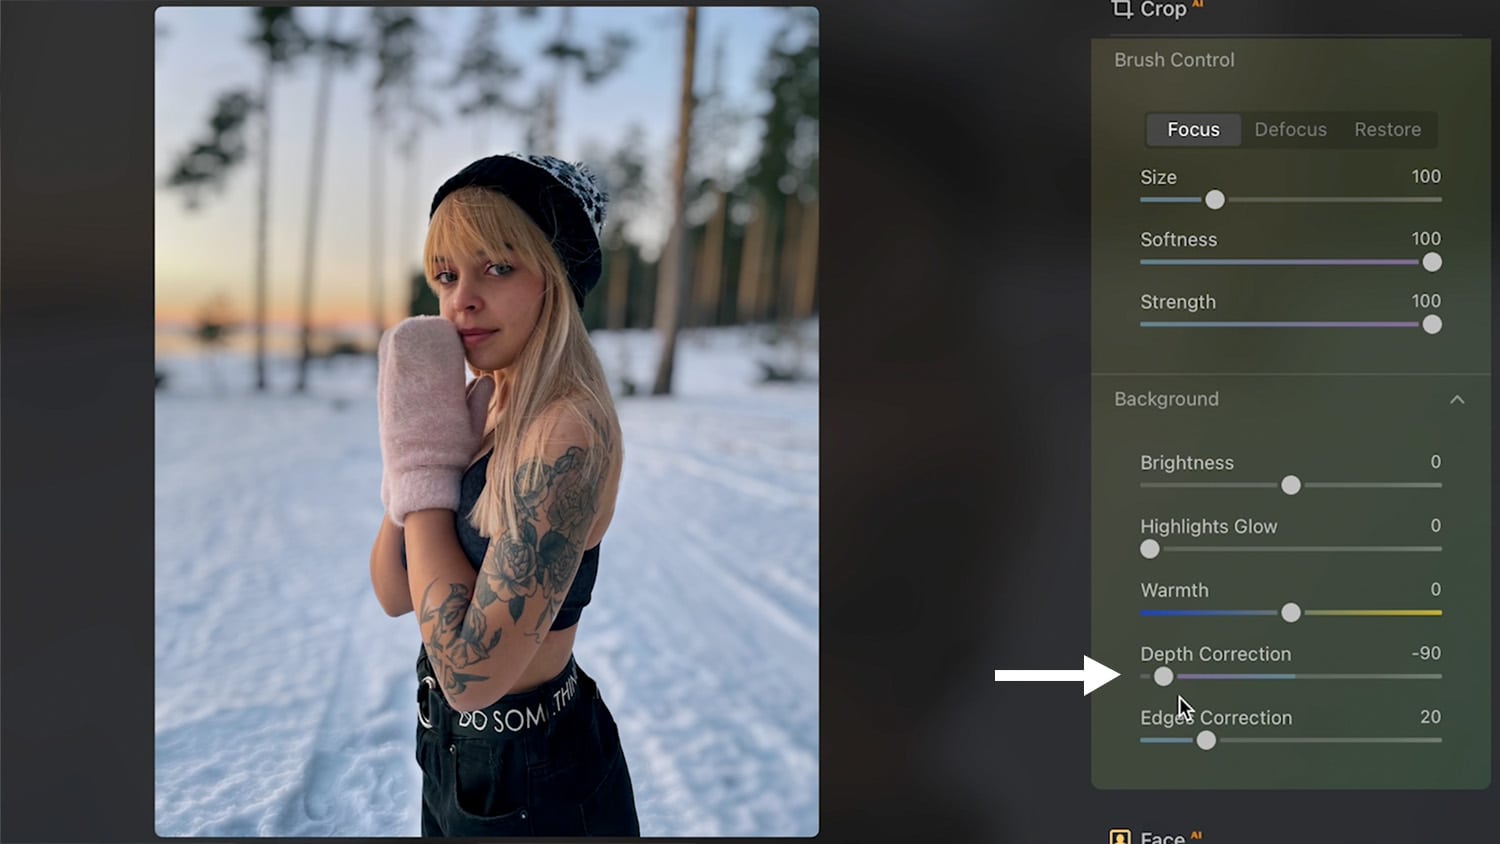
You also have the edge correction slider, which will help you fix the edges of details like hair.
Quick Tip: you can toggle the before and after preview using the backslash key \ on your keyboard, and you can also control the visibility of the individual features by clicking on the eye icon.
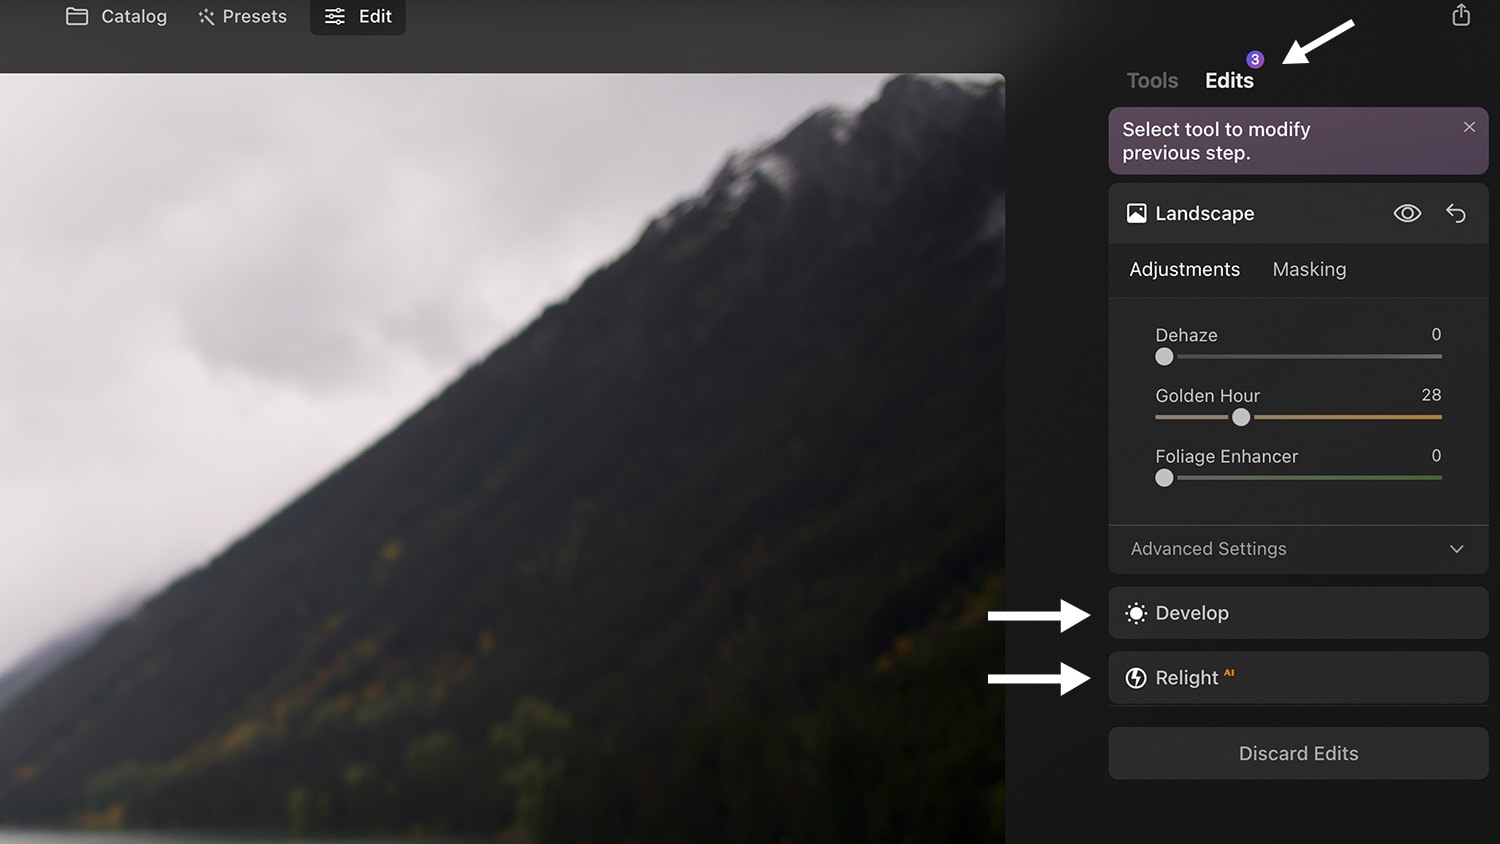
in Luminar Neo they introduced the layers feature, so if you close the tab of any particular feature, and then reopen it again, you will see that all the settings will be reset, that’s because it’s now moved under the “edits” section, and there you can continue making changes to the features you applied
and you can also stack them on top of each other, and you even have the ability to stack multiple layers of the same effect.
If you hover over the canvas, you will see a preview of the mask that Luminar created, and you can use the brush tool to paint on top of this mask,
in this example, if I increase the amount of Bokeh, you will see that Luminar has missed some areas
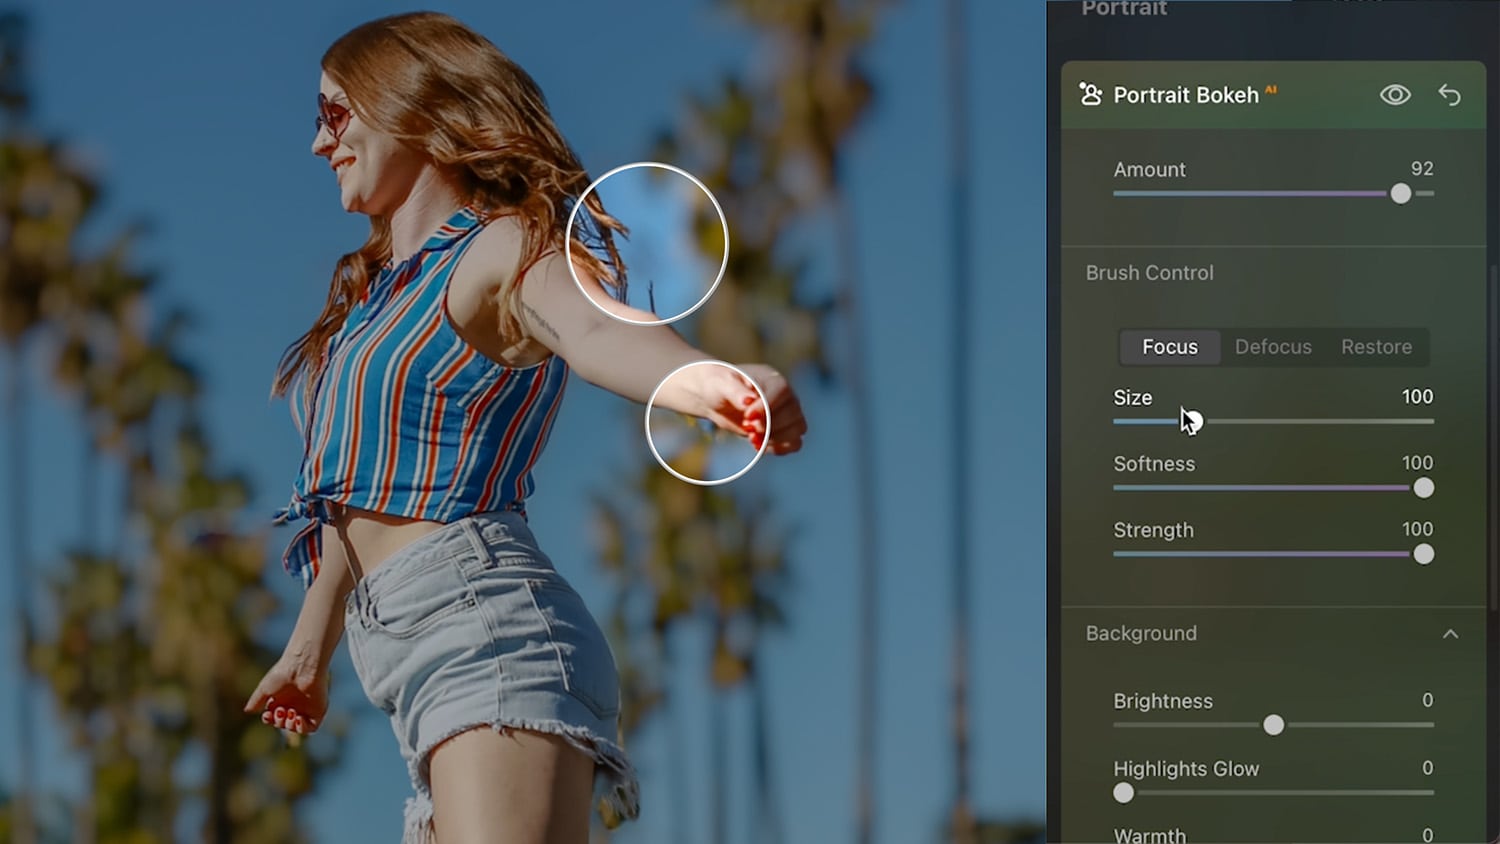
we can try to fix that using the “edge correction” slider, which will help the image a little bit, but what we can do now is use the brush tool to fix them.
you can switch to the “defocus” mode, then use the bracket keys [ ] to control the brush size, now you can paint on top of these areas to exclude them from the mask, and you can also use the shift and bracket keys to control the softness of the brush.
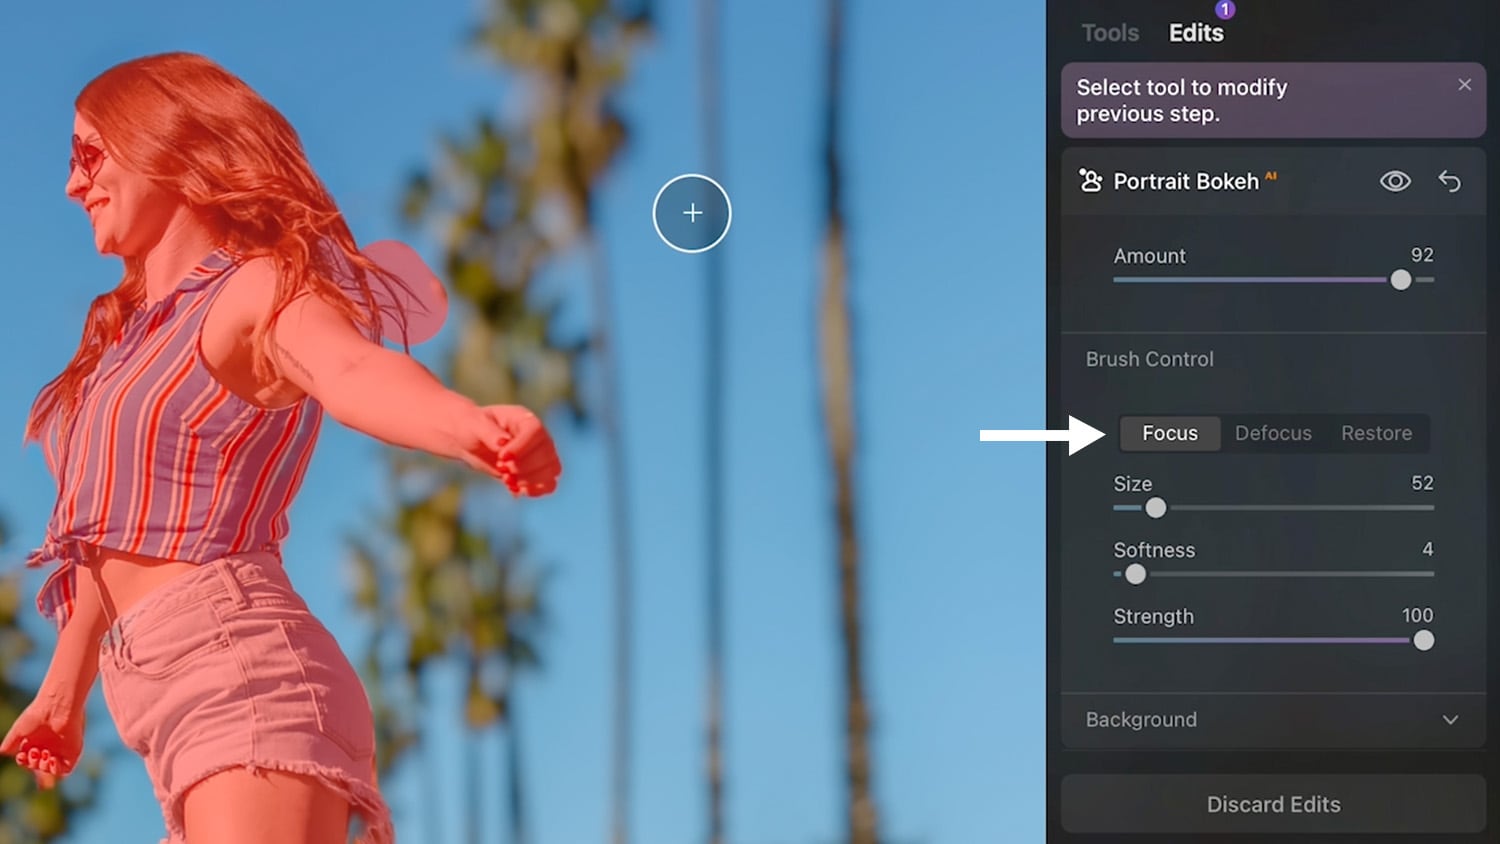
if you want to restore an area, you can switch back to “focus” and then simply paint on top of it to fix it.
2 Enhance Ai
This next feature is going to be very useful for you if you are one of those people that gets overwhelmed with the number of controls and sliders in a software like Photoshop and have no idea where to start to edit an image, or if you want to simply save time.
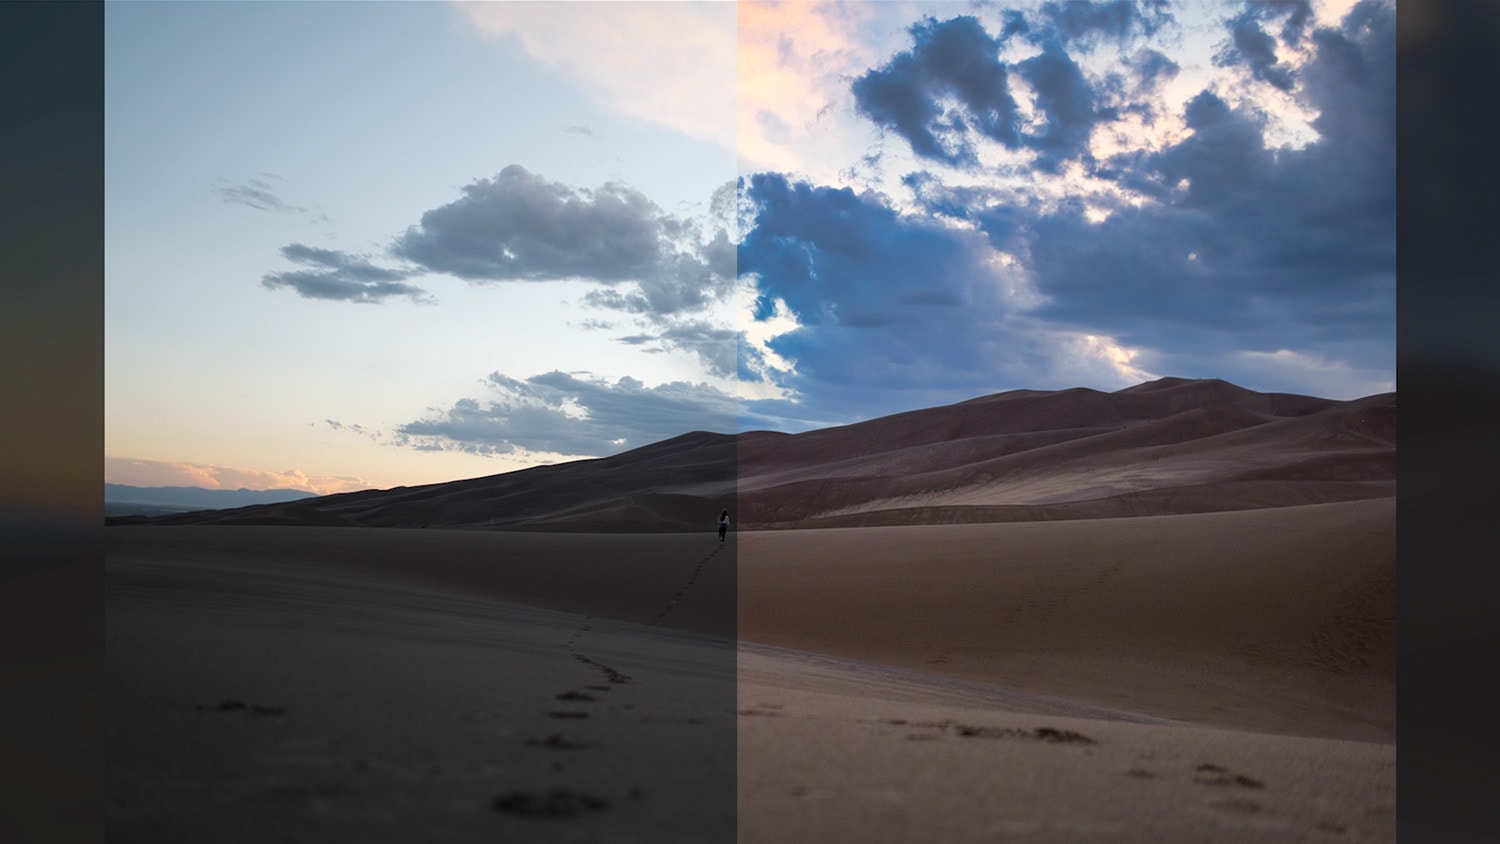
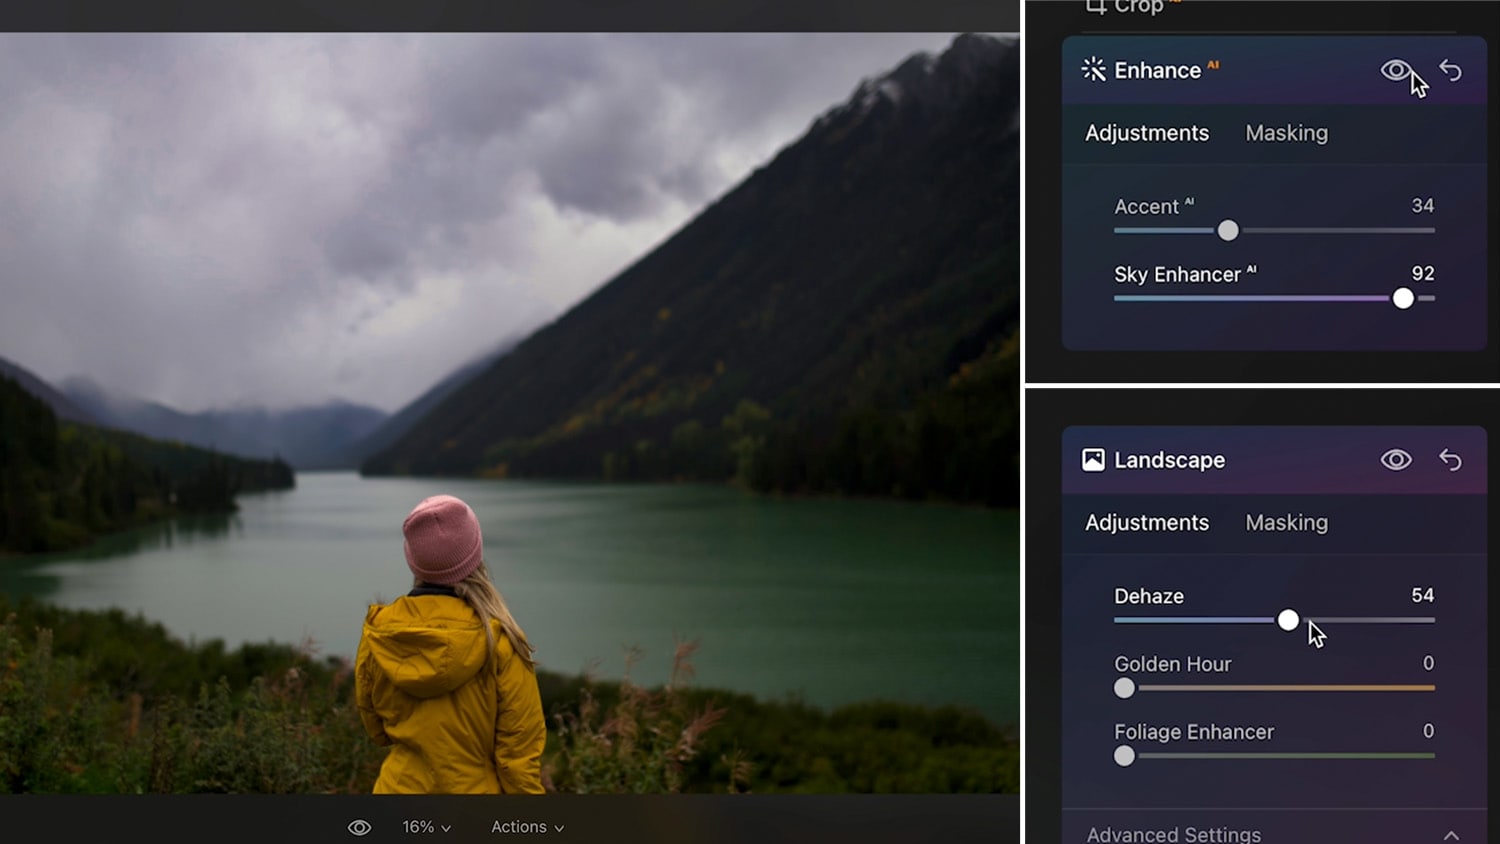
This feature is called “Enhance Ai”, and you can use it to enhance the image using the “accent” slider, which will restore the details in the image and also adds some contrast.
There’s also a sky “enhancer slider”, which will really bring back those details in the Sky.
what we can also do is go to the landscape tab, and then enhance that golden hour effect using the “golden hour” slider
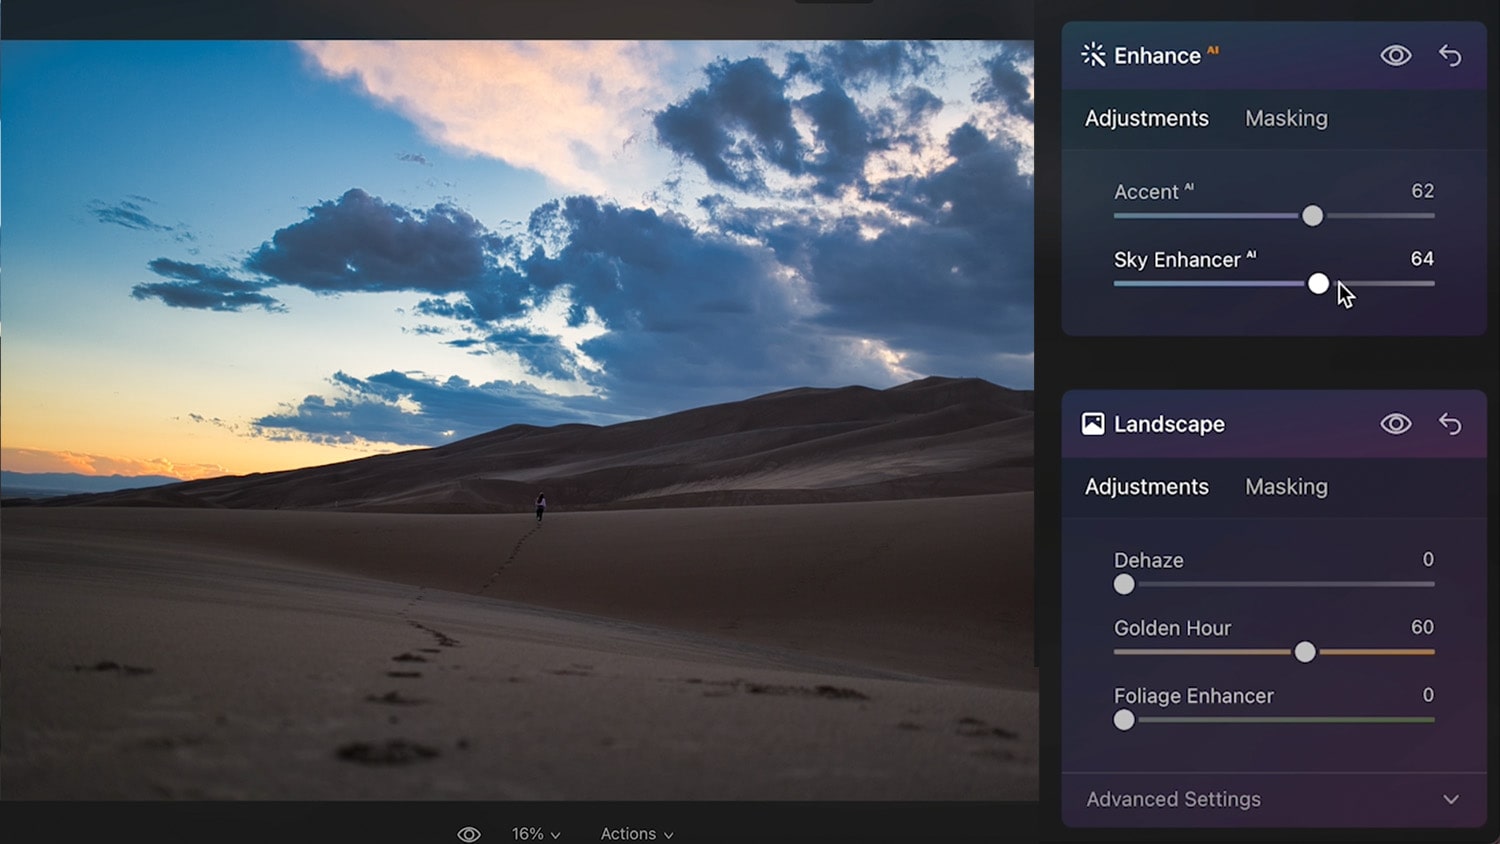
You can also go even further and apply another layer of enhanced AI to the image. If you want, and as you can see, just by moving a few sliders, we made a big difference in a short amount of time.
So, this is a very useful feature, especially if you are a beginner and want to edit some images fast
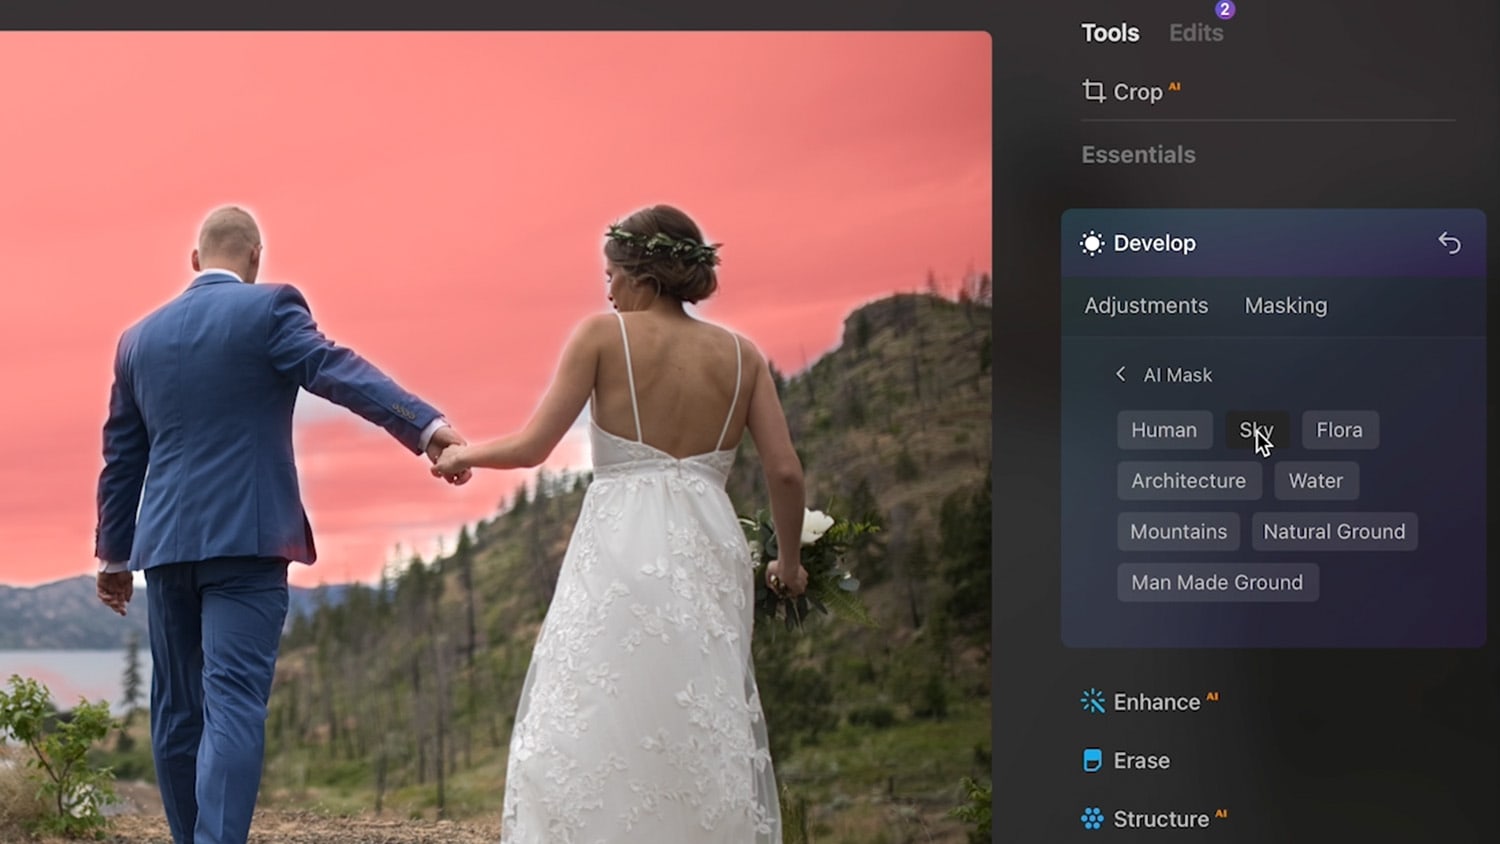
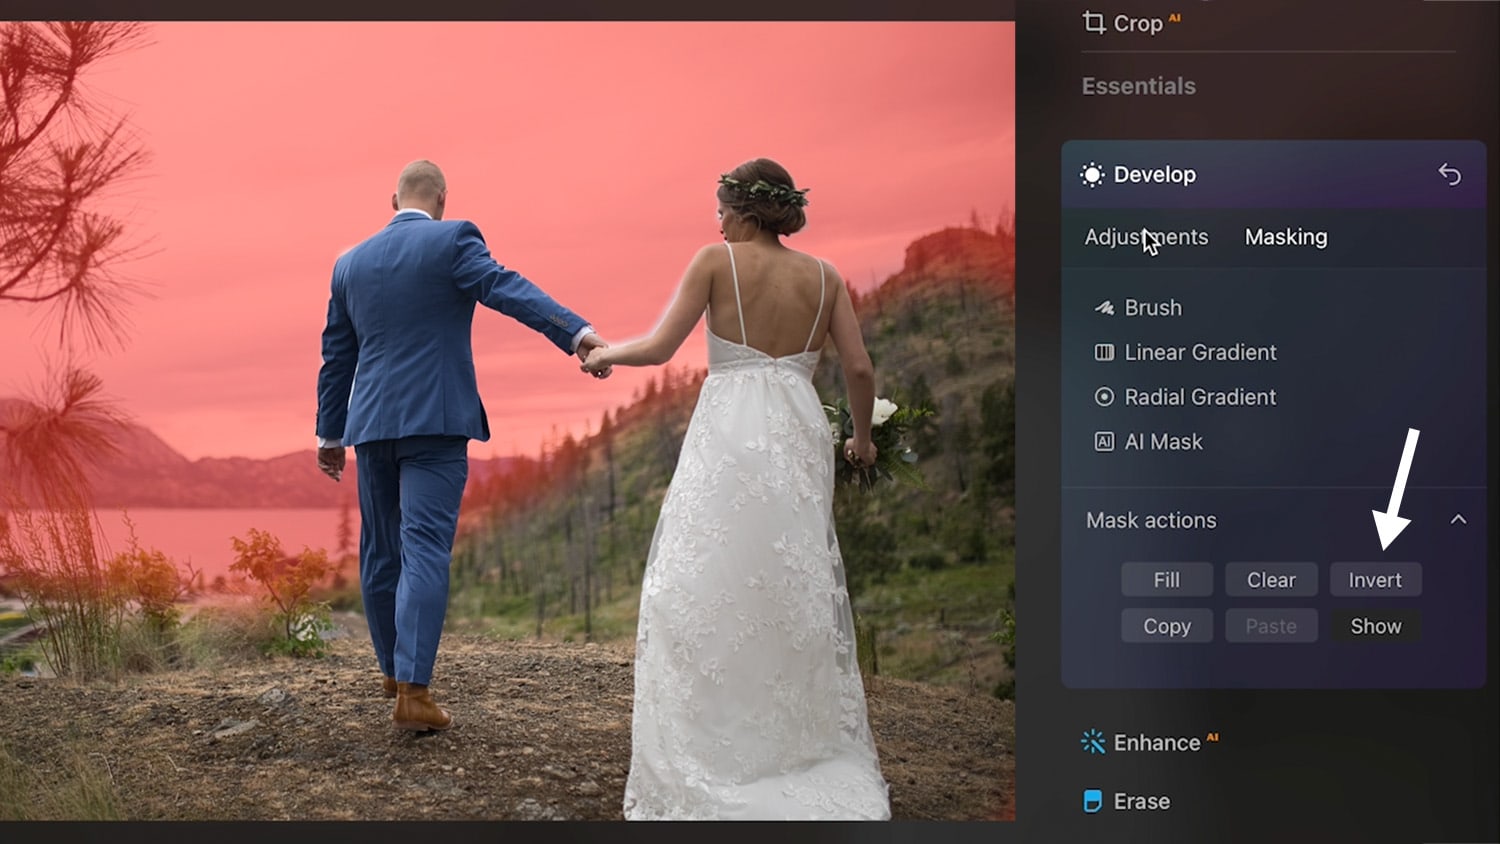
3 Ai Mask
Another great feature that was introduced with Luminar Neo is “Ai mask”.
you can find the AI mask options under any masking tab, then you need to click on “Ai Mask”.
Ai Mask is available on most of the features in Luminar, once you click on it, you’ll see an animation that indicates that Luminari is using AI to scan the image and is going to output multiple masks of what it thinks is inside the image.
As you can see, now we have multiple masks that we can use to tweak the image.

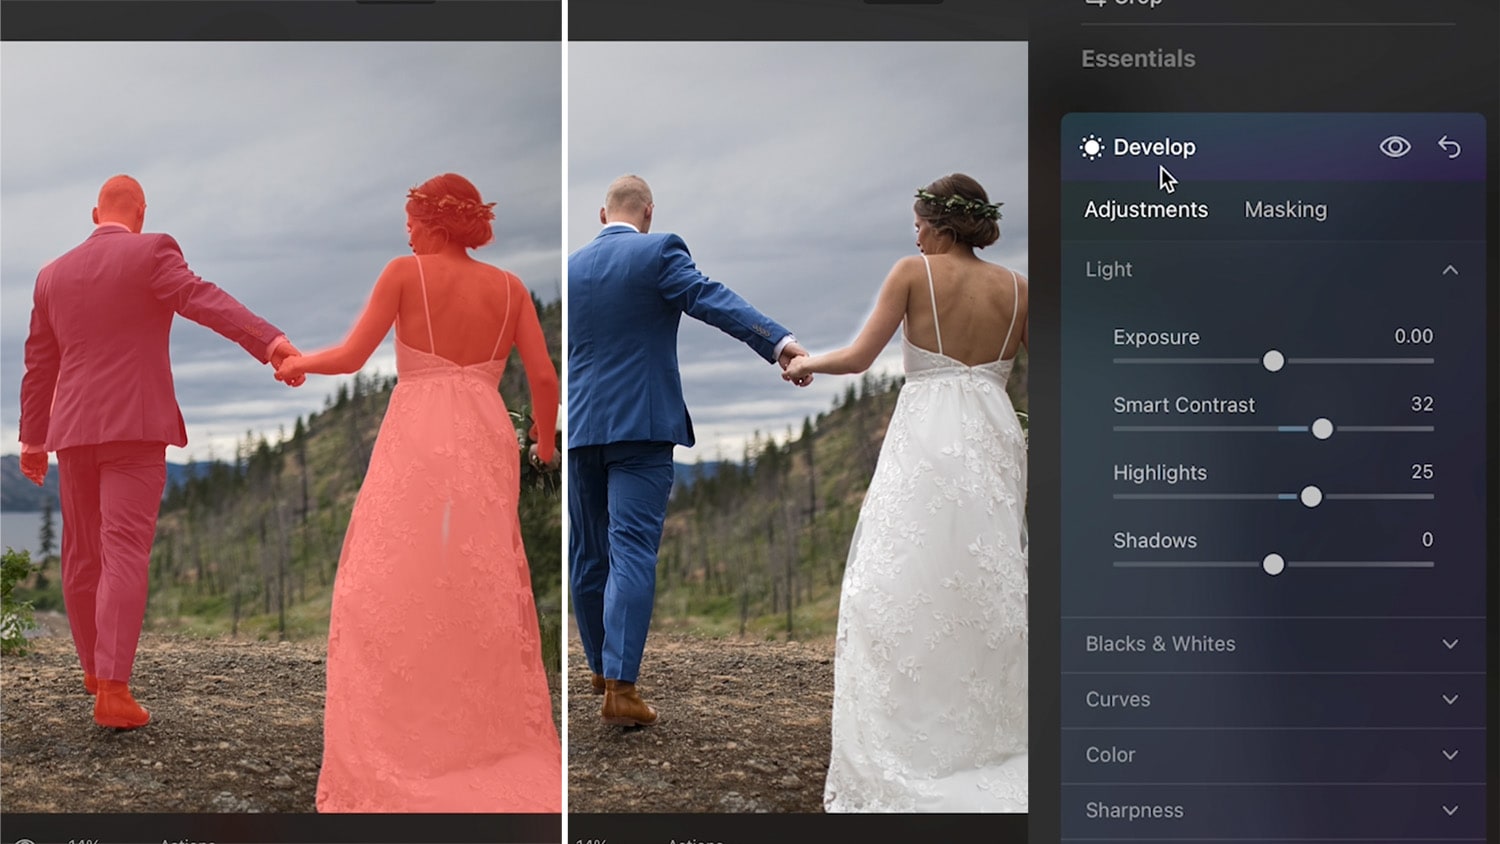
The first mask is “human”, and this is going to be our subject, there is a mask of the sky, the water in the image, we can also select the mountains as well as other masks that we can use.
you can also select multiple masks, so if you want to work on the subject and the sky, we can click on both of them and make changes to the sky as well as the subject

In this case, the image is a little bit overexposed in the sky, so we can click on the sky mask and use it to reduce the exposure.
Once you have your mask selected, you can go back to “adjustments” and reduce the exposure from the sky, but in this case, I don’t really like the mask of the sky in this image because it’s given us some halos on the edges.
So what I’m going to do is select the subject instead, then switch to the brush tool and I’m going to include this part of the foreground by painting on it until we have pretty much all the foreground selected
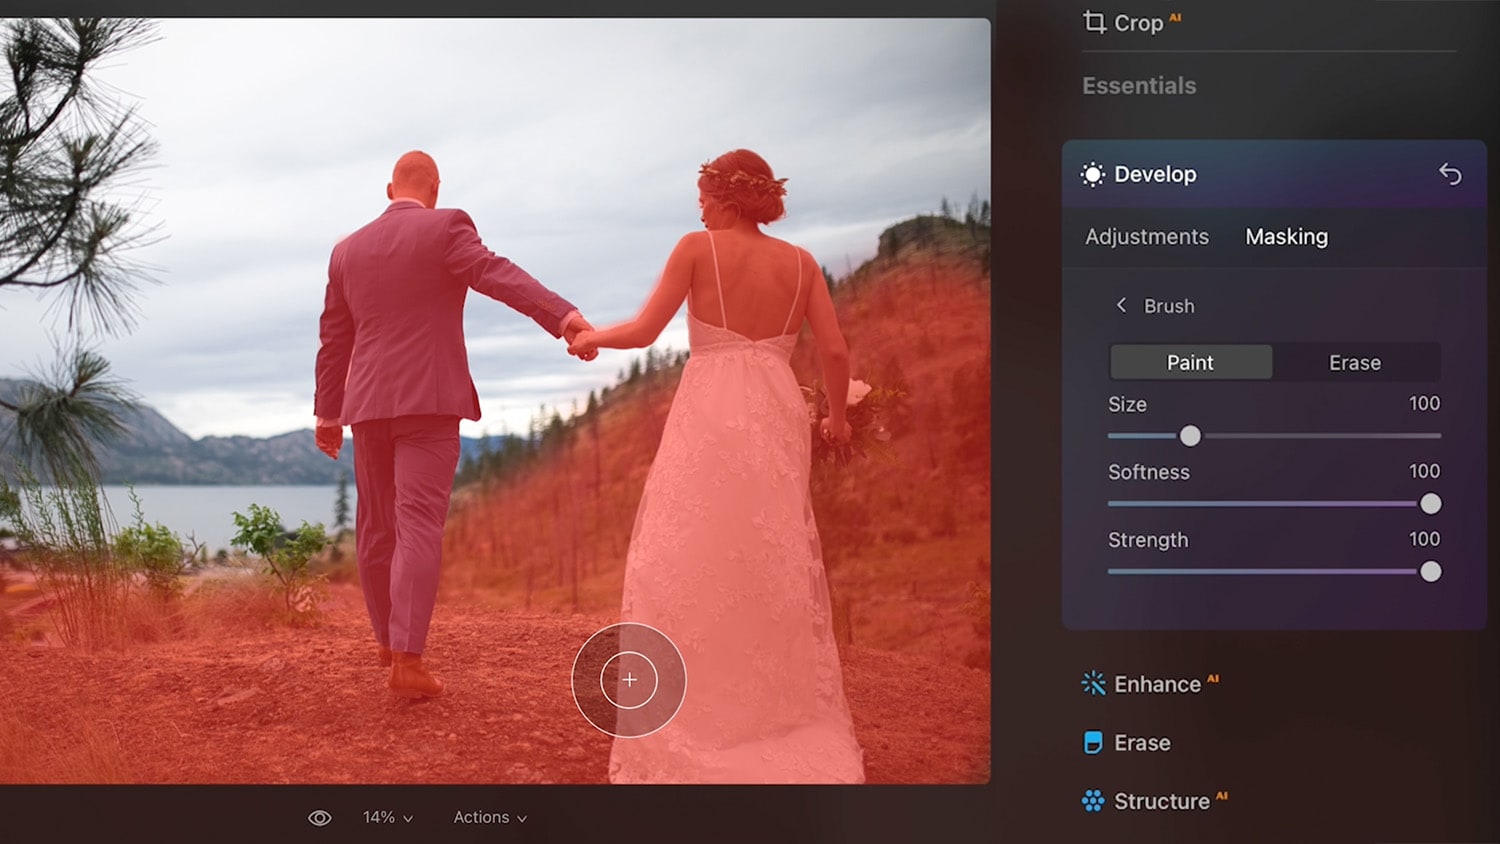
Now I’ll go to the mask options, and this will give us some options to fill, clear, and invert the selection.
i’ll click on invert and now we have the selection of the sky
Then go back to the adjustment tab and what i can do is reduce the exposure a little bit, as well as reduce the highlights.

So this is the first change that I wanted to do, now if we want to make another adjustment to the subject, we can close the develop tab and then reopen it again to add another layer of adjustment with another mask
this time I’ll go to “Ai mask” again, and because we have the masks generated, it’s going to be much quicker now to show the generated masks
let’s click on “human” to select the subject, and what I want to do this time is add some contrast to our subject and I’m going to also enhance the highlights.
and that’s how you can use Ai mask in Luminar Neo to control certain parts of an image.
here is how the image looks after adding some color correction and applying a color lookup table to the image

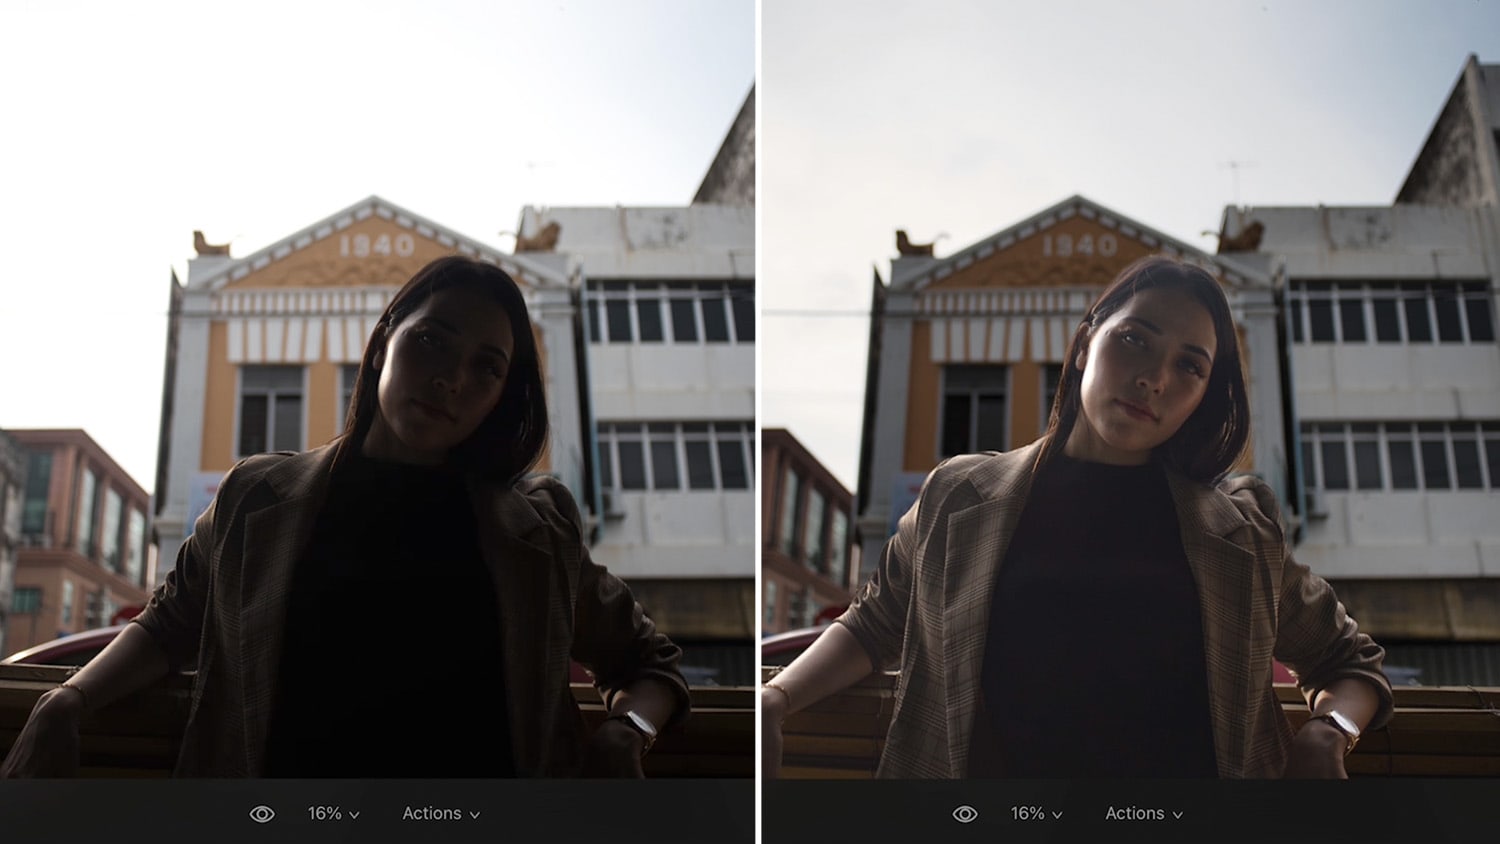
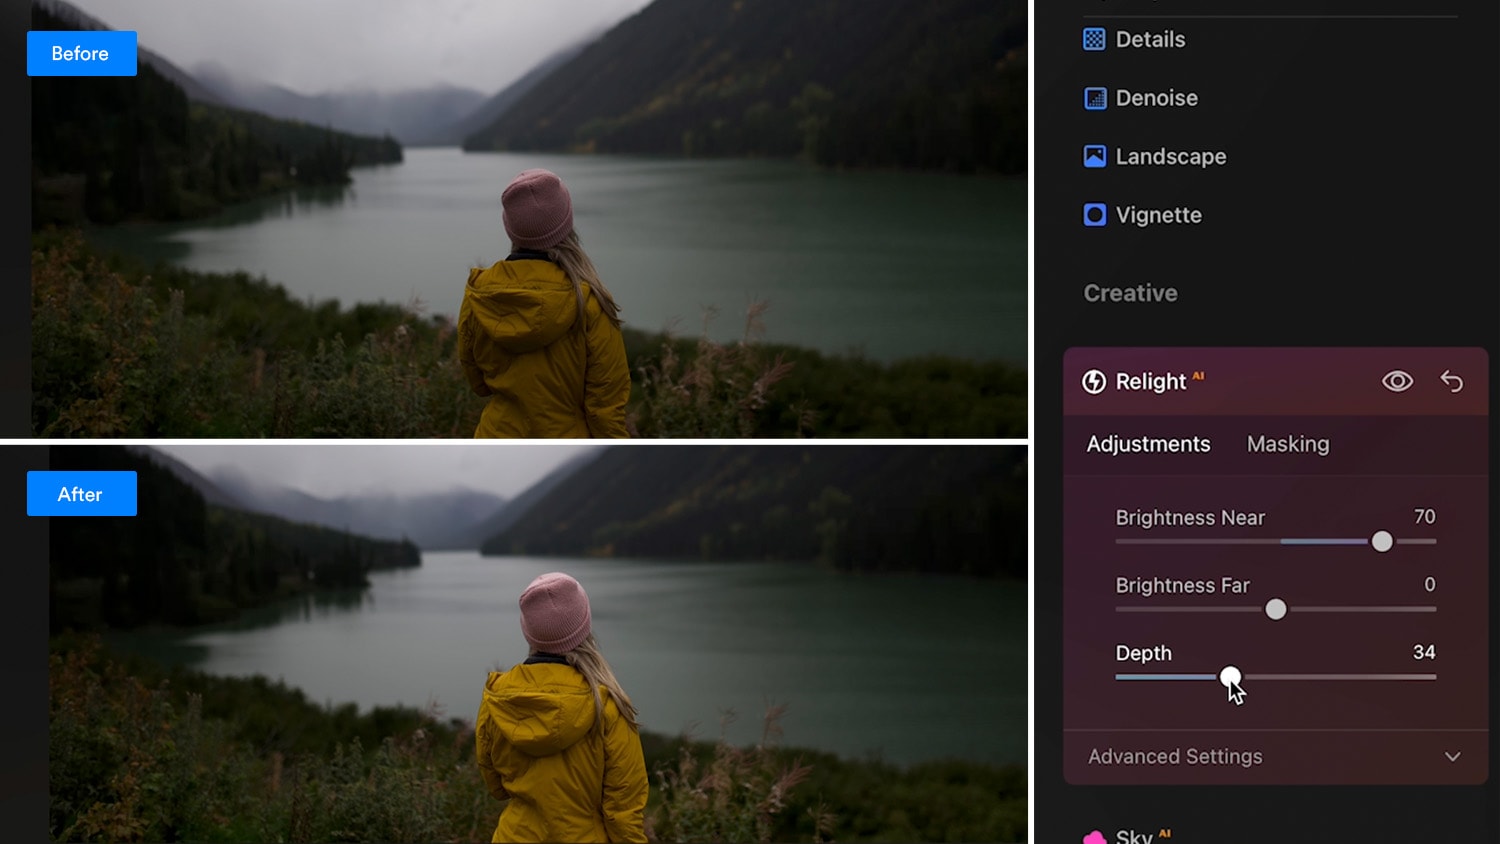
4 Relight Ai
Relight Ai is one of those useful features that’s going to allow you to control the lighting of specific objects in your image without having to create masks,
let’s open up relight Ai, and the first slider that we have is “brightness near” which is going to allow you to brighten or darken the objects in the foreground of your image.
In this case, we have an image with a very bright background which is making our subject a little bit underexposed, so we can use the “brightness near” slider to increase the exposure of our subject

there’s also a “brightness far” slider which as the name implies will allow you to darken or brighten the objects in the background.
We can also use the “depth” slider to specify a depth map of the image and control how far or near the brightness is going to be, so this is a before and after, and we were able to easily brighten up this subject without having to create masks.
in this next image example, we can use relight AI to bring focus or subject, so let’s use the brightness near to brighten up our subject and I’m going to also change the depth over a bit.
As you can see, our subject is now standing up a little bit more.
Now i’ll go to enhance Ai and increase the “Accent Ai” a little bit, and also use “sky enhancer” to bring back the details in the sky.
Next, i’ll go to “landscape” and increase the dehaze which also is going to bring back some of the details in the sky.
Then after doing some color grading to bring back some life to our image, then applying a color lookup table, the image looks like this in just a short amount of time.

5 Objects Removal
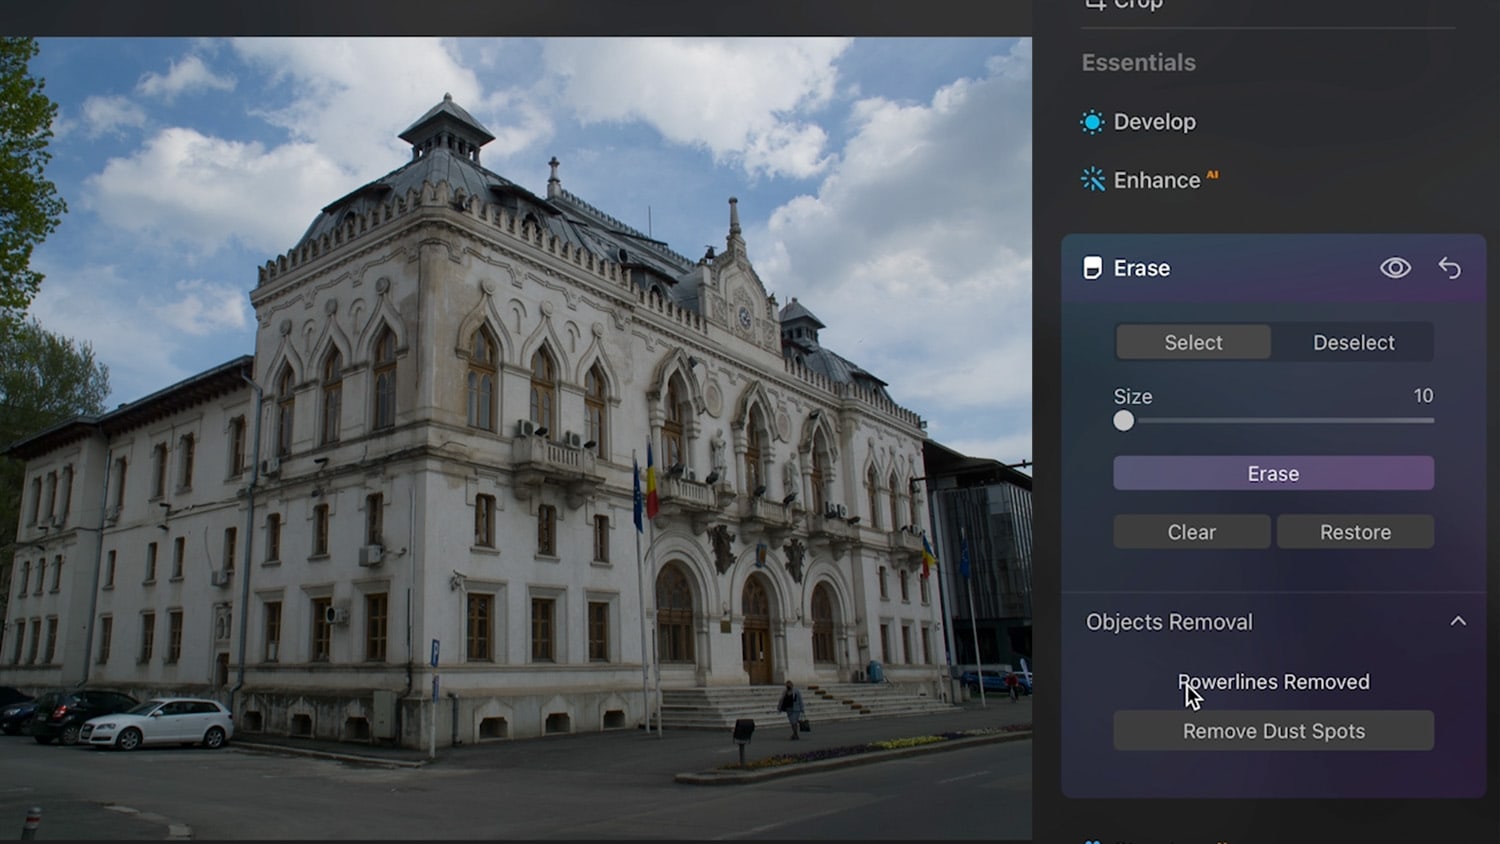
one of the most impressive features in Luminar Neo and I find very time-saving is the objects removal tool, you can find this tool under the “erase” menu, and in this case, I want to remove the power lines in this image and there’s a button for that
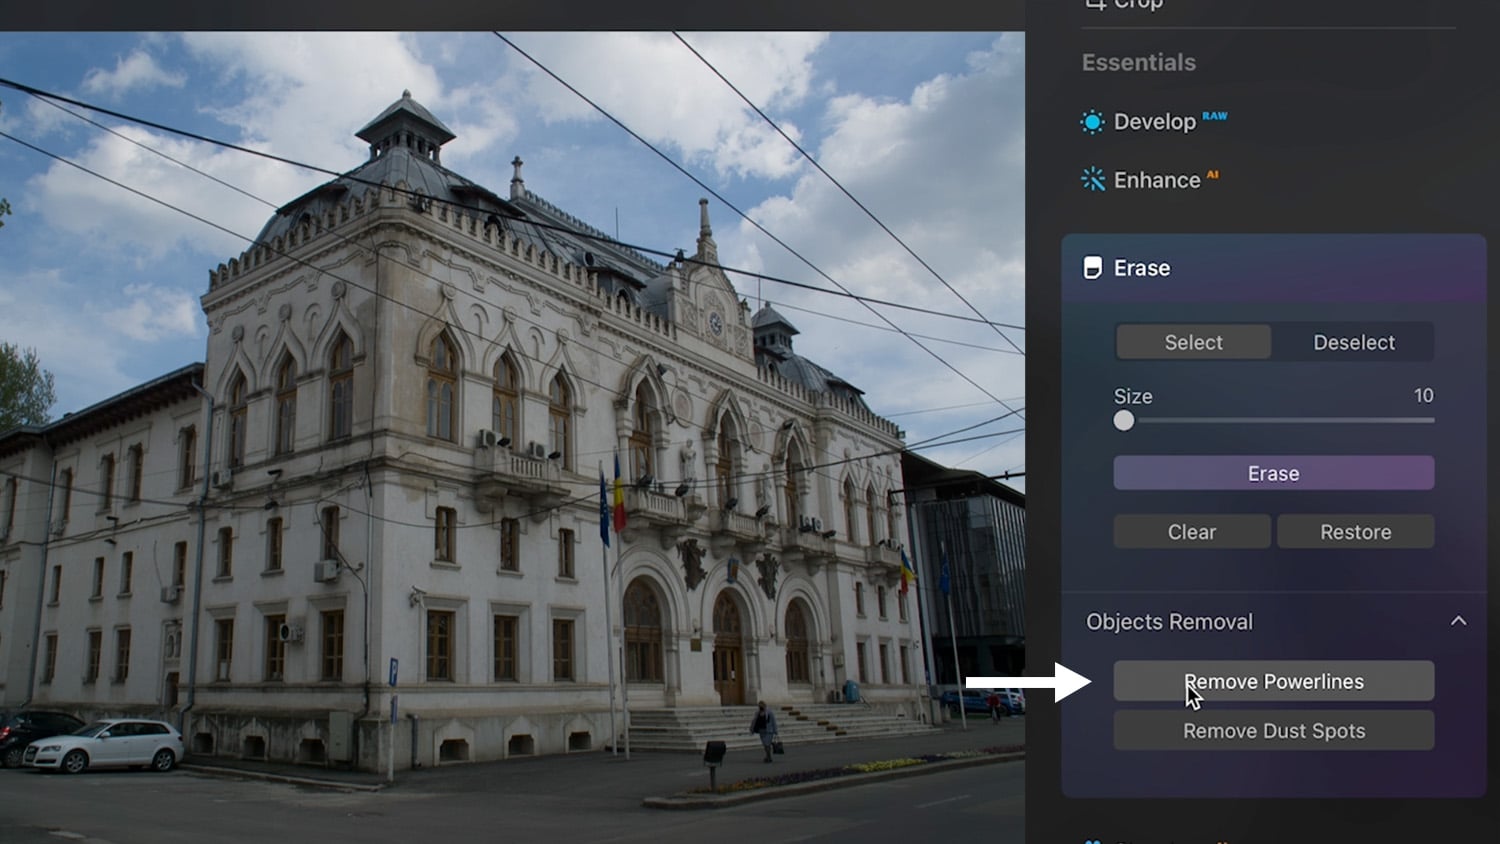
all you have to do is to click on “remove powerlines”, it will take some time to analyze the image and remove all the power lines for us.
And just like that, it did an amazing job of removing all of those power lines with just a click of a button.
I find this very impressive because if you’re doing this in Photoshop with something like the clone stamp tool or the content-aware fill, you still have to take the time to paint all of those power lines.
Of course, this will not work perfectly a hundred percent of the time because it might struggle on very complex images, and in this case, you can see that it missed some parts of the power lines, but that’s okay. We can still fix that using the brush tool

all you have to do is to paint on top of the area that it has missed using the brush tool, you can also use the shift key just like in Photoshop to paint a straight line, and then click on the erase button.

Likewise, if you want to restore an area back, you can just paint on top of it and then click on the “restore” button.
So if you’re doing image cleaning like this all the time, this feature is going to be very useful for you.
6 Sky Ai
sky AI is a feature that I use all the time in Luminar Ai and now in Luminar Neo, it allows you to really quickly replace complex skies even with reflections, so let’s go to the “sky Ai” tab and see how we can quickly replace the sky on this image.
First, you’re going to start by selecting a Sky from the dropdown, I’m going to choose this image from the sunset collection.

Then you’ll need to wait a little bit for Luminar to scan the image and replace the sky and there you go that was fast and easy
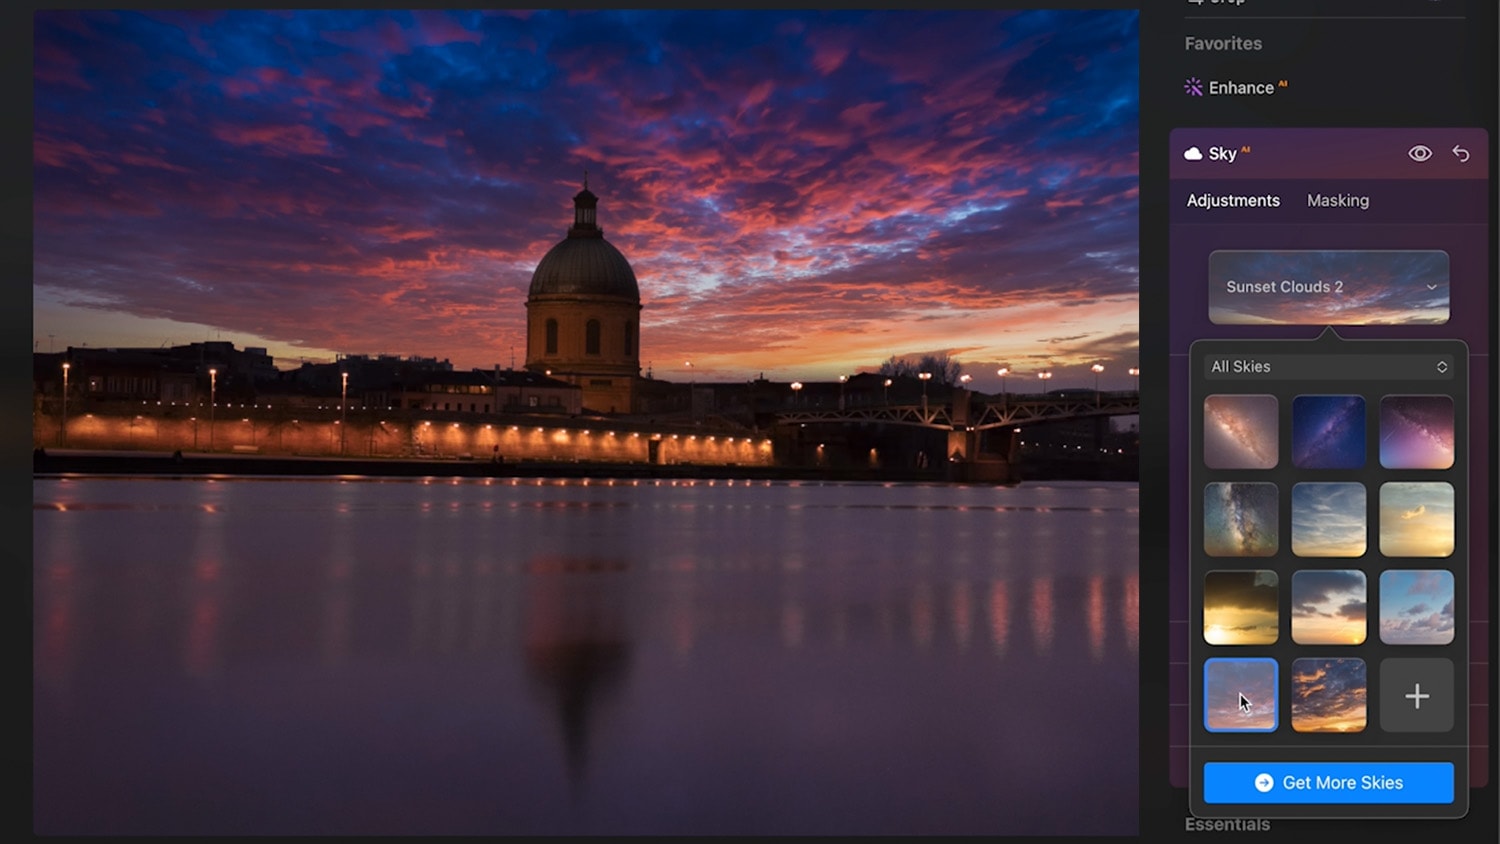
The mask on this sky replacement looks really accurate, but we have a few problems that we need to fix, and the most obvious one is the grain, the original image has a lot of grain and the new sky does not I’ll show you how to fix that in a little later.
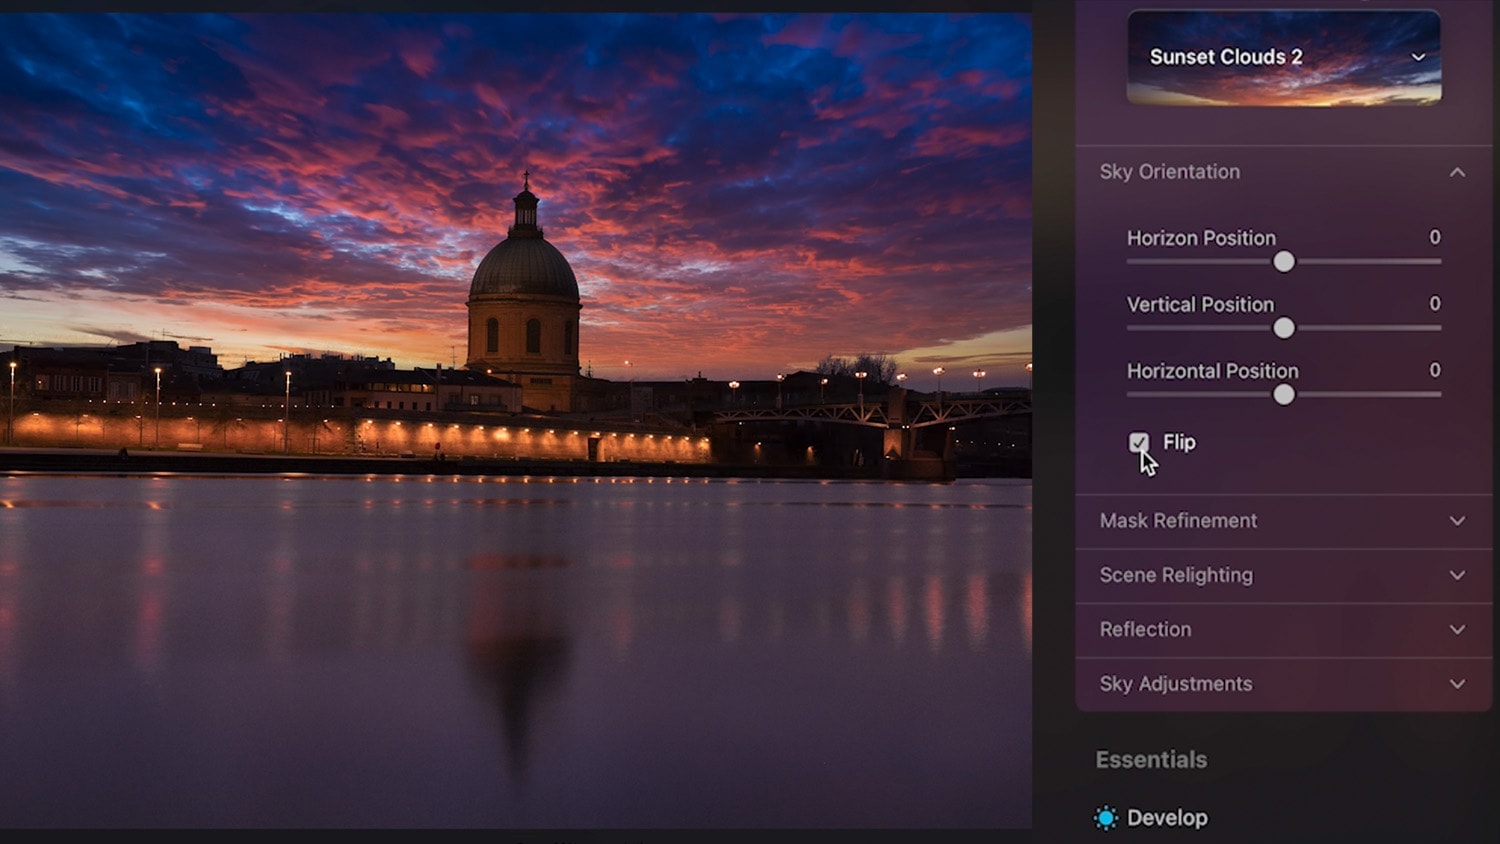
So you have a lot of adjustments on these tabs to modify the sky, the first one is sky orientation, I’m happy with the sky position on this image, but if you want to change the horizontal, vertical position, or flip the sky, you can do that on this tab.
There is a mask refinement tab, which will allow you to refine the details like trees.
most of these sliders are self-explanatory and easy to understand, so if I reduce the “global” slider, you’ll see that now we have a less accurate mask, but if we increase it, it’s going to refine the details more and more
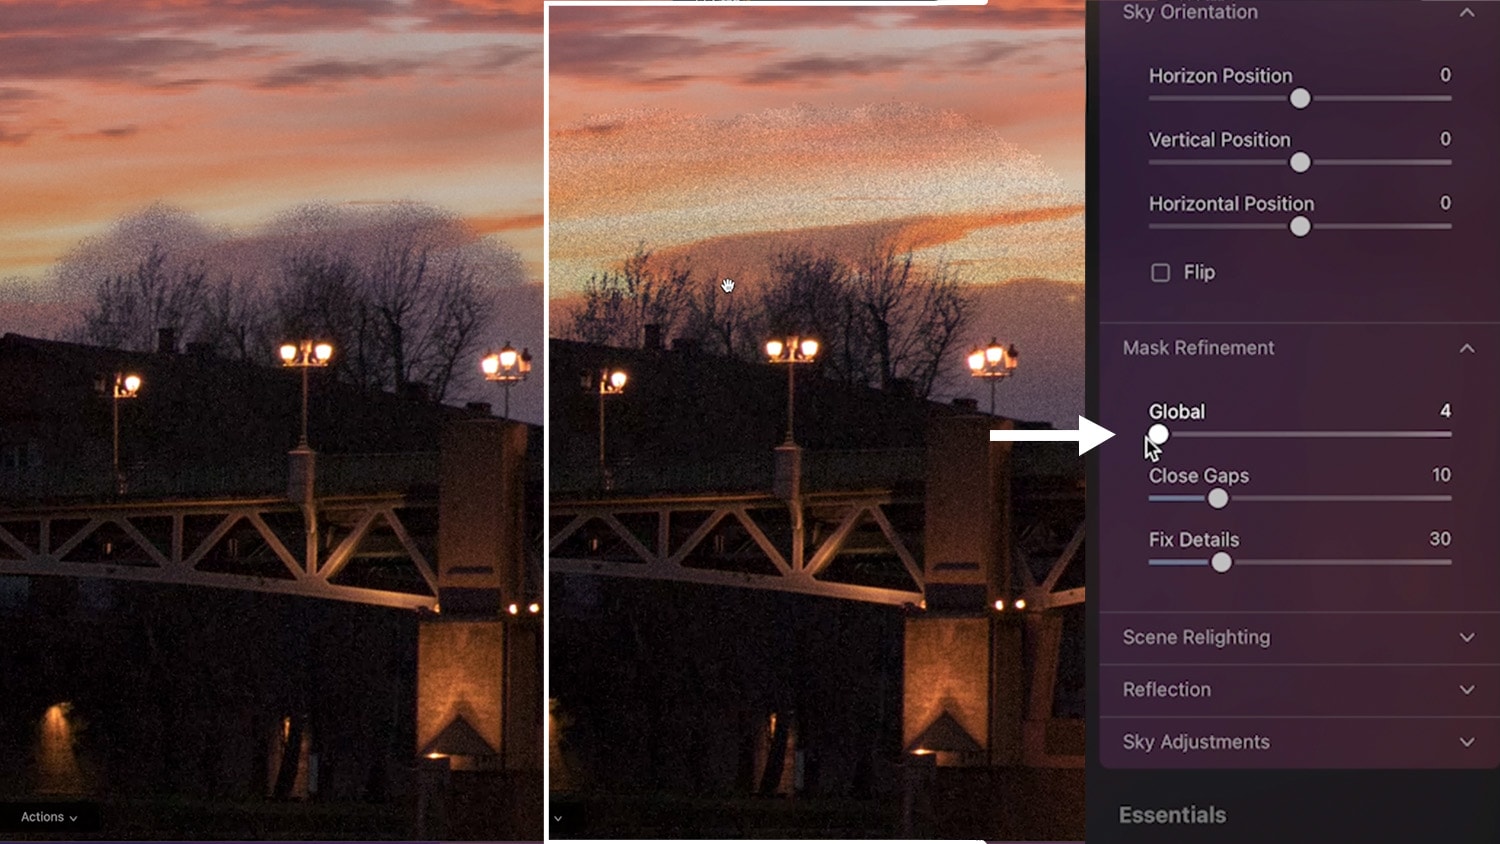
you can use the close gap slider to close the gap between the sky and the horizon,
And the “fix details” slider will allow it to fix the smaller details like powerlines or smaller trees
next is “scene relighting”, and this is going to allow you to match the color of the scene to the new sky, so let’s increase the scene light on this image, and we’ll also increase the saturation.
So, as you can see, the color in this image is now matching very well with the sky.
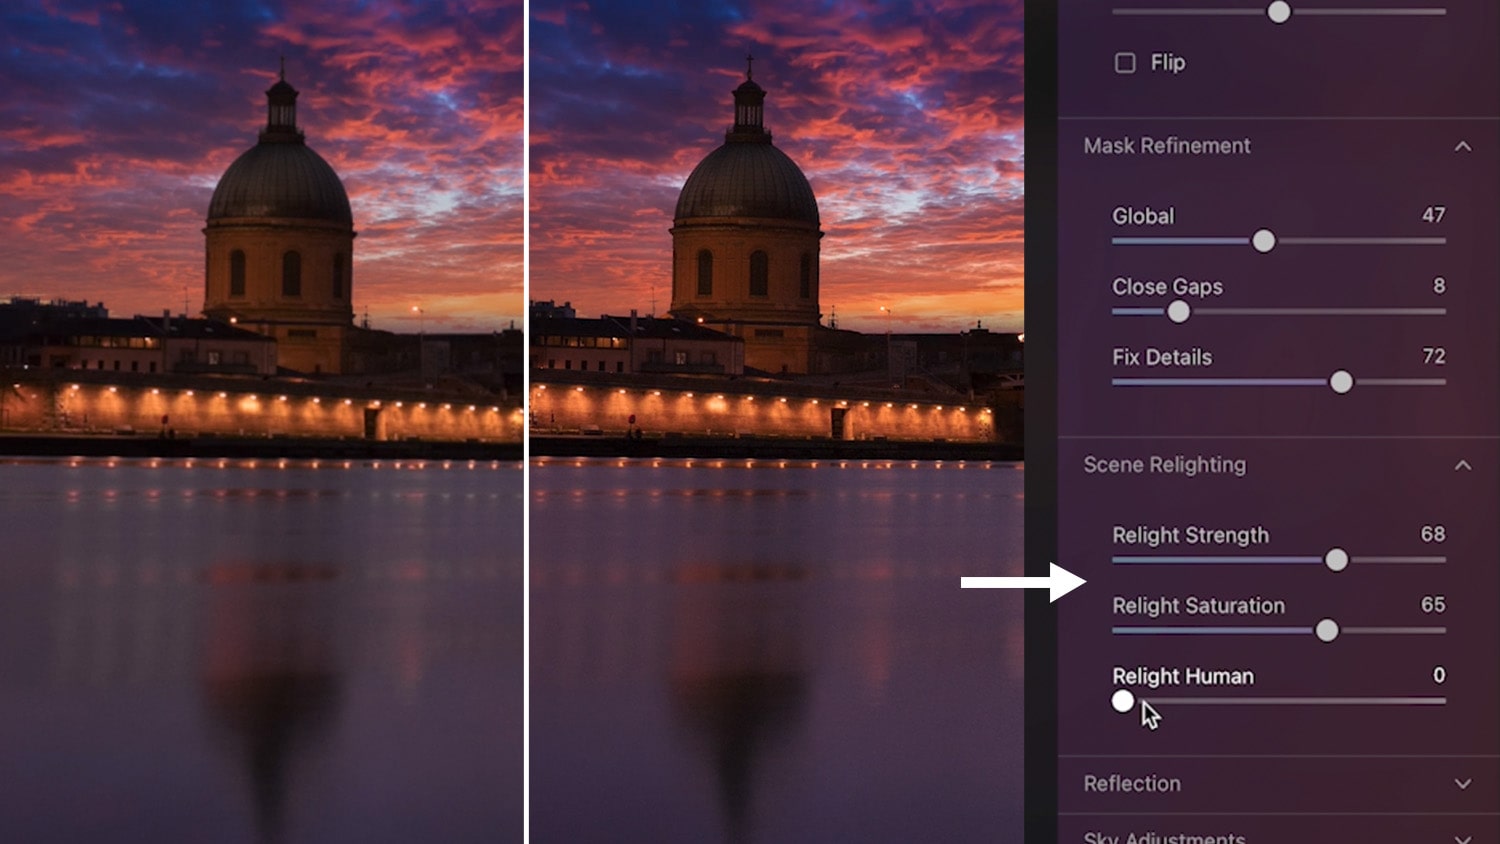
If you have a subject in your image, you can use the “relight human” slider to control its brightness.
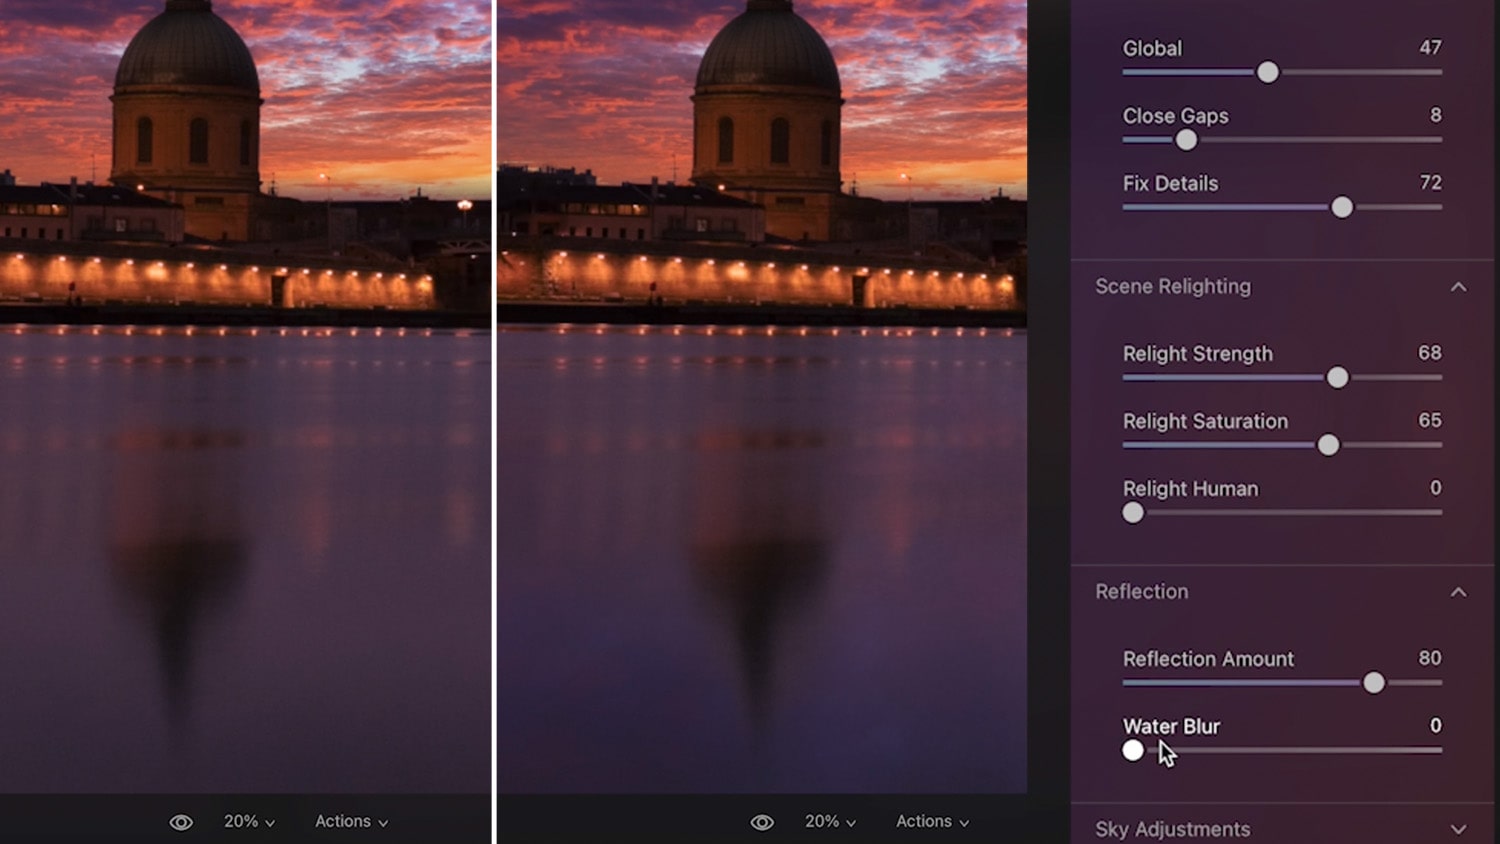
Next is “reflection”, and this is the reflection of the sky on water, so let’s increase the amount on this image all the way, and if you want to match a long exposure image, you can use the “water blur” slider to blur the reflection of the sky, but in this case, we don’t need to do that.
The last tab is “sky adjustments”,
sometimes you have an image with a blurry sky in the background, and you can use the de-focus slider to match the blur on the sky.
The next one is grain, which is going to be very handy in this image because if we increase the grain on this sky, we can now match the amount of grain to the original image, so about 50 is going to work on this image
The last few sliders are “atmospheric haze” if your image needs to have a little bit of haze, there is a warmth slider, and a brightness slider.

So sky replacement and Luminor is the great feature. That’s going to help you to really quickly repay skies without having to create masks.
7 is Luminar Neo For You?
Those were the six features in Luminar Neo that will make your workflow much faster and easier, And right now you might be wondering if Luminar Neo is for you and whether we should compare it to photoshop
I think that it doesn’t have to compete with Photoshop, in fact, it could be a great addition to Photoshop at the time when you want to edit some images fast and save time.
And at the time when you want to go deep and change every single detail in an image with layer masks and adjustment layers, then Photoshop will be more powerful and the best tool for that.
My answer is it depends on your workflow, if you are someone that wants to get results fast, and don’t want to spend the time to understand the know-how of everything, then luminar Neo might be the best fit for you.
But in my opinion, making this decision is a no-brainer considering that this software is very cheap, and compared to Photoshop, it is at a fraction of the cost.
You can get Luminar Neo at a discounted price using the link below.
And if you are a Luminar Ai owner, you can also benefit from this offer, so click the link to learn more.
I hope that this tutorial was helpful for you, make sure to subscribe to my newsletter to receive future tutorials about Luminar if you haven’t already,
thank you so much for following along and I’ll see you in my next tutorial.