
As someone who has been using Photoshop for over a decade, i know blending modes are not very easy to comprehend.
It’s tough to know which mode to choose or how to use it effectively for a specific effect or outcome.
You can spend so much time scrolling through all the different blending modes hoping that you’d stumble upon one that works with your image or design.
Trust me, I’ve been there.
Unless you want to leave your design success up to pure chance, it’s essential to have a complete understanding of each blending mode in Photoshop.
By grasping how each mode works and knowing when to use it, you can take control of your designs and create stunning visuals that stand out from the rest.
In this article, I’ll guide you through a step-by-step tutorial on Photoshop blending modes and how to use them effectively, even if you’re a complete beginner.
You’ll learn what Photoshop blending modes are, how they work, and how to use them to create beautiful and unique designs.
So, grab a cup of coffee, fire up Photoshop, and let’s get started!
What are Photoshop Blending modes?
Blending modes are a set of tools that allow you to blend layers together in various ways. In other words, blending modes change the way the pixels of one layer interact with the pixels of the layer beneath it.
There are a total of 27 blending modes in Photoshop, each with its own unique effect on the layer(s) it is applied to.
Some of the most commonly used blending modes include “Multiply”, “Screen”, “Overlay”, “Soft Light”, and “Hard Light”.
Blending modes can be used for a variety of purposes, such as adjusting contrast and brightness, creating special effects, or even removing unwanted parts from an image.
When you apply a blending mode to a layer, it changes how that layer interacts with the layers beneath it. For example, if you apply the “Multiply” blending mode to a layer, it will darken the colors of that layer based on the colors of the layers below it.
If you apply the “Screen” blending mode, it will lighten the colors of the layer based on the colors of the layers below it.
Learning how to use blending modes can take some time and practice, but it’s well worth it.
they are popular with the use of overlays in particular which open a world of possibilities on how you edit your images


THE ULTIMATE
OVERLAYS BUNDLE
Snow . Rain . Fire . Particles . Lens Flares. Light Rays and more
How to use blending modes in Photoshop?
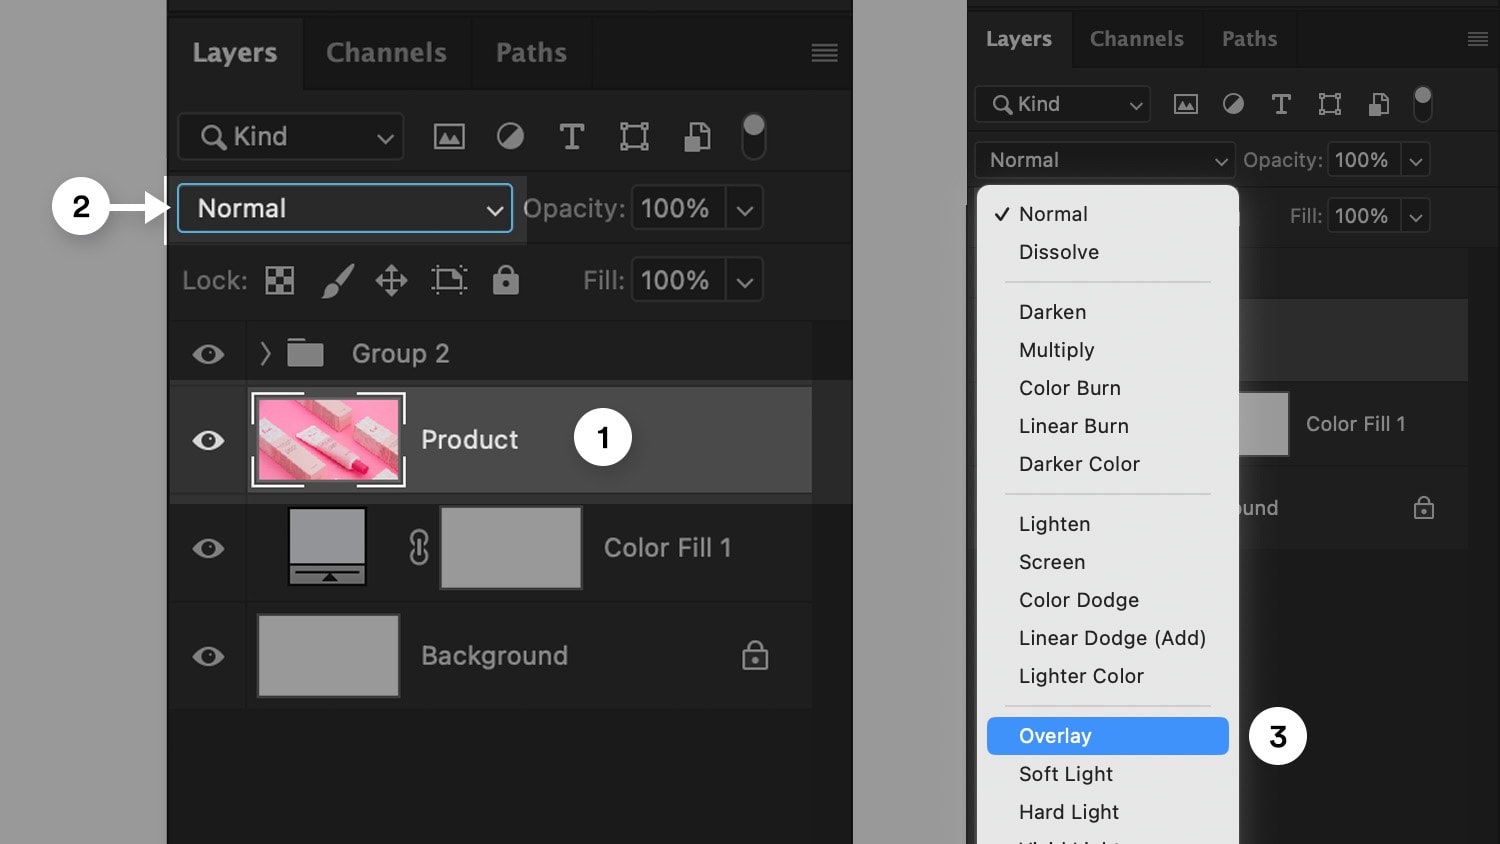
The process of changing the blending mode in Photoshop is simple and intuitive
just navigate to the Layers panel, select the layer you want to modify, and click on the Blending Mode dropdown menu at the top.
You’ll be presented with a wide range of options, each with a unique effect on the way your layers interact.
From there, select the mode you want to use.
You can also use the up ↑ and down ↓ keyboard shortcuts to quickly switch between blending modes.
Additionally, adjusting the opacity or the fill of the layer can also have an impact on the final result.
it’s important to keep in mind that not all blending modes are created equal.
Some may work better for specific types of content, while others may not yield the desired results. That’s why it’s essential to experiment with different modes to find the perfect fit for your project.
Quick Tip:
Use the keyboard shortcut Shift ⇧ + + and Shift ⇧ + - to quickly cycle between the next and previous blending mode even if the dropdown menu is not open, this way you can switch between modes very fast.
What are the 6 categories of blending modes?
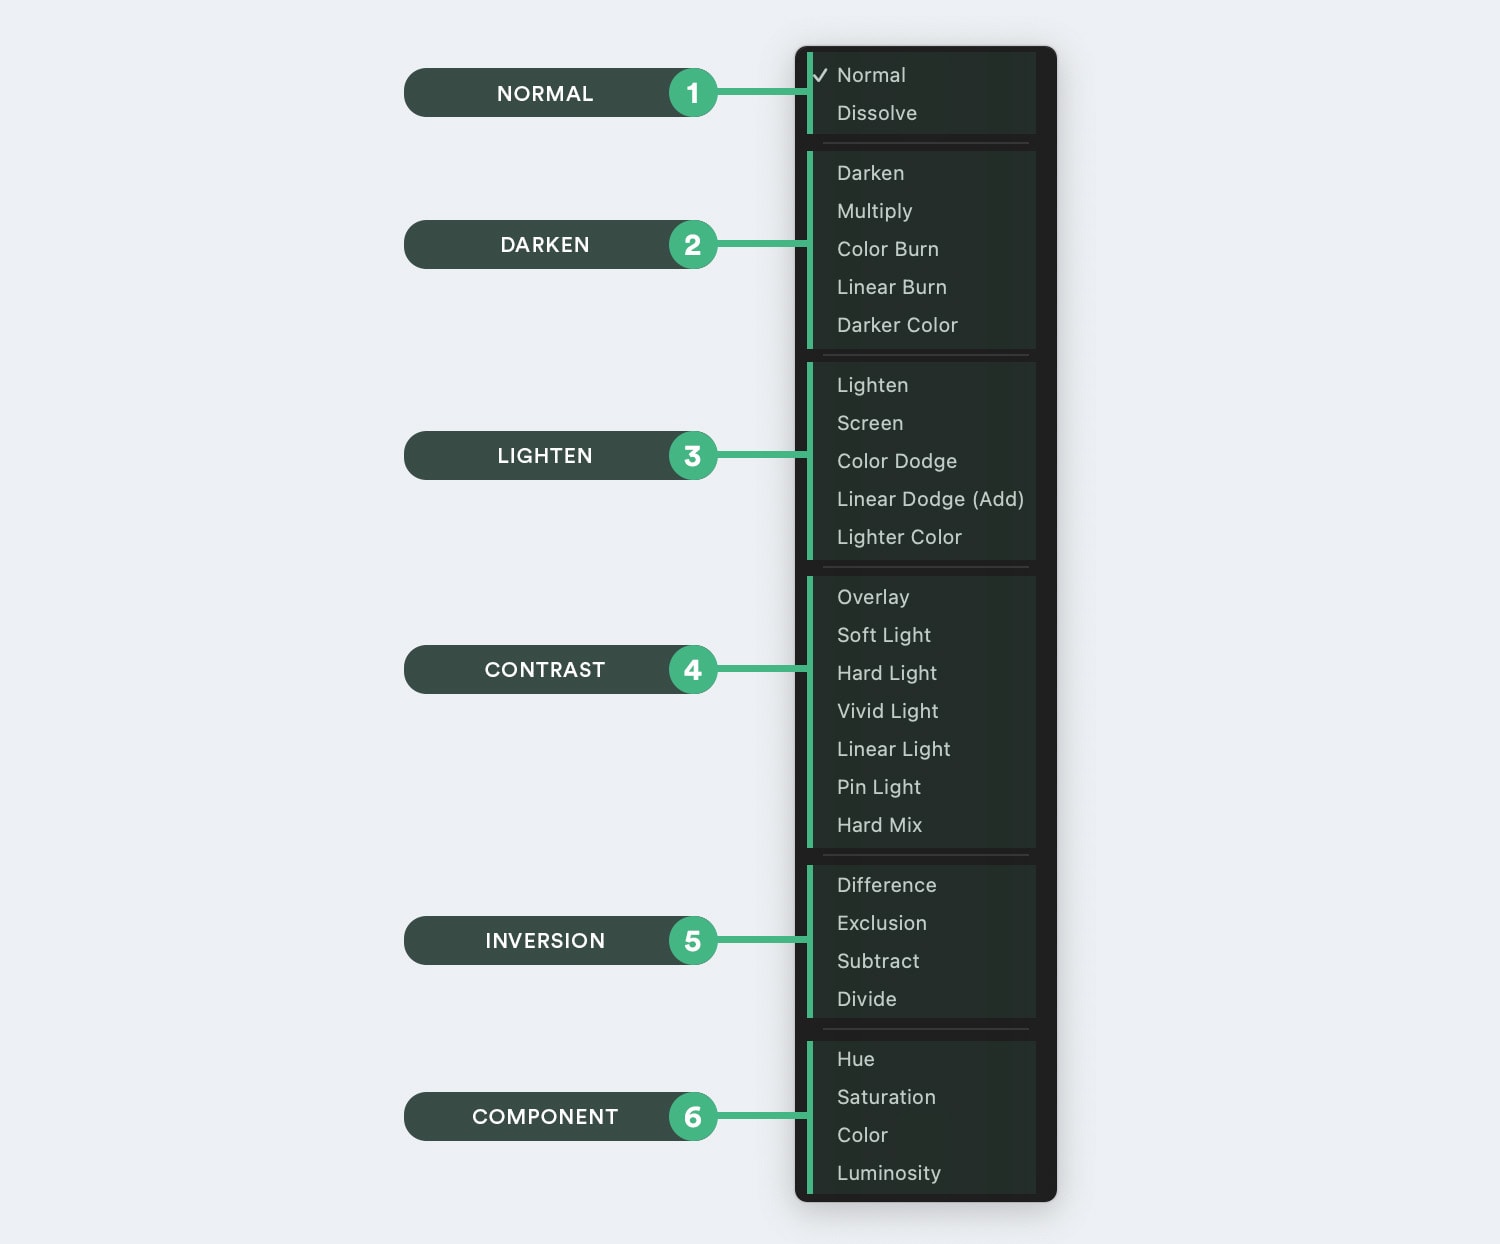
The 6 categories of blending modes in Photoshop are divided into the following order Normal, Darken, Lighten, Contrast, Inversion, and Component.
It’s easy to distinguish between these categories by looking for the divider in the dropdown menu between each category.
1 – Normal
The Normal category includes blending modes that do not change the color of the layer but instead affect its transparency, but simply stack them on top of each other, these include Normal and dissolve
“Normal” is the default mode for layers in Photoshop.
2 – Darken
The “Darken” category contains modes that darken the underlying layer based on the pixel values of the layer being blended.
It includes Darken, multiply, color burn, linear burn, and darker color
Quick Tip:
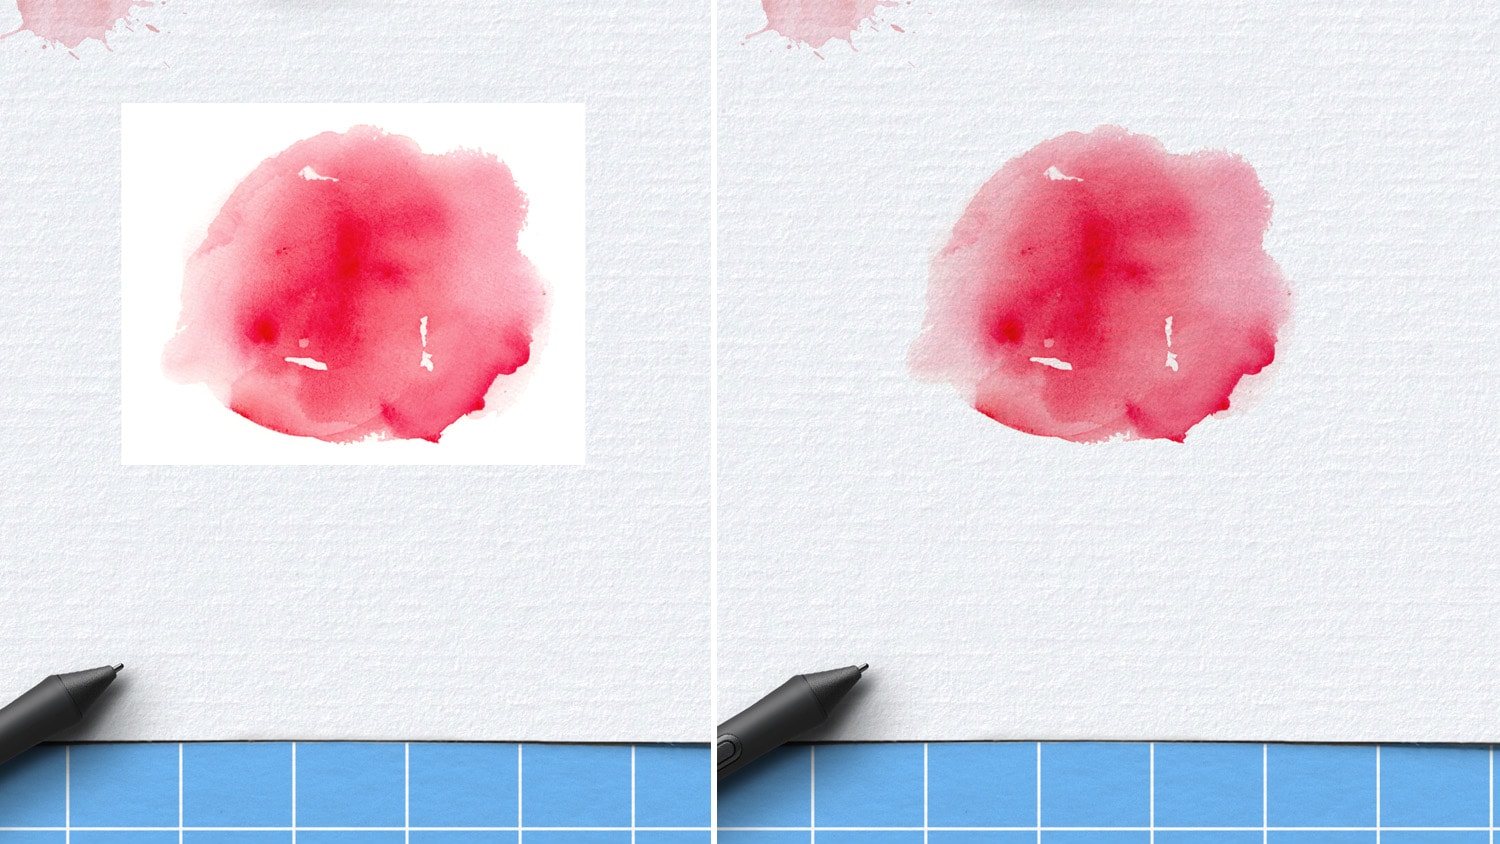
The darken blending mode category will make white invisible, you can use them to apply a grunge texture or add contrast to an image.
3 – Lighten
The “lighten” blending modes, as the name suggests, lighten the pixels in your design, making them brighter and more vibrant.
But wait, there’s more!
Within the Lighten blending modes category, you have four options: Screen, Color Dodge, Linear Dodge (Add), and Lighter Color. Each one has its own unique way of adding lightness to your design.
Screen mode brightens your design by combining the inverted colors of the top layer with the bottom layer.
Color Dodge mode increases contrast and lightens the colors in your design. Linear Dodge (Add) mode adds the brightness of the top layer to the bottom layer.
And finally, the Lighter Color mode compares the colors of both layers and keeps the lighter of the two.
Quick Tip:
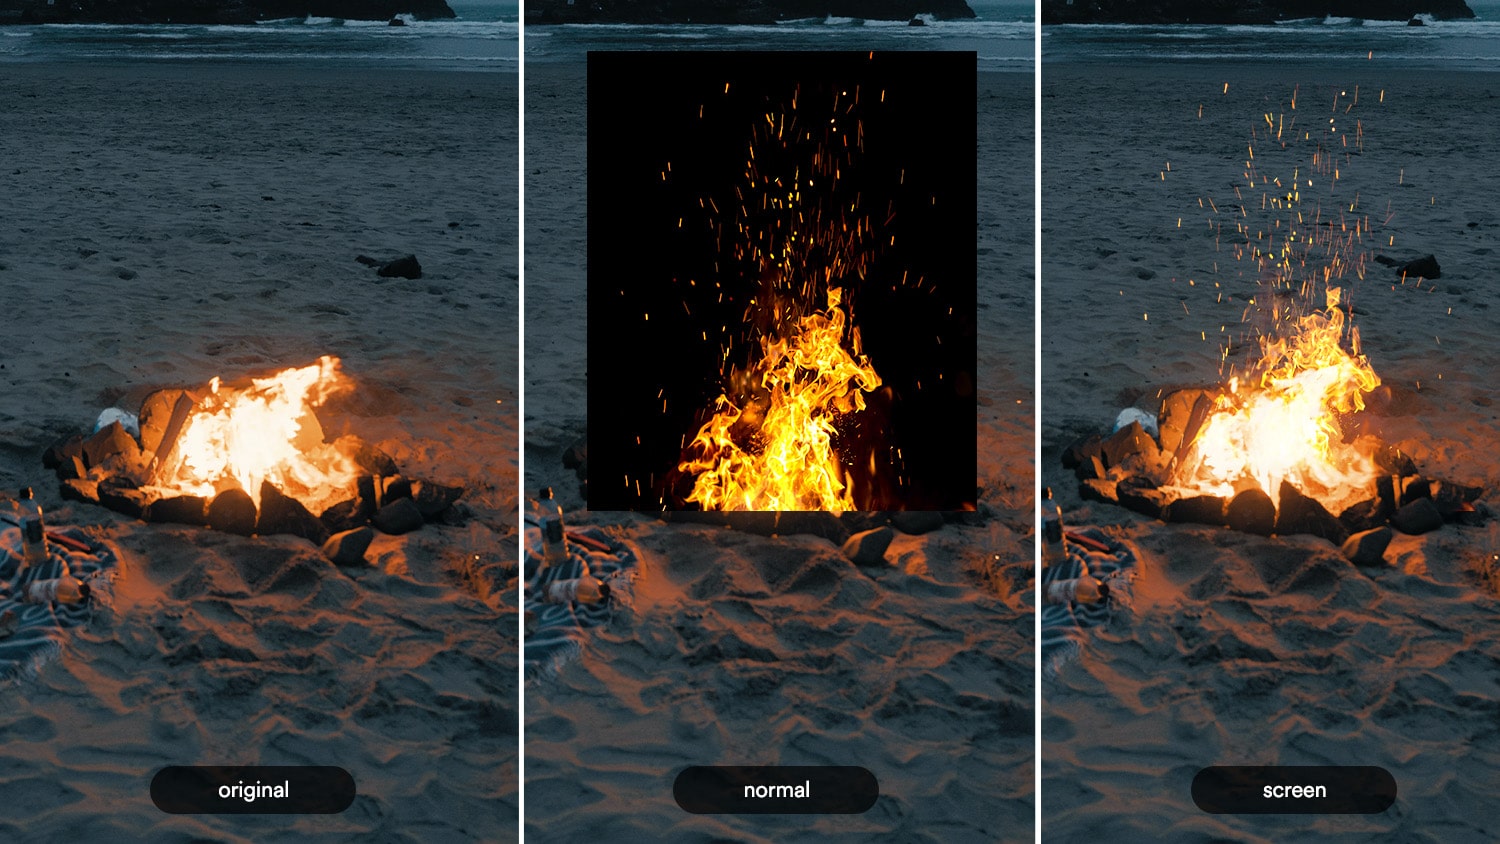
The Lighten blending modes category will make black invisible, you can use them to apply a snow or rain overlay for example
4 – Contrast
The “Contrast” category increases the contrast by making the lighter areas lighter and the darker areas darker, while preserving the overall tonality of the image.
This happens by multiplying or screening the colors depending on the base color resulting in a vivid, high-contrast effect, which can be useful for adding a dramatic effect to an image.
This category includes overlay, soft light, hard light, vivid light, linear light, pin light, and hard mix.
Quick Tip
Contrast blending modes will also make 50% gray invisible except for the last one “Hard mix”, which makes them perfect for applying noise effects and sharpening images.
5 – Inversion
The blending modes in this category invert the colors of the base layer and blend them with the blend layer. These blending modes create interesting effects by reversing the color values and tones of the underlying layer.
When applying an inversion blending mode, the darker areas become lighter, and the lighter areas become darker. This inversion can result in striking visual transformations, offering a unique and creative approach to manipulating colors and tones in your designs.
This category includes difference, exclusion, subtract and divide
6 – Component
The blending modes in this category affect only certain color channels of the base layer, such as the red, green, or blue channel, while leaving the other channels untouched.
This can create interesting effects by selectively blending colors, this category includes Hue, saturation, color, and luminosity
Practical Use Cases of Blending Modes
Blending modes can take your photos and designs from simple to stunning, and By utilizing these modes, you can easily add various effects, from subtle tweaks to dramatic transformations.
To use blending modes creatively, you have to experiment with different modes and settings to find the one that works best for your image and desired outcome.
Additionally, blending modes can be combined with advanced techniques like layer masks and adjustment layers to produce even more complex effects.
Check out these examples of blending modes and their effects:
Multiply
The Multiply blending mode Brings out darker areas, intensifies contrast in the image, and makes white invisible.
It takes the pixel values of the layer being blended and multiplies them with the corresponding values of the underlying layers.
This mode works wonders when you want to add depth and contrast to your image.
For example, if you have a vibrant sunset photo and want to make the colors pop even more, duplicating the layer ctrl/cmd ⌘ + j and applying the Multiply blending mode can darken the shadows and bring out the richness of the scene.
Also very popular for adding all sorts of textures to a design, because as i mentioned earlier, The darken blending mode category will make white invisible.
Screen
The screen blending mode lightens the colors of the layer being blended based on the underlying layers, resulting in a brightening effect.
This mode is fantastic for adding a dreamy and ethereal atmosphere to your images.
Let’s say you have a landscape photo that lacks a bit of luminosity. Applying the Screen blending mode can help enhance the overall brightness and create a soft, glowing ambiance.
The screen blending mode adds brightness by making the highlights brighter and blacks invisible, it is also very popular for applying overlays
Soft Light
Think of soft light as a digital makeup artist. It magically diffuses light and gently softens your image, creating a delicate and dreamlike effect, Soft light blends the layers by darkening or lightening the colors based on the top layer’s pixel values.
It’s perfect for giving portraits a soft and glowing appearance or adding a touch of romance to a wedding photograph.
Overlay
overlay combines the multiply and screen blending modes, resulting in a vibrant and textured look, it’s like a more intense version of soft light
Overlay enhances contrast and saturation, making it a go-to choice for adding texture, patterns, or grunge effects to your designs.
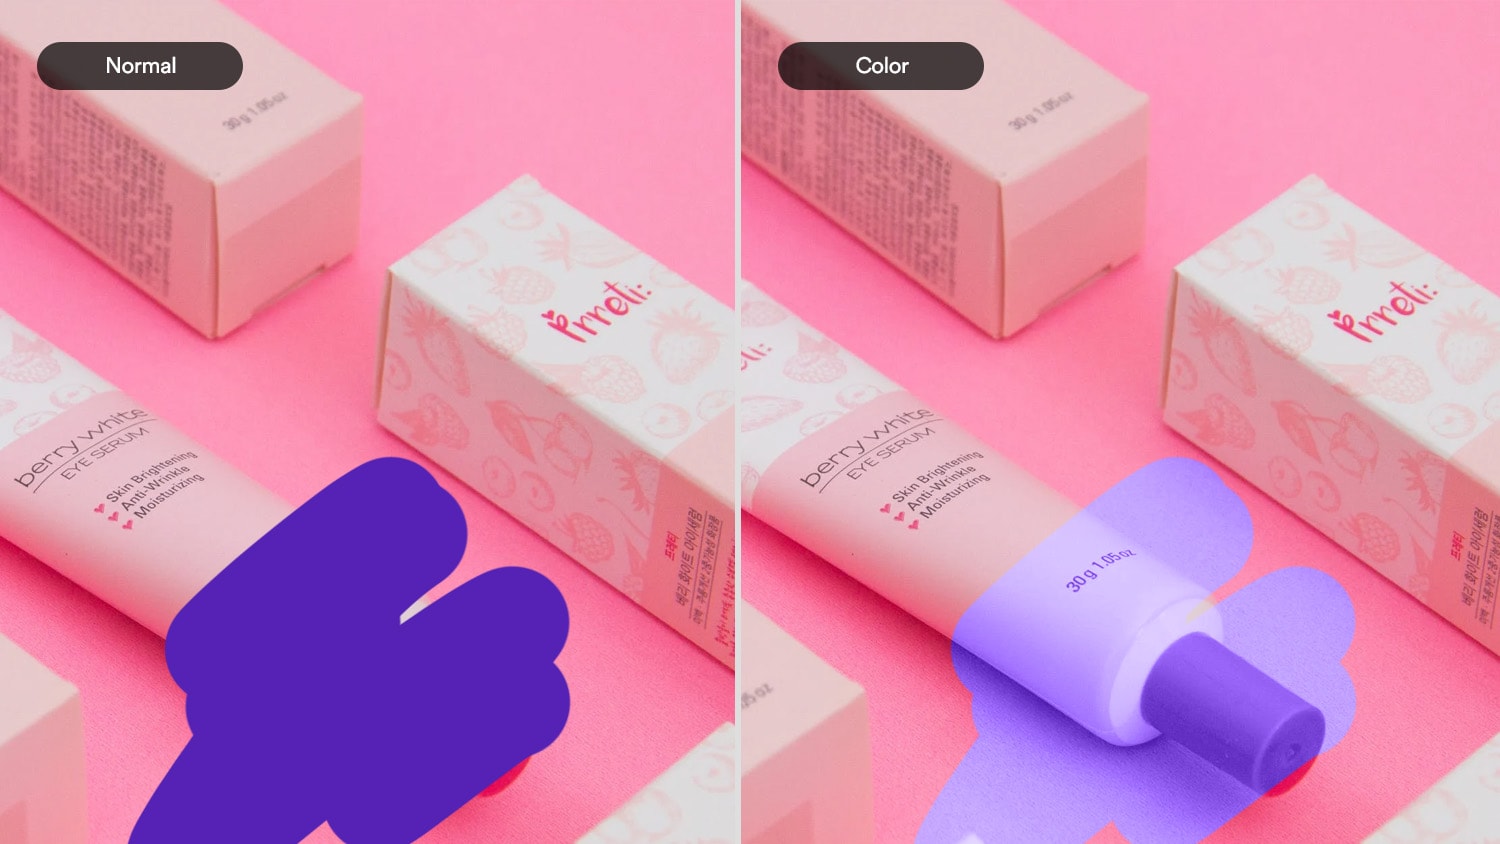
Color
The Color blending mode applies the hue and saturation of the layer being blended while retaining the luminosity of the underlying layers.
This mode is excellent for creative color grading and enhancing specific color tones in your image.
For instance, if you have a product photograph where you want to intensify the color of a specific object or even change the color, applying the Color blending mode can give it a boost without affecting the overall brightness.
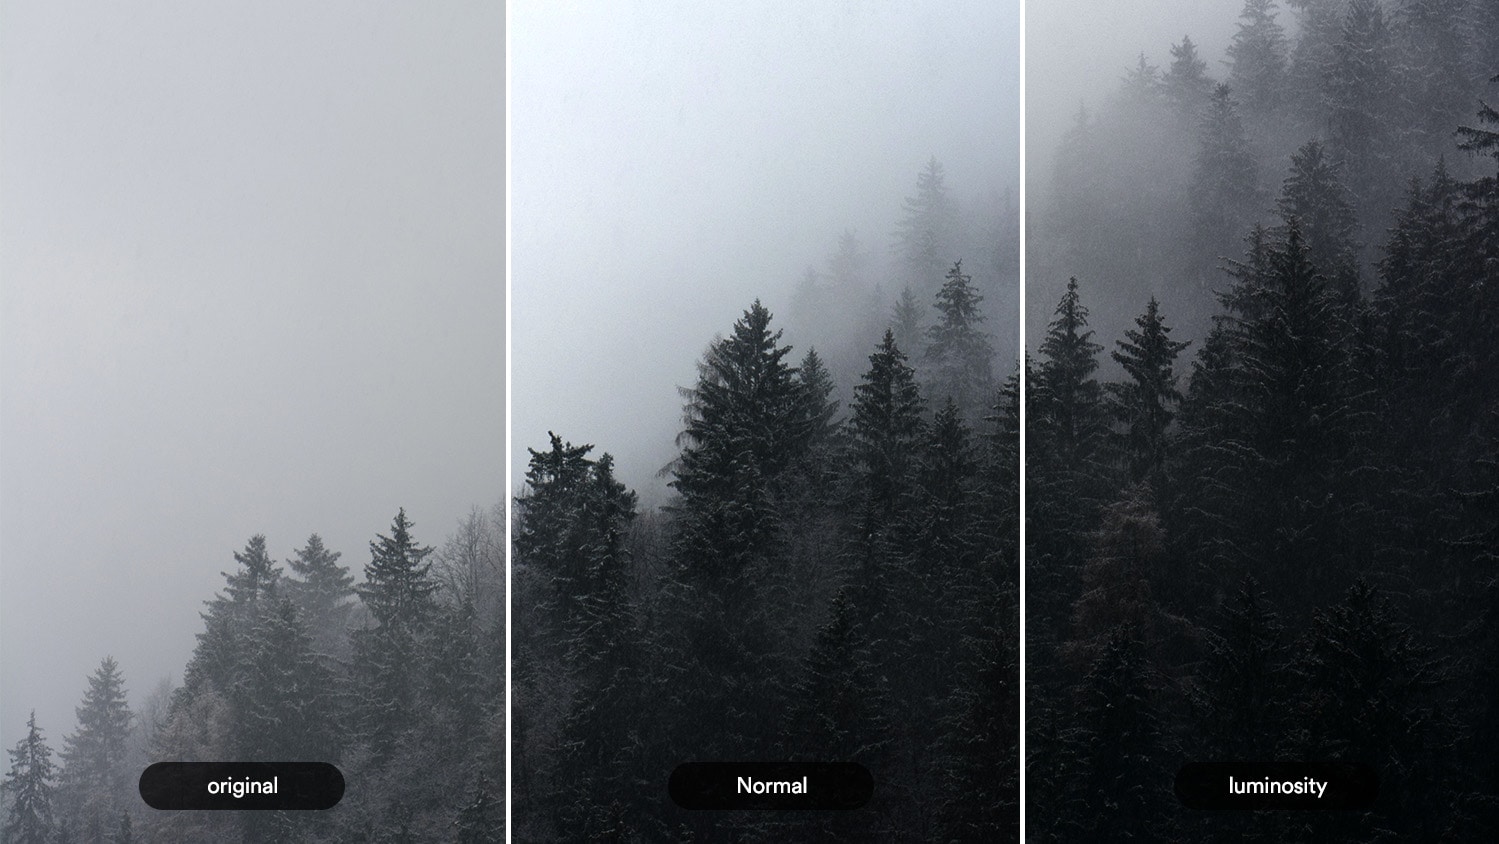
Luminosity
The Luminosity blending mode focuses on the brightness values of the layer being blended and applying them to the underlying layers, It leaves the colors intact while adjusting the luminance to match the brightness values of the layers below.
This mode is often used in color correction and tonal adjustments. If you have a landscape photo with slightly off-balanced exposure, applying the Luminosity blending mode to curves, levels or any adjustment layer can help harmonize the brightness levels and create a more pleasing overall tonality without affecting color.
Those were just a few of many blending modes to choose from, but you will find yourself using them all the time more than the others, plus you don’t need to memorize all of them at the beginning.
each blending mode has its specific use cases, such as intensifying colors, emphasizing shadows, adding dreamy effects, or even giving a touch of magic to your photos.
It’s through trial and error that you’ll discover the perfect combination of blending modes that brings out the best in your artistic vision.
The Pass Through Blending Mode
I have a little secret to tell you, i haven’t told you about the “28th blending mode” “Pass Through”, this mode actually won’t show when you have a regular layer selected, it will only show when you select a group.
So how does the “Pass Through” mode work?
In essence, the Pass Through blending mode allows you to maintain the transparency and blending effects of underlying layers within a layer group.
When you apply this mode to a layer group, it bypasses the traditional blending calculations and passes the layer effects and transparency from the group to the layers below it.
It’s like a secret handshake among layers, allowing them to communicate and collaborate seamlessly without the need for multiple clipping masks.
So, what can you do with this intriguing blending mode? Well, the possibilities are practically limitless, Here are a few examples to spark your imagination:
- Non-Destructive Editing:
Imagine you have a layer group with multiple adjustment layers and special effects applied to it, By setting the blending mode of the group to Pass Through, you can make changes to individual layers within the group without affecting the layers below. It’s like having a backstage pass to tweak and fine-tune your design without any lasting consequences. - Dynamic Layer Group Interactions:
Let’s say you have a complex composition with different elements arranged in layer groups. By using the Pass Through blending mode strategically, you can create dynamic interactions between the layers, where effects and adjustments applied in one group seamlessly blend with the layers in other groups. - Supercharge Your Special Effects:
With the Pass Through blending mode, you can apply eye-catching effects and filters to a layer group, and these effects will extend their magic to the layers beneath. For example, you can add a glowing aura to a character in a digital painting, and the glow will radiate through the layers below, giving an ethereal and captivating effect.
Remember, the Pass Through blending mode is not a frequent player in the blending mode lineup, but when you discover its hidden powers, it can become your secret weapon for complex compositions, non-destructive editing, and mind-bending effects.
Download my Photoshop Blending Modes Cheat Sheet PDF
Feeling a little overwhelmed and can’t memorize all these blending modes at once? no problem, you don’t have to
but you can download my blending mode cheat sheet pdf, where I put together all the essential information you need so you can refer to it whenever you get stuck or just need a refresher

Free download
Free Blending Modes Cheat Sheet PDF
Save this cheat sheet to your desktop and refer to it whenever you need it!
Wrapping up
So, there you have it! Photoshop Blending modes are super powerful and can give your designs that extra oomph they need to stand out from the crowd.
With 27 blending modes to choose from, it can seem overwhelming at first, But once you understand what each of the six categories of blending modes does you’ll be well on your way to creating your own unique designs
The key is to experiment with different modes and settings to find what works best for you.
And whether you’re just starting out or have been designing for a while, using blending modes effectively can take your skills to the next level and open up a whole new world of creative possibilities.
Thank you for reading till the end, this article is part of the Photoshop Basics tutorial series, check out my guide on Photoshop Brushes next to level up your Photoshop brushes skills.