
Let’s face it – Adobe Photoshop can be a little intimidating, especially for beginners. Whether you’re trying to create professional designs or edit photos as a hobby, it’s easy to get lost in the sea of options and features.
And let’s not even get started on the frustration of trying to modify one tiny element without ruining the whole project.
It’s enough to make you want to give up altogether, isn’t it? But don’t give up just yet. There’s a solution to these issues, and it lies in mastering Photoshop layers.
this comprehensive guide will teach you everything you need to know about layers in an easy-to-follow, step-by-step process.
By the time you finish reading, you’ll be able to confidently create and manage layers, apply layer styles and effects, and use layer masks to create complex designs and edits.
So whether you’re a photographer, graphic designer, or just someone who wants to up their Photoshop skills to the next level, mastering Photoshop layers is an essential step before you can become productive and efficient working with Photoshop.
At first glance, layers may seem like an intimidating tool – but trust me, once you get the hang of it, layers will become your best friend in all your design endeavors.
So, what exactly are layers?
What are Photoshop Layers?
Simply put, they are a way to organize and manage the different elements in your design.
Each layer is like a transparent sheet that you can place different objects on, such as images, text, shapes, or anything you want.
You can then edit each layer individually, move objects around, adjust effects, or even delete elements altogether without affecting the rest of your design.
Using layers is important because it allows you to create complex designs while keeping things organized and flexible.
Instead of having everything you need in one layer, you can separate each element into its own layer, making it easier to track your design progress.
Plus, you can add effects, adjust transparency, and even control the order of layers to create a unique look for your project.
When you are just getting started learning Photoshop you’ll want to become familiar with the Layers panel.
The layers panel is the place where all your layers are displayed, you can add, delete, rename, and reorder layers as needed, and Knowing how to navigate the Layers panel is essential in achieving your desired design.
Becoming proficient in using layers in Photoshop requires time and effort, but the end result is definitely worth it.
By mastering layers, you can produce exceptional designs that set you apart from the crowd.
What are the different types of layers in Photoshop?
Whoever said “There’s no such thing as too many layers” was definitely talking about Photoshop! You can add depth and interest to your designs with so many layer types available.
Let’s learn about these layer types and how they can be useful for you
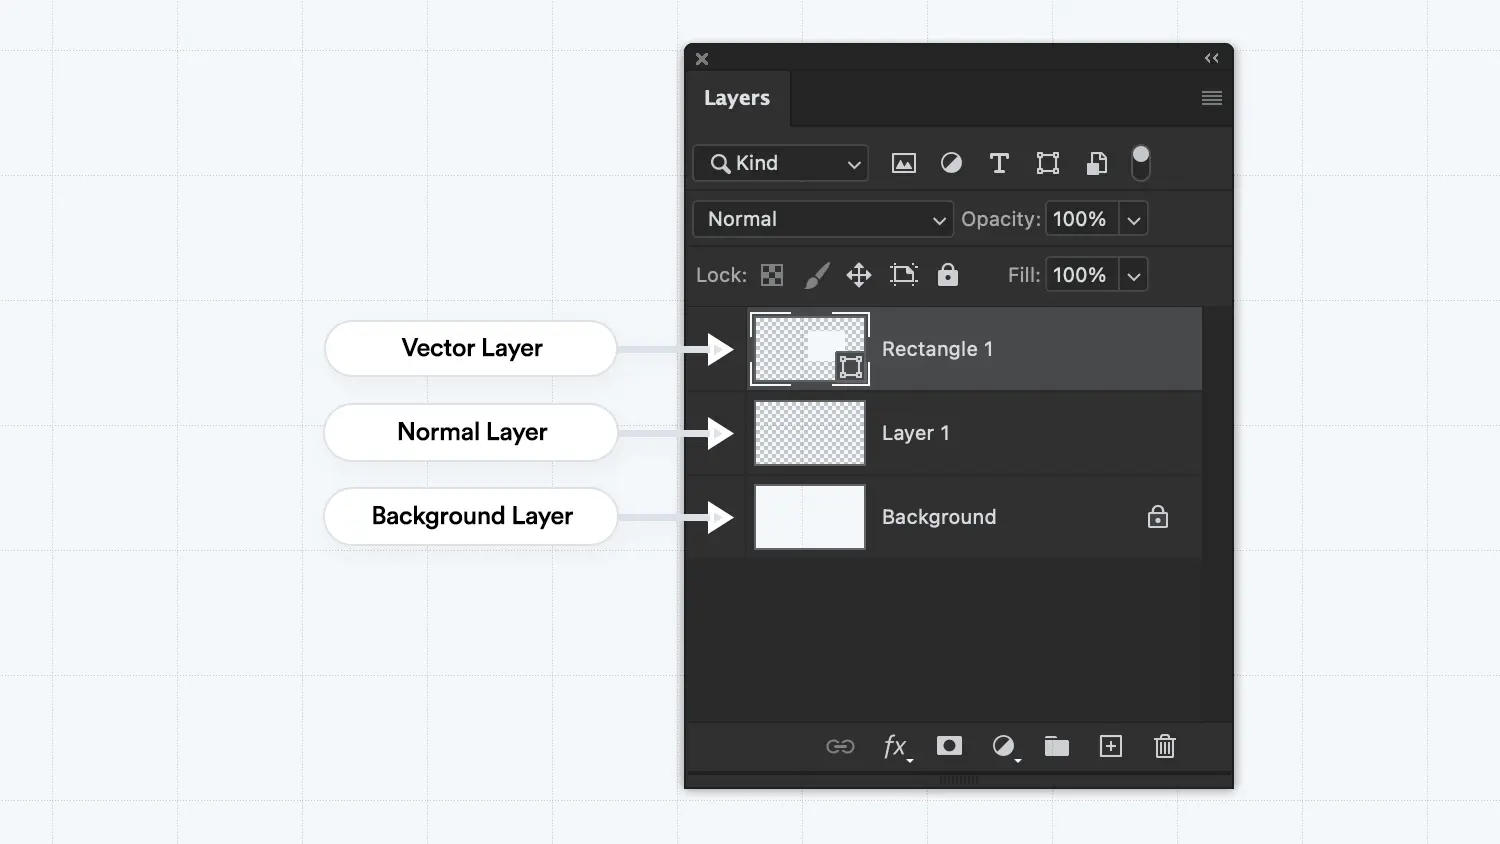
– Normal Layers
For starters, there are normal layers, these are transparent empty layers that you can add as many as you want of them from the layers panel. You can add any type of content inside of them, from images to text to shapes, you can paint on them with the brush tool or do anything you want.
– Background Layer
Another type of layer in Photoshop is the Background Layer, which is the default layer that is created when you open a new document.
This layer is locked and is always located at the bottom of the Layers panel. If you want to modify the background layer, you can convert it to a normal layer by clicking on the lock icon at the top of the layers panel.
Vector Shapes
You’ve got shape layers, which can be used to create everything from basic shapes to custom designs. These layers contain vector shapes created using the Shape tools, such as rectangles, ellipses, or custom paths with the pen tool.
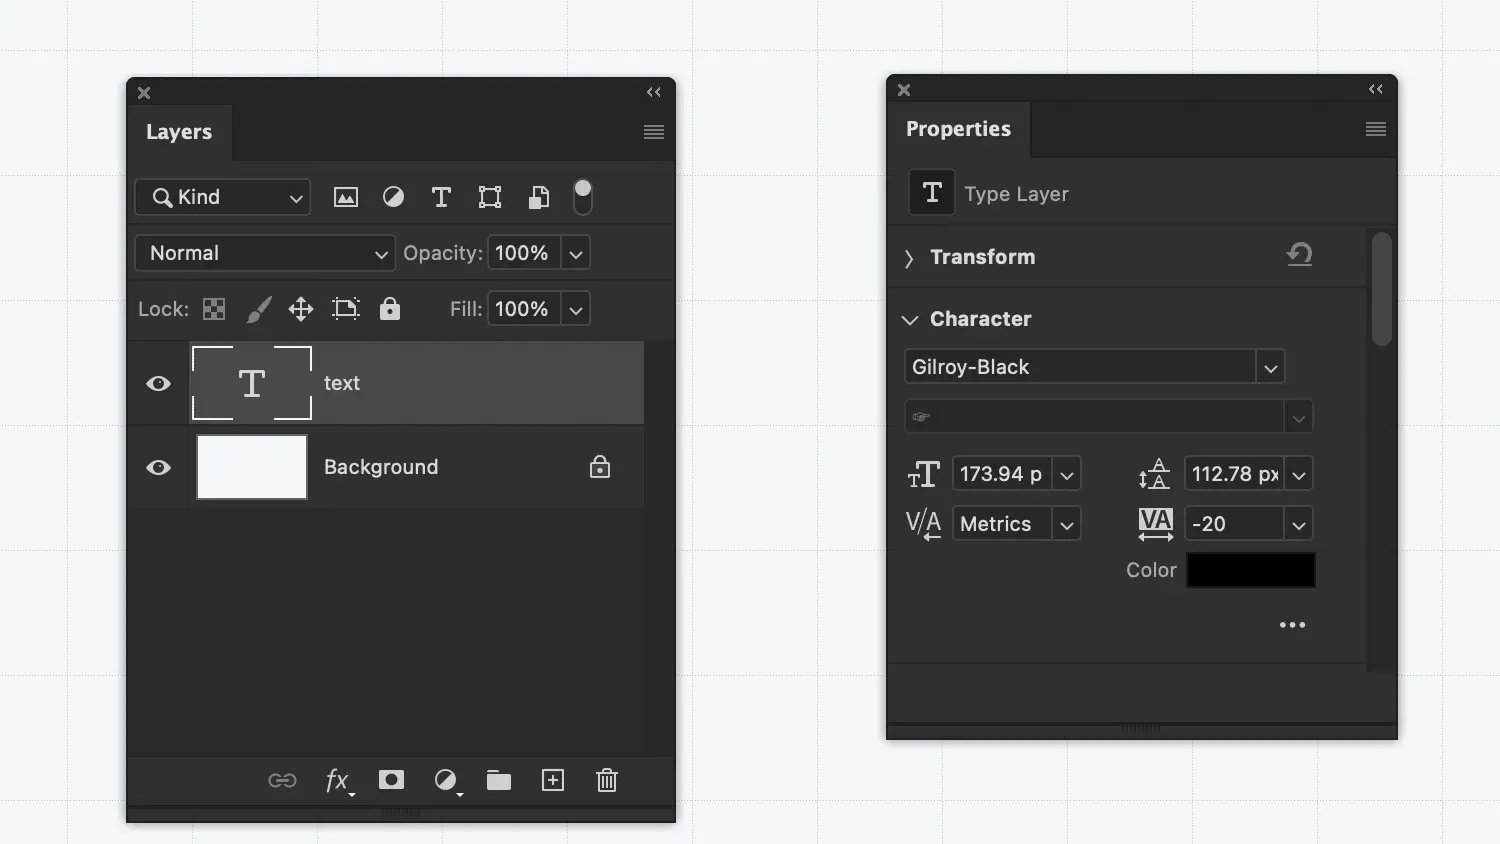
– Text Layers
Text layers, on the other hand, are perfect for adding text to your design, with a variety of font, size, and color options to choose from.
These layers contain editable text that can be formatted and styled using the Character and Paragraph panels.
– Fill Layers
A fill layer allows you to add solid colors, gradients, or patterns to your designs. They are a versatile tool for adding color and texture to your artwork.
With fill layers, you can easily modify and experiment with different color schemes and effects, without directly altering the underlying pixels of your image, therefore, providing flexibility and non-destructive editing.

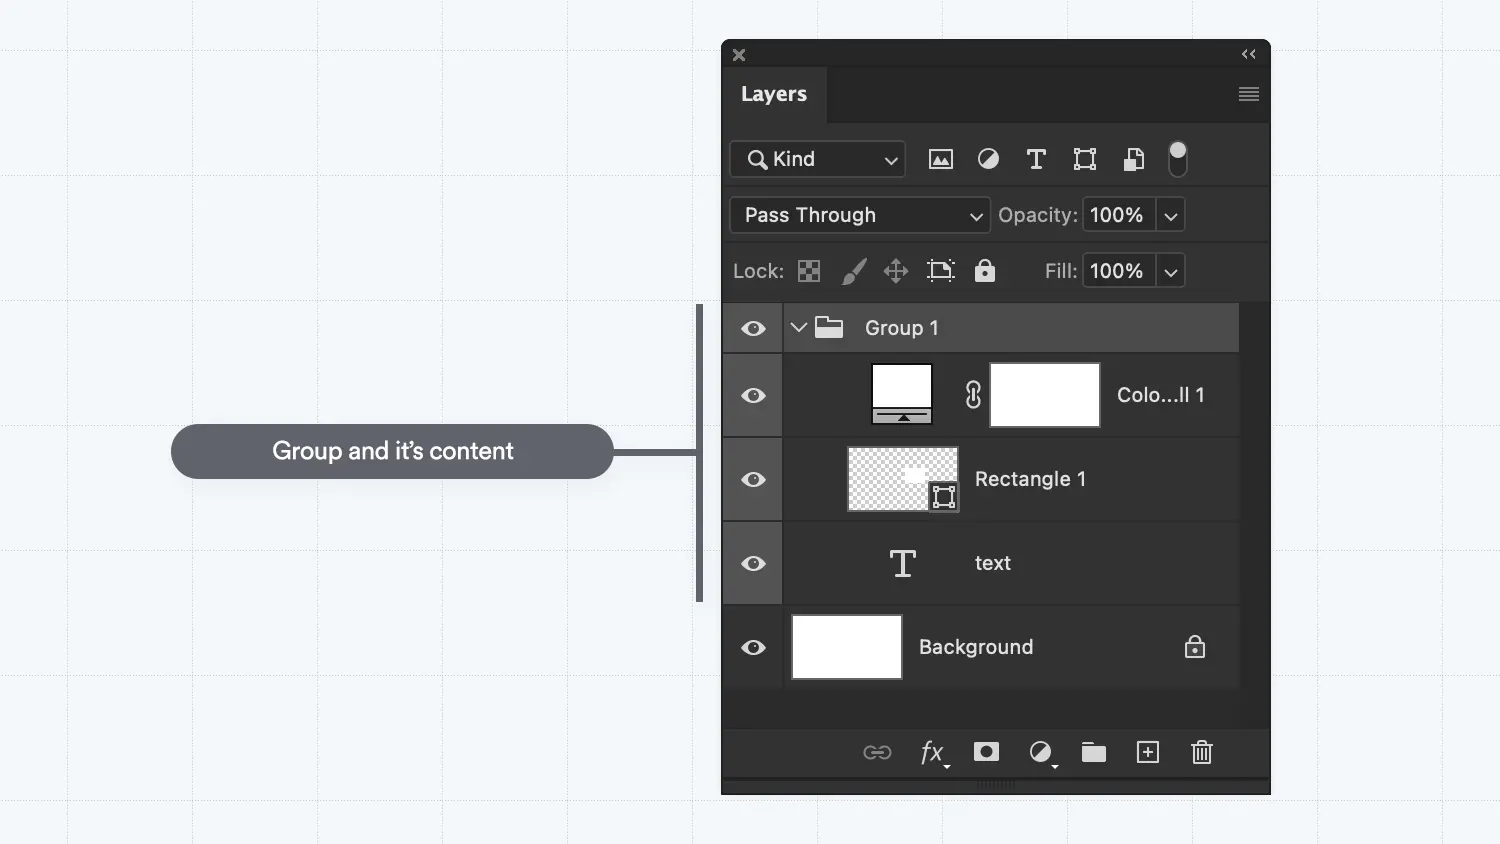
– Groups
Group Layers are another type of layer that can help you keep your project organized. You can group multiple layers together and apply effects or adjustments to the entire group, rather than to each layer individually.
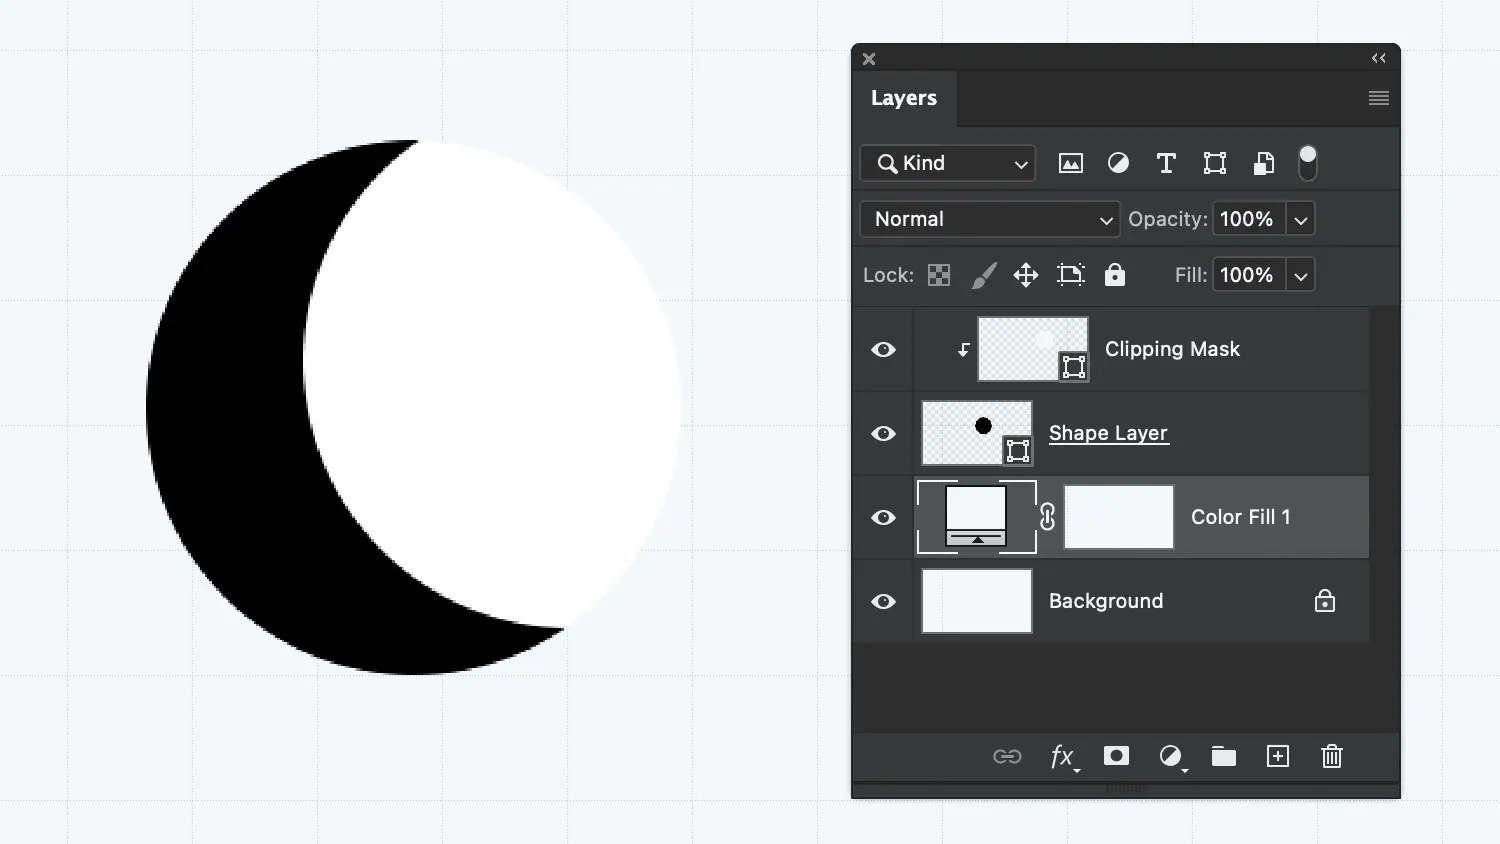
– Clipping Masks
Clipping Masks allow you to apply an adjustment or effect to a specific layer or a specific group, based on the content of another layer. The content of the clipping mask layer will only be visible in the layer it’s clipped to.
This is particularly useful for adding texture or color to specific parts of an image.
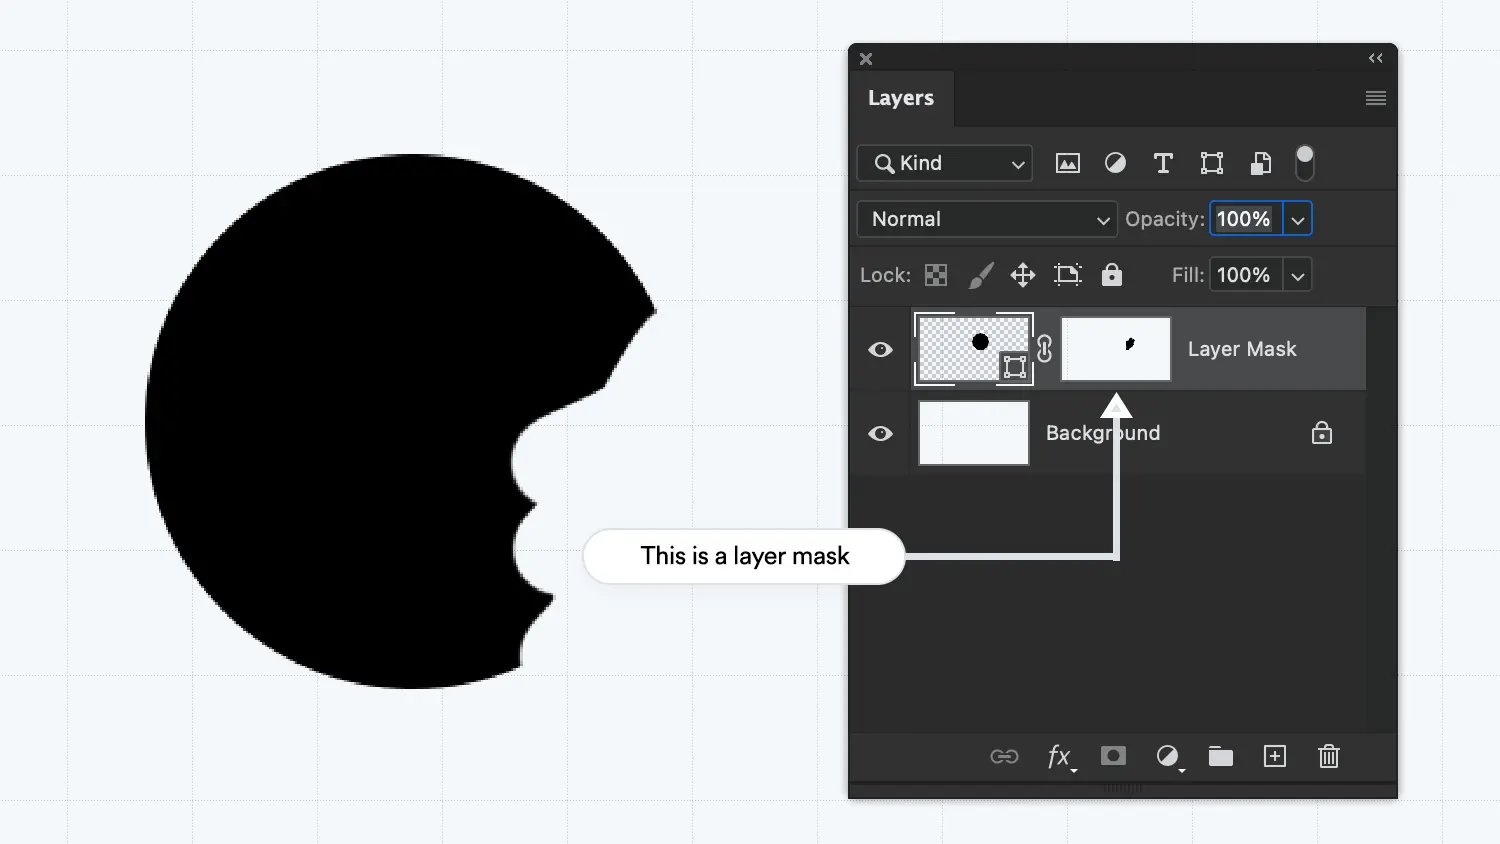
– Layer Masks
Layer masks allow you to hide or reveal parts of a layer, while fill layers, gradient layers, and pattern layers can add texture and dimension to your work And for photos, layer masks let you apply non-destructive edits, keeping your original image intact while you experiment with different effects.
You can paint directly inside of a layer mask, make selections, and more.
layer masks are always black and white, white reveals and black conceals, so if you want to hide part of an image, you fill that area with black and vice versa.
Quick Tip:
To fill a layer mask with background color use cmd ⌘ + delete (mac) or Shift ⇧ + b space (win).
To fill it with foreground color use option ⌥ + delete (mac) or alt + B space (win).
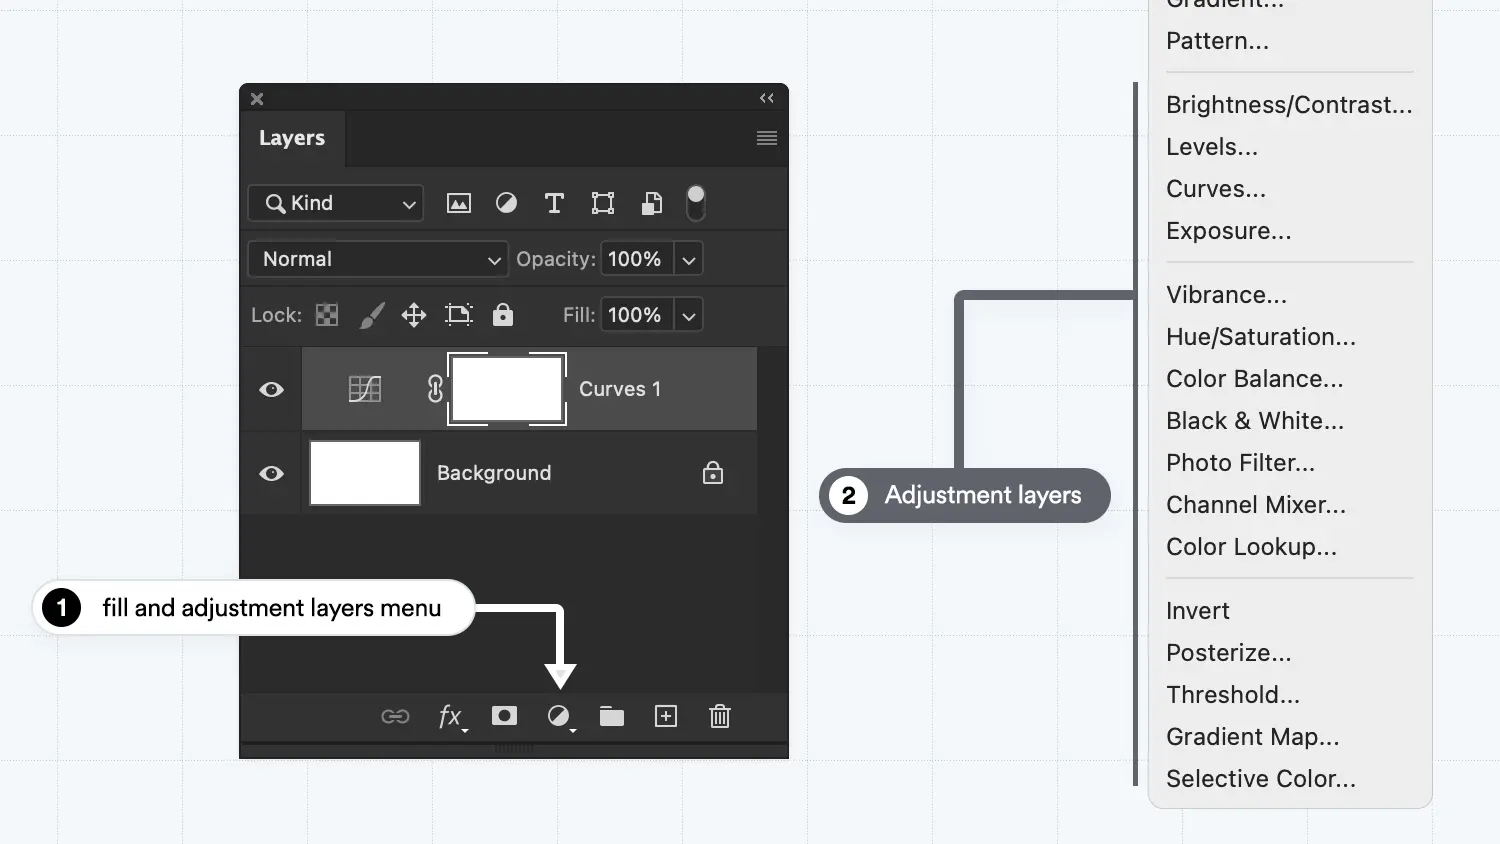
– Adjustment Layers
Rather than applying edits directly to your images or layers, you can use adjustment layers to create a separate layer that affects all the layers beneath it.
This means that you can easily experiment with different adjustments and settings without permanently altering your original artwork.
Adjustment layers can be used to change color balance, brightness and contrast, hue and saturation, levels, curves, and more.
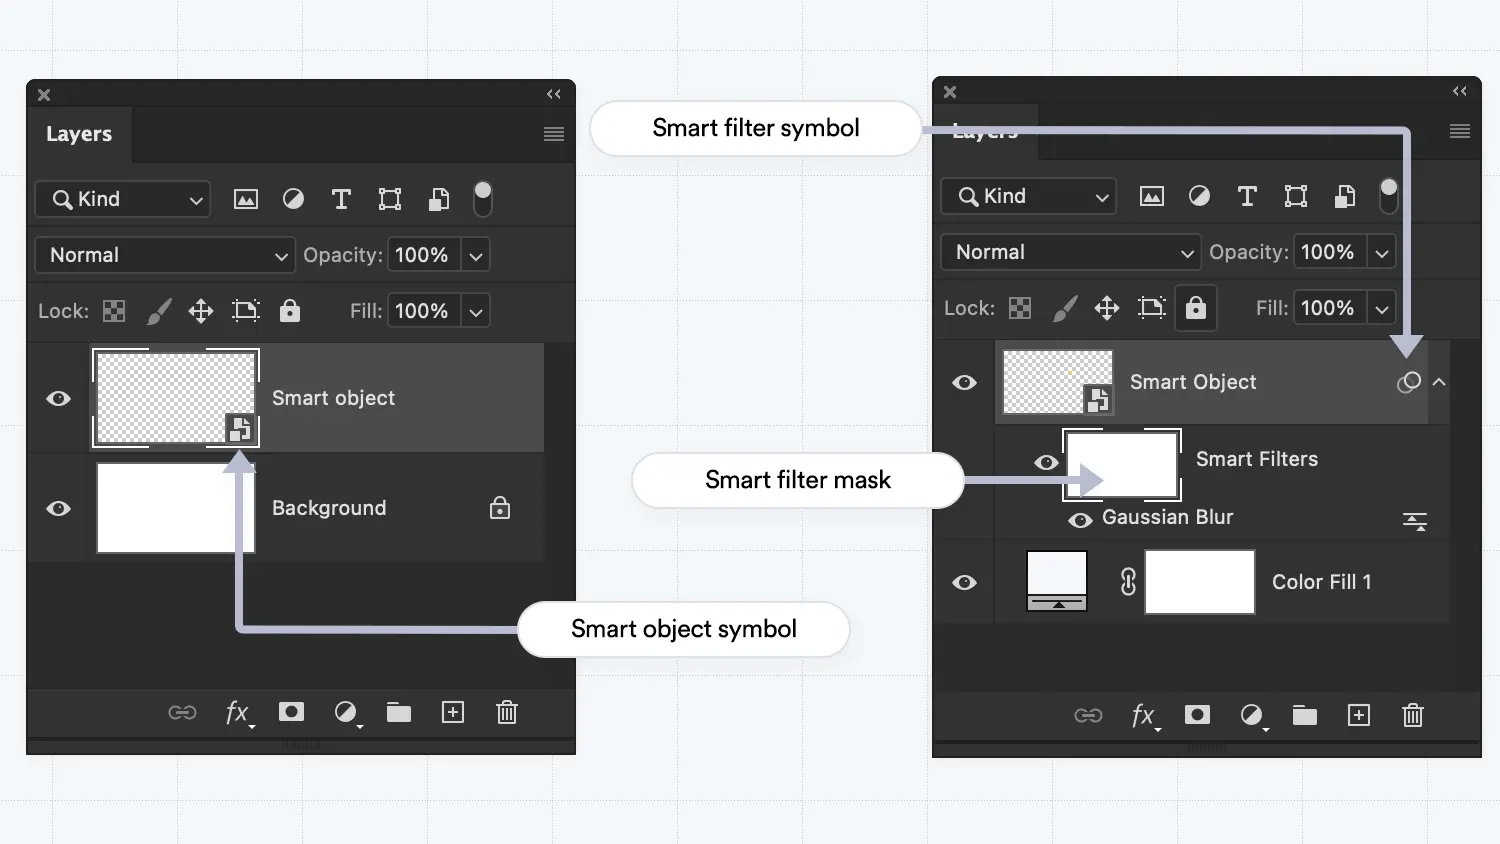
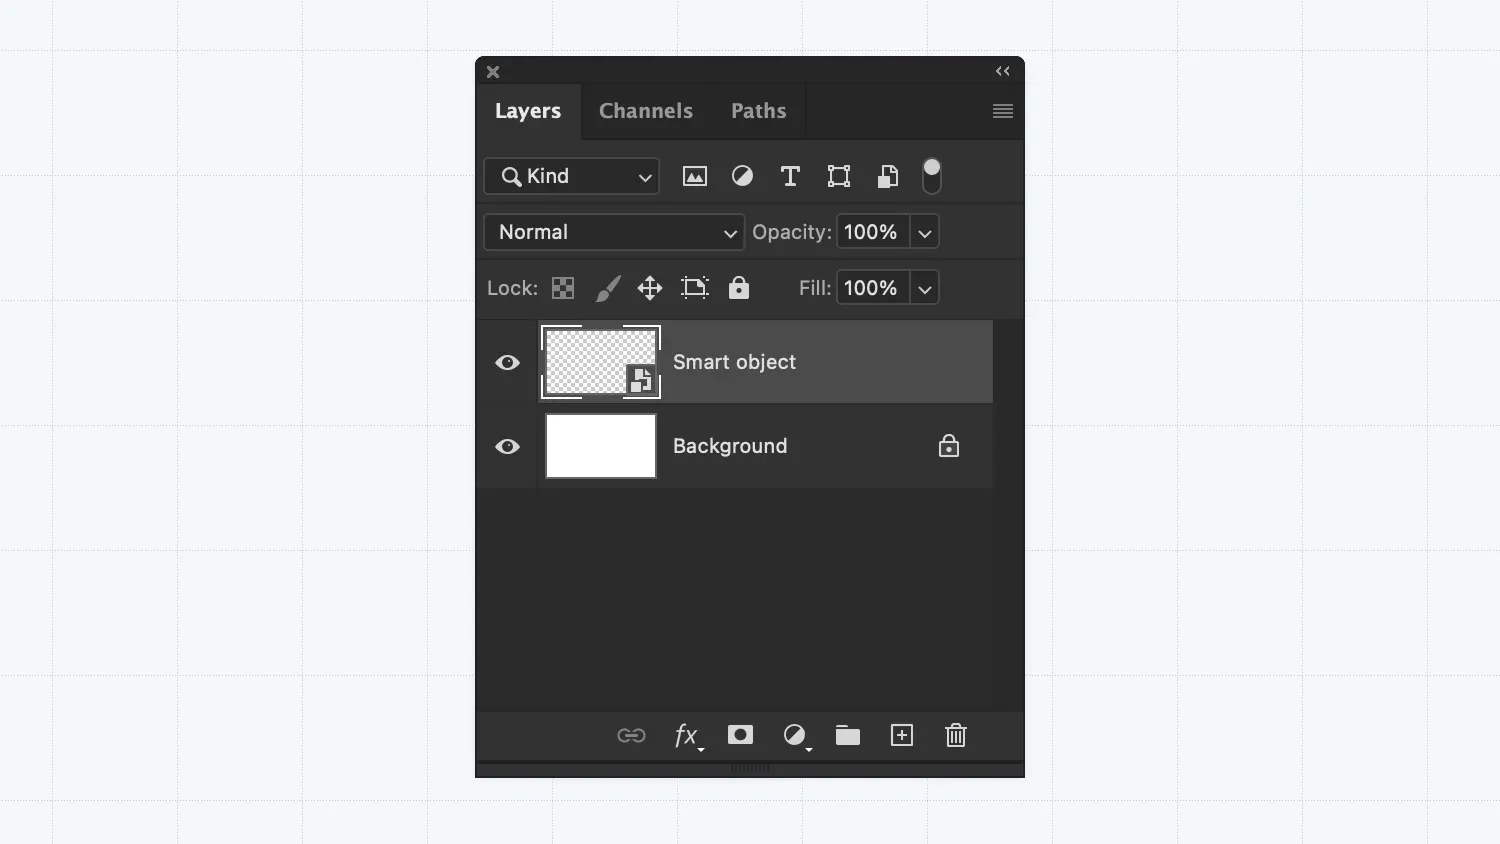
– Smart Objects
Similar to how adjustment layers work, smart objects allow you to apply filters (from the filter menu) directly to a smart object layer as smart filters. Smart filters are attached directly to the smart object layer and they can be turned on and off or deleted at any time.
This allows you to make non-destructive changes to your image at any time without affecting the original image file.
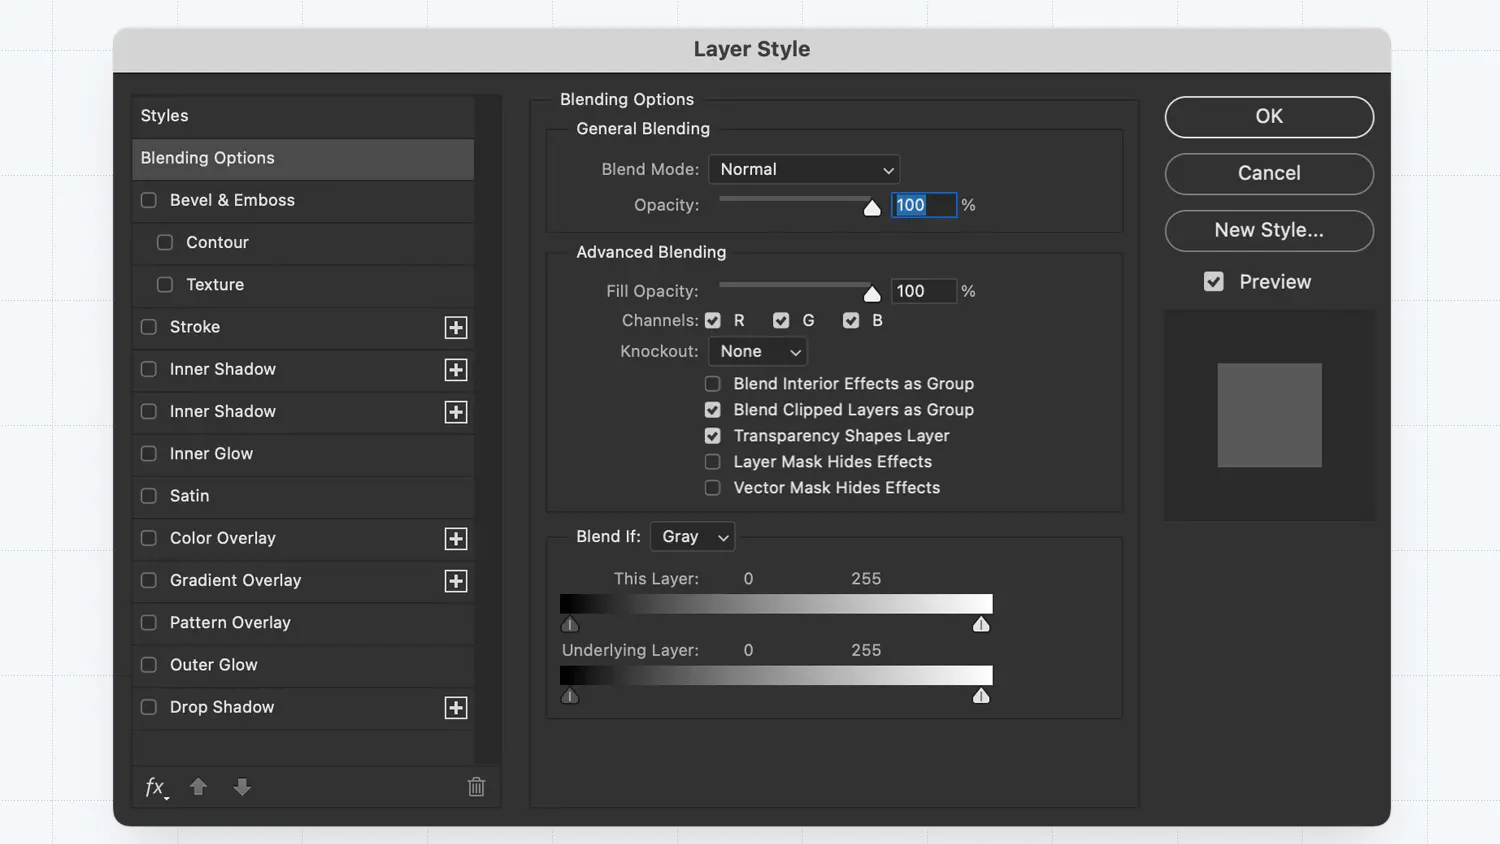
– Layer Styles
Layer styles consist of a variety of modifiable effects that can be applied to layers in Photoshop. These effects, such as drop shadows, bevels, glows, and more, enable designers to add depth, texture, and visual appeal to their designs.
layer styles are non-destructive which allows you to experiment with various design elements without permanently changing the original layer, simplifying the process of refining your work and achieving the ideal appearance.
One of the key benefits of layer styles is their customizability. Each effect includes a set of customizable parameters, allowing you to modify the effect’s appearance.
For instance, when adding a drop shadow, you can adjust the angle, distance, size, and opacity to achieve the desired depth and intensity.
Quick Tip:
To open the Layer Style dialog box, simply double-click on a layer in the Layers panel or right-click on a layer and select “Blending Options” From this point, you can choose the preferred effect and fine-tune its settings according to your preferences.
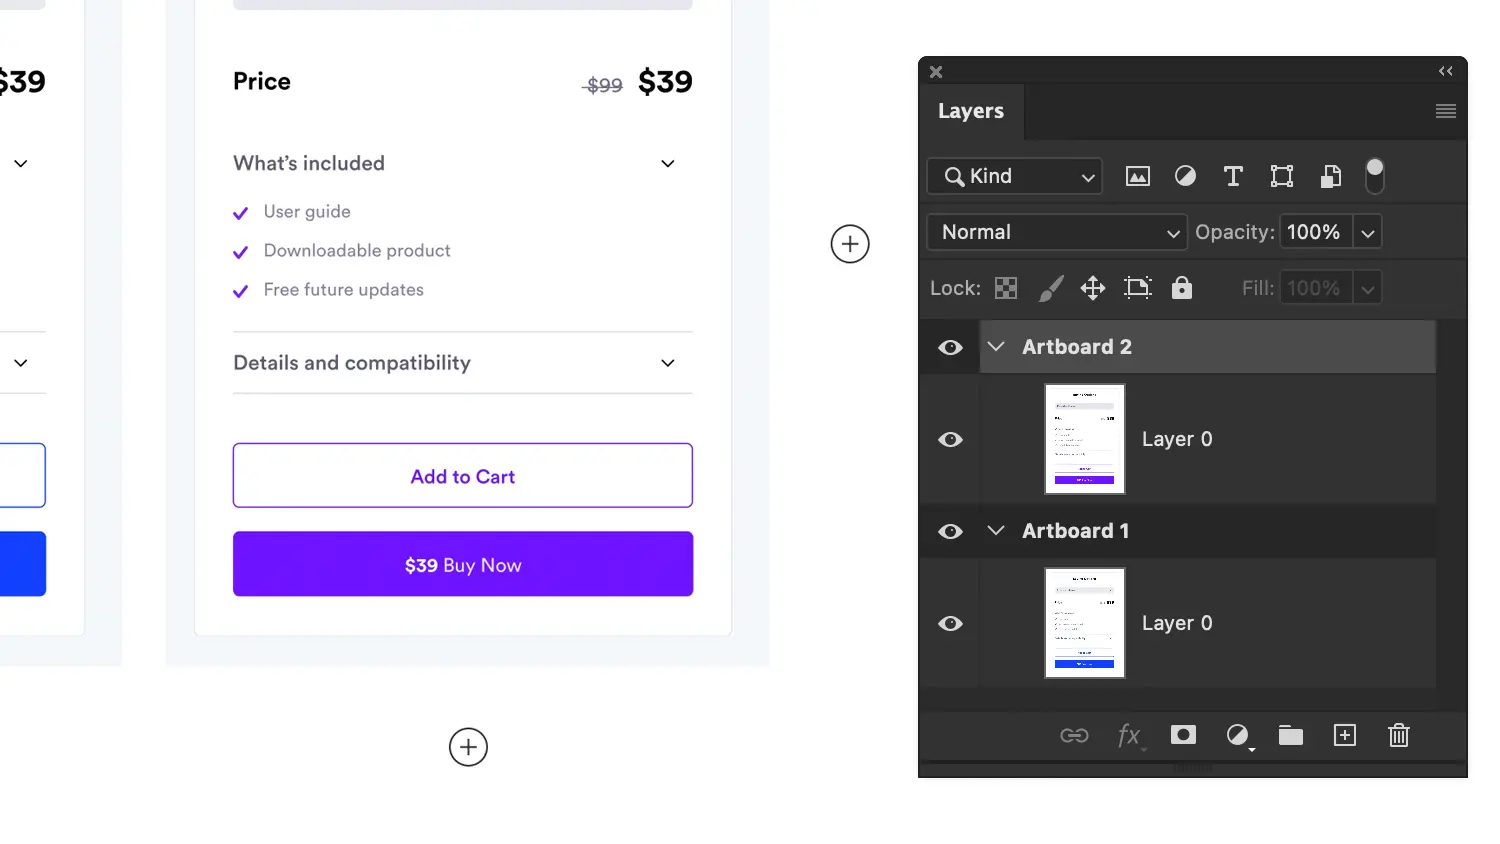
– Artboards
Last but not least, Artboards are a special type of layer that is used to create multiple designs on different canvases within a single Photoshop document.
This is particularly useful for creating different versions of a design or for designing multiple elements for a project.
understanding the different types of layers in Photoshop is crucial for creating dynamic and engaging designs.
With the right combination of layer types and effects, you can take your designs to the next level and truly make them your own.
The Ultimate Brush Bundle
Supercharge Your Editing With Brush Presets
High-quality brushes that will help you edit images faster and create special effects with one click.
Creating and Managing Layers in The Layers Panel
Now that we’ve covered the basics of what layers are and some of the different types available, let’s look at how you can work with layers in Photoshop.
The first thing you need to know is how to create and manage layers in Photoshop.
The Layers Panel
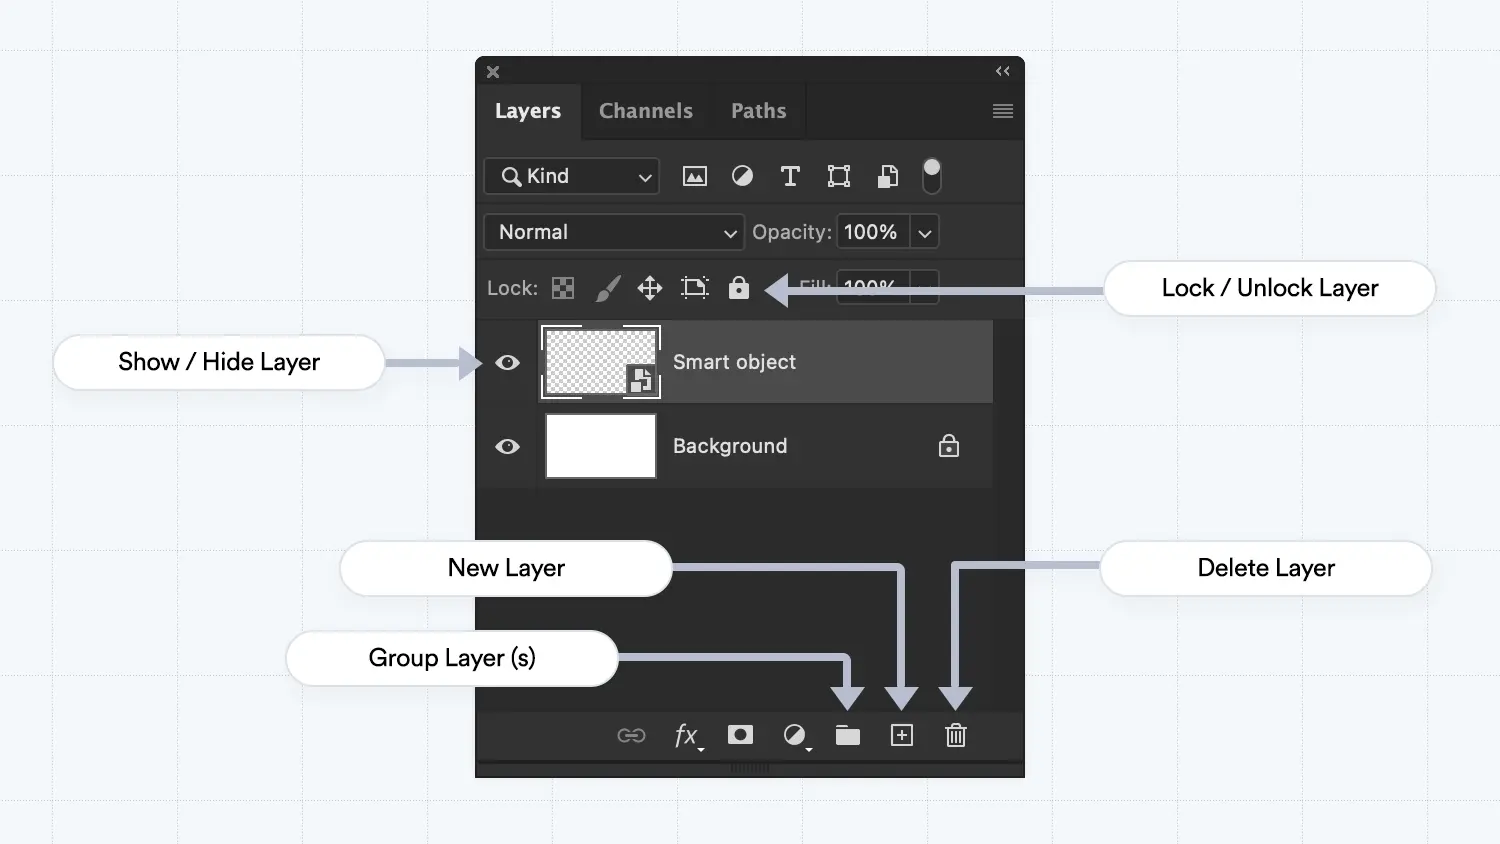
To access the Layers panel, go to Window > Layers or press F7 on your keyboard. The Layers panel shows all the layers in your document, as well as their names, thumbnails, visibility icons, lock icons, and blending modes.
Creating layers
To create a new layer, click on the “Create new layer” icon at the bottom of the Layers panel or press Ctrl + Shift ⇧ + N (win) or cmd ⌘ + Shift ⇧ + N (mac). A new layer will appear above the currently selected layer.
You can rename the layer by double-clicking on its name and typing a new one.
Quick Tip:
To create a new layer without the popup menu click on ctrl + alt + shift ⇧ + n (win) or cmd ⌘ + option ⌥ + shift ⇧ + n (Mac)
Deleting Layers
To delete a layer, select it and drag it to the trash icon at the bottom of the Layers panel or press Delete on your keyboard.
Duplicating Layers
To duplicate a layer, select it and drag it to the Create a new layer icon or press Ctrl + J (win) or cmd ⌘ + J (Mac).
Locking Layers
To lock a layer, click on the lock icon next to its name, This will prevent you from editing or moving the layer, To unlock it, click on the lock icon again.
Showing and hiding Layers
To hide a layer, click on the eye icon next to its name, This will make the layer invisible but not deleted, To show it again, click on the eye icon again.
The keyboard shortcut for hiding and showing a layer in Photoshop is cmd ⌘ + , (mac) or ctrl + , (win)
Grouping Layers
To group layers, select them and click on the Create a new group icon at the bottom of the Layers panel or press Ctrl + G (win) or cmd ⌘ + G (mac), This will create a folder that contains the selected layers, You can rename, delete, duplicate, lock, hide, and move the group as a whole.
Rearranging Layers
layers can be moved up and down inside the layers panel which is a crucial task that can help you organize your design elements and create the desired visual hierarchy you want.
To move a layer up or down in the layer stack, you can simply click and drag the layer to the desired position. multiple layers can also be moved together.
The keyboard shortcuts for rearranging layers are Ctrl/cmd ⌘ + [ to move a layer (s) down, or Ctrl/cmd ⌘ + ] to move a layer up.
These shortcuts can save you time and effort when working with multiple layers in your design.
Additionally, you can use the Layer > Arrange menu to access more advanced layer arrangement options, such as bringing a layer to the front or sending it to the back of the layer stack.
Layer organization and management tips
Keeping track of layers can be a daunting task, especially when working with multiple layers in Photoshop. However, these layer organizing and management techniques will help you stay on top of your layers and keep them organized.
- Name your layers
Naming your layers is crucial to saving you time and hassle in the long run. Unlabeled layers can easily be forgotten and lost, so make sure to give your layers descriptive names that can help you and your coworkers identify them later. - Use Groups
Groups are also an effective way to organize multiple layers. You can easily create a layer group by selecting the layers you want to group and pressing Ctrl/cmd ⌘ + G.
Naming your group and collapsing it will keep your layers panel tidy and easy to navigate. - Use Color Codes
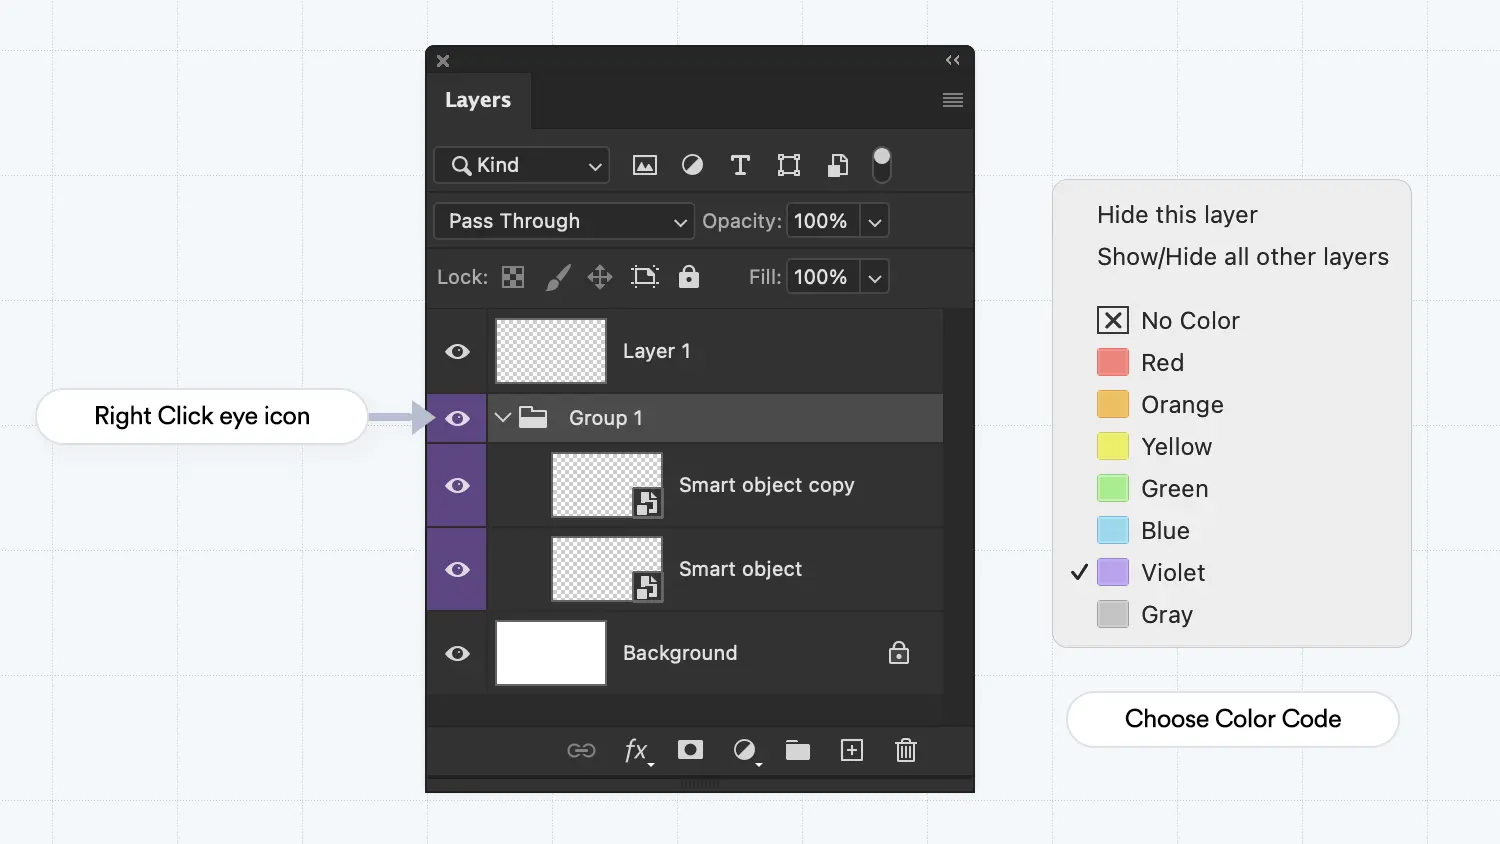
Color-coding your layers is a great way to stay organized, especially if you have multiple layers related to each other, Simply right-click on a layer and select a color to distinguish between different groups of layers.
To apply a color code to a group or layer, right-click on the eye icon and choose the color you want
- Work Non-destructively
Layer masks, smart objects, and adjustment layers can help you create non-destructive edits to a layer and avoid duplicate layers. They allow you to work with minimum layers, making it easy to keep your layers panel tidy. - Stay Organized
Arrange your layers logically, with the most important layers at the top and the least important at the bottom. This will make it easier to navigate through your layers and ensure that your document is organized.
Note:
By utilizing these layer management techniques, you can stay organized and keep your Photoshop documents easy to navigate.
With practice, these methods will become second nature, and you’ll be able to keep your layers organized without any hassle and your coworkers will thank you for it.
wrapping up
layers serve as an indispensable asset in Adobe Photoshop, enabling designers to effectively organize and handle design components.
By breaking down each element into separate layers, designers can make non-destructive modifications, implement effects, manipulate transparency, and determine the layer order, all while crafting a distinct appearance for their project. Various layer types are available for you to express your creativity, and add depth and a personal touch to your creations.
By becoming skilled in managing and creating layers through the Layers panel, you can produce breathtaking designs that set you apart from others.
So don’t be intimidated by Photoshop anymore – give layers a try and see how they can transform your designs.
Thank you for reading till the end, this article is part of the Photoshop Basics tutorial series, check out my guide on Photoshop Blending Modes next to level up your Photoshop skills.


4 thoughts on “Photoshop Layers Explained: A Comprehensive Guide for Beginners”
When we say a layer is a transparent sheet, does the layer itself have no physical size or substance? Objects in a layer can exist outside of the canvas size, so don’t layers also have a physical size?
Why is it called resizing or moving a layer when resizing or moving the contents of the layer, not the layer itself?
If there are no objects in the layer, the size of the layer is 0. If there are objects, is the size of the objects the size of the layer?
As a Photoshop beginner, I can understand the functional aspects of layers, but I don’t understand some of the technical properties of layers.
Thank you for the detailed tutorial.
Thank you for the great explanation!
Hi Rabii,
Keep up the good work, your tutorials are clear and intuitive, as a reluctant Ps user who prefers shooting to post-production your explanations and basic Ps tutorials really help.
Thank you for your positive feedback! I’m happy to hear that my tutorials have been clear and intuitive for you.
Keep shooting and enjoying your photography journey!