Learning how to Batch edit in Lightroom can definitely speed up your photo editing workflow and save you a lot of time, especially when you are working on multiple photos with the same theme, with a click of a button you can synchronize the same look across all your images.
In this tutorial, you will learn how to quickly batch edit multiple photos in lightroom at the same time and step up your editing workflow using the quick develop panel and Lightroom presets.
If you don’t have lightroom presets, i’ll also show you other methods to batch edit not only in lightroom classic CC, but also in lightroom cc (the cloud version) and in the Lightroom Mobile app as well
Let’s get into it.
1 – How to apply a preset to multiple photos in Lightroom Classic
Step 1: import all images to the library tab
here we are in Lightroom Classic CC, I have imported a few images in my timeline here, and I want to apply a warm fall look to all of them, we can easily achieve that in the quick develop panel.

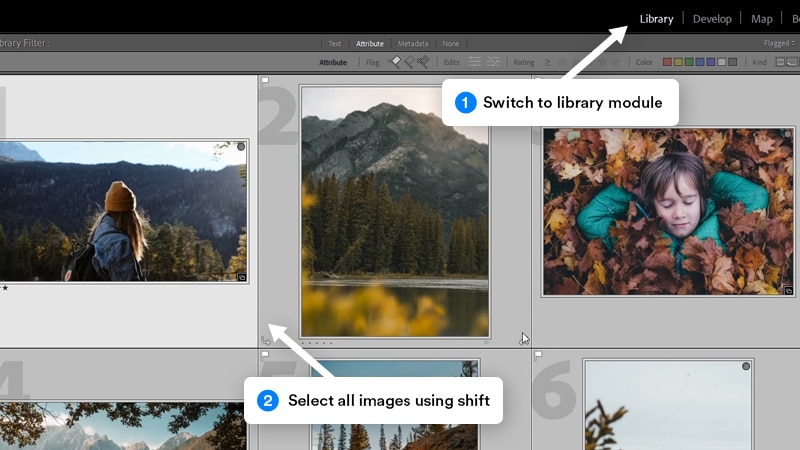
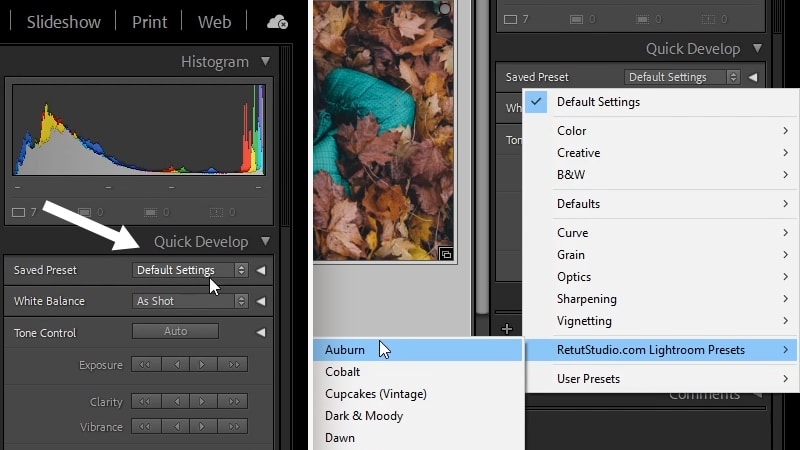
So to access the quick develop panel, first, make sure you are in the library tab, by clicking on “library” from the top bar
Step 2: Select all images
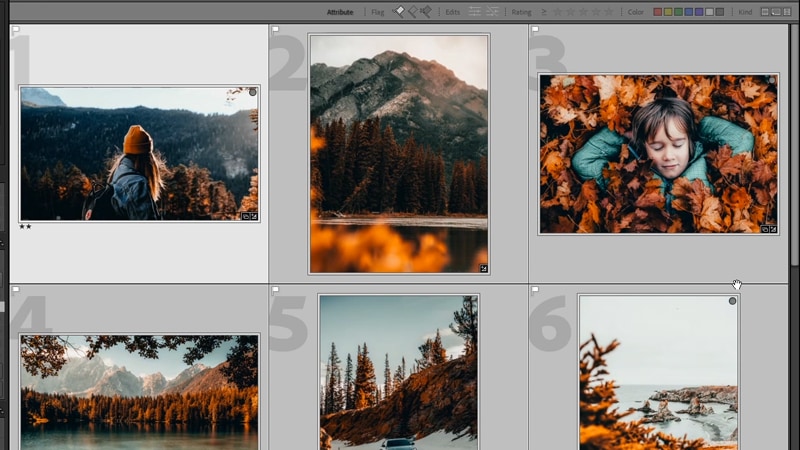
select the first one, Then hold shift and select the last one.
Step 3: Apply a preset from the quick develop panel
Now to apply a preset to all selected images, go to the “quick develop” section on the right side, then under “saved preset” click on the dropdown, in my case I’m going to scroll down all the way to my Lightroom presets folder, And I’m going to click to apply the preset “Auburn” from my Lightroom Presets Pack, which will apply a nice warm fall look to all of the images.
So as you can see, the preset was applied to all of them at the same time, and it was very fast and easy to do, all the images now have the same develop settings and they all look cohesive and share the same look.
Quick tip:
To reset multiple photos in Lightroom, make sure you are in the library tab, select all photos you want to reset then hold CTRL + SHIFT + R (Win) or CMD ⌘ + SHIFT ⇧ + R (Mac)
So that was how you can easily batch edit multiple images with almost one click, if you have Lightroom presets,
but if you don’t have Lightroom presets already installed, or you have been already editing an image and you want to apply that same look to the rest of the images, let me show you how you can also do that without using Lightroom presets.
2 – how to batch edit in lightroom classic cc (without presets)
So let’s say you have been editing an image, and you like the edit and you want to apply it to the rest of the images.
Step 1: Select your reference image
To apply develop settings to multiple images, you need to go to the library tab, then select the image that has the develop settings first, and then hold shift or ctrl/Cmd if you want to select each image individually and select the rest of the images
now, because the image with the develop settings is selected first, this one is now the main reference image, and you can tell because it’s more highlighted than the other images
Step 2: use the sync settings button
and now all you have to do is to click on the “sync settings” button on the bottom right-hand side
a pop-up will come out, you’re going to check all the adjustments that you did in the develop module, if you are not sure, you can also check them all by clicking on the “check all” button and then click on “synchronize”.
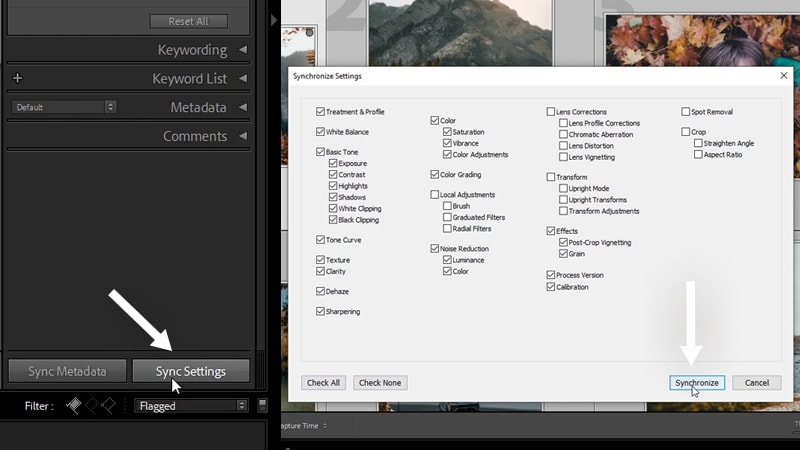
And now just like we did before all the images are now synched and they share the same Look,
this will save you a lot of time, especially when you’re editing a lot of images with a similar theme at once.
After you do this, you might need to do some adjustments to individual images, and you can do that easily by going back to the develop tab and make your changes from there to a single image.
3 – how to batch edit in lightroom cc
Batch editing in lightroom cc (the cloud version) is a bit different than lightroom classic, as of the time of writing this article, there is no “Quick Develop” panel or a “Sync Settings” button
You have to copy and paste develop settings between images and here is how to do it
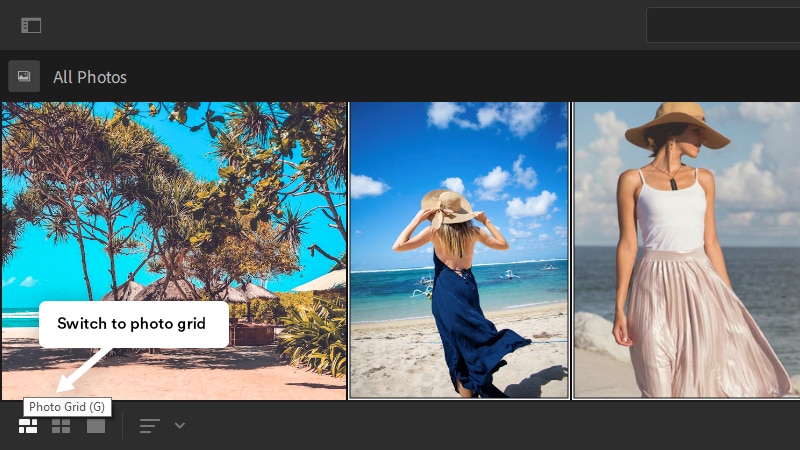
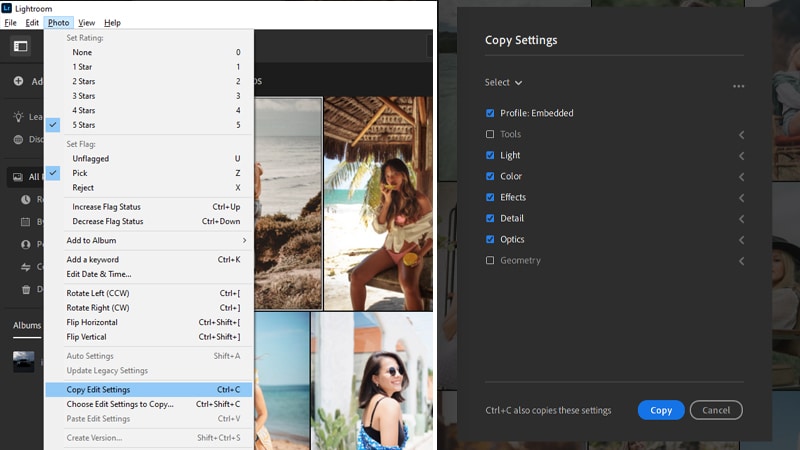
Once you are done editing an image in lightroom cc and you want to copy its settings to other images, first switch to “photo grid” or “square grid” using the bottom filter or using the shortcut G
Next, make sure the edited image is selected, then go to Photo > Copy edit settings or photo > Choose edit settings to copy if you want to only copy specific settings from that edit
You can also use the shortcuts Ctrl/Cmd + C and Ctrl/Cmd + Shift + C
If you choose option 2, a popup will come up, then you can pick the options you want
Once you copy the settings, you can now select all the images you want to batch edit and go to Photo > Paste edit settings or use the shortcut Ctrl/Cmd + V

And that’s how to batch edit in lightroom cc
Quick tip:
To reset a photo to its default settings in lightroom cc, you can use the keyboard shortcut SHIFT ⇧ + R (Reset Edits) or CTRL/CMD ⌘ + SHIFT ⇧ + R (Reset to open)
4 – how to apply a preset to multiple photos in lightroom cc?
Unfortunately, as i mentioned earlier, there is no quick develop panel in lightroom cc to use to quickly apply a preset to multiple photos but you can apply a preset to a single image, then you can copy and paste the develop settings to multiple images just like i showed you before
To apply a preset in lightroom cc, open up the “edit” panel E , then click on “presets” at the bottom to open the presets panel
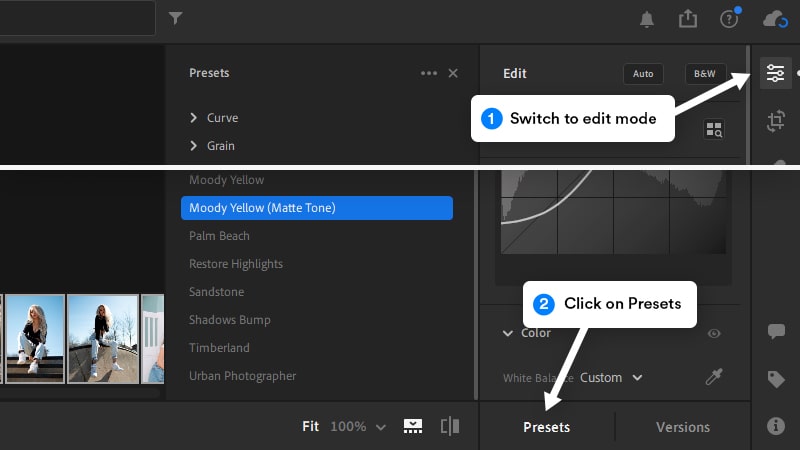
From here you can hover over any preset to see how it’s gonna look like on your image and click on it to apply it
And now to apply this preset to multiple images, you are gonna follow the same steps above to copy and paste the preset settings to all images
5 – how to batch edit in Lightroom Mobile
The batch editing process in lightroom mobile is pretty much the same as lightroom cc, you need to copy and paste develop settings as there is no “quick develop” or “sync settings” options
same thing for presets if you want to apply a preset to multiple photos in Lightroom mobile and the process goes as follows
You need to edit your image first or apply a preset by opening an image, then scroll all the way to the right and click on “presets”
Form here the process is simple, click on the drop-down to select your presets folder, and then click on any preset to apply it

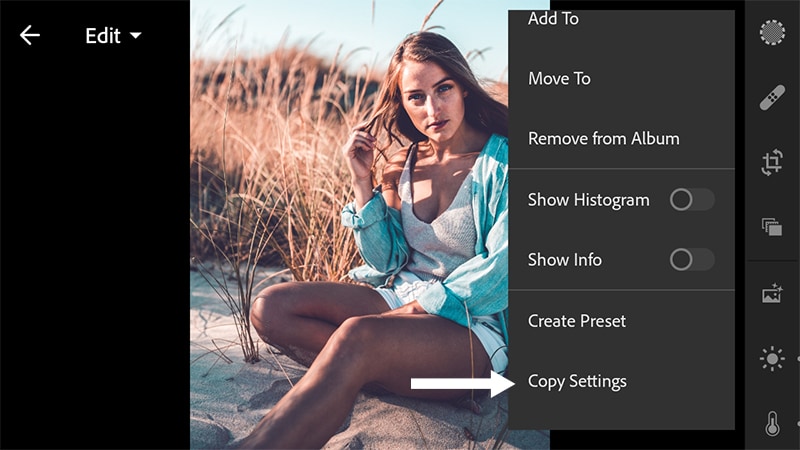
Once you are done editing you can now copy your edit settings to other images by clicking on the 3 dots menu at the top right corner, then choose “copy settings”
Now go back to your image folder, then select all images you want to batch edit, Click on the 3 dot menu again, and choose “Paste Settings”
Now all images will be edited with the same settings and will look cohesive

If you want to export the images, select them all, then click on the share icon and you will have the option to share to your device or to social media
So that’s how you can easily batch edit multiple images in Lightroom. Let me know in the comments below, if you find any of these tips helpful, make sure to subscribe to my youtube channel If you want to learn more about Photoshop and Lightroom.
Other than that, I hope you guys find this tutorial helpful, thank you so much for reading and I’ll see you in the next tutorial. ✌