Using an animated GIF is a great way to showcase your work and show the building process of it and that’s what i’m going to show you today, you’ll learn How to make a GIF animation in Photoshop by discovering how to use the timeline frame animation feature to create looping GIFs
In the following tutorial on making an animated GIF, i’ll be using the 2018 version of Photoshop, but the steps should be similar in other versions.
Watch the video tutorial
How to make an animated GIF in Photoshop
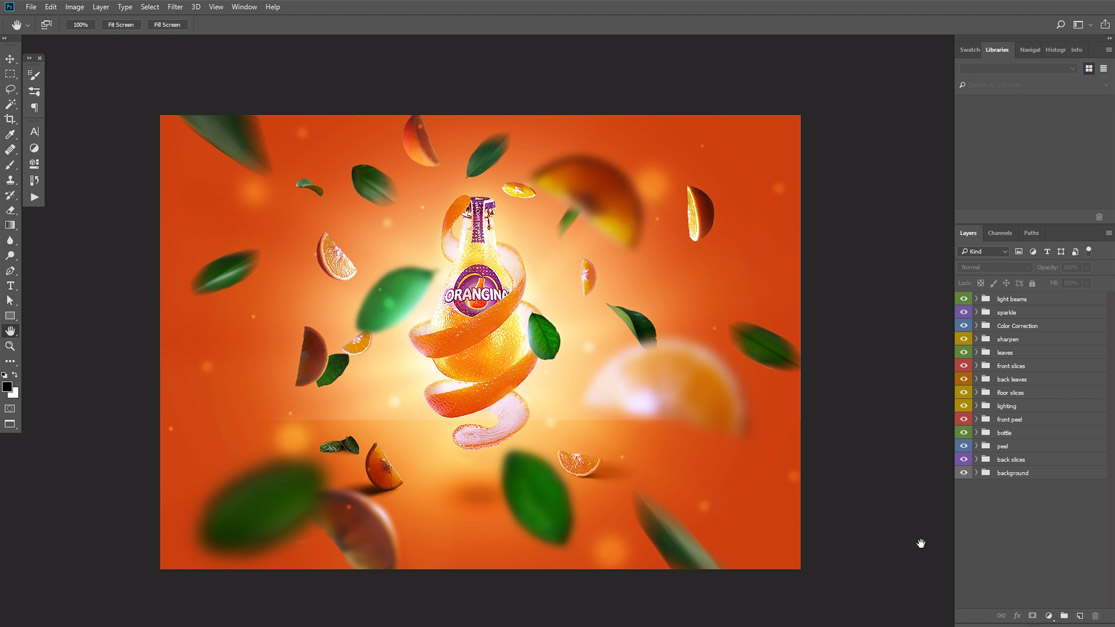
So this is the image that you were going to be working on, this is from a project that I did a while ago, if you wanna learn more about how I created this image click here
so what we’re going to do is create an looping GIF animation that shows the process of putting together this image from the start to the end, and to learn How to make a GIF animation in Photoshop, we need to first show the timeline by going To window timeline
#1 – Create The Frame Animation
first we need to create a frame animation by clicking on the create frame animation button and it will create the first frame for us, now yours might say create video timeline change it from the drop down to create Frame animation
How to make a GIF animation in Photoshop
so this frame represents what is visible in the layers panel and what you see on the canvas
and if I make a change in the layers panel and hide all the groups you can see it updates in the first frame and basically what I want to do is hide everything and start from the very beginning and create the first frame
next I’m going to click on the new frame button to create a new frame then I’ll make my change for the next step by showing the next layer or layer style and you can see it updates in the selected frame which is the second one , you can also click on the frame to see how it looks , im going to create another frame again and make my changes , and basically you need to repeat this process until you finish the composition
#2 – Work Faster With Keyboard Shortcuts
But If you have a large PSD that requires a lot of steps like this one it can be a tedious process of going back and forth with the mouse between clicking on the new frame button and making your changes in the layers panel that’s why I added a keyboard shortcut for create a new frame…that way I can go much faster and keep the mouse in the layers panel… and if you want to know how to add this keyboard shortcut go to edit keyboard shortcuts… How to make a GIF animation in Photoshop
then from the drop-down menu select the panels menu then go to the very bottom where you see timeline frames, new frame and you can see that I added the f8 shortcut for new frame
Select it and press the key that you want to add as a shortcut click okay to accept the changes…
and now I can just press f8 to add a new frame make my change, press f8 again to create a new frame and so on, and now i can go much faster
so now you’ll need to do the same thing and go through the rest of the layers and add the rest of the frames one by one until you finish the composition, and you can see that mine required 53 frames in total and now you can click on the play button to play the animation…
you can also change the looping options and set it to play once, three times or you can set a custom number by clicking on other, and in this case I want it to Loop forever so i’ll select forever
next you can change the delay between the frames from here in my case .2 seconds is good for me
but as you can see we have to change the delay of all of the frames and don’t worry if you forgot to change it from the very beginning because we can select the last frame hold shift and then click on the first one to select them all, and now when I change the delay to 0.2 seconds it updates all of them,
play it one last time to see your animation and make sure it is looping
#3 – Export Your Frame Animation as an Animated GIF
and now that the animation is complete it’s ready to be exported so go to file, export, save for web…
Quick tip
Resize your image before you go to the save for web menu because it will slow down Photoshop if you have a large file.
I’m going to resize it to 800 pixels.
first of all we need the format to be gif
next 256 is the preferred number of colors but you can reduce it do 128 or 64 if you want a very small file size
check transparency if you have transparent background but we don’t have any transparent pixels in this image, and definitely converted it to SRGB if you’re going to upload it to the web…
next choose your looping options, I’m going to change it to forever of course, and leave the quality to bicubic, you can also see the estimated file size at the bottom left corner while you are changing the settings before you save,
Now click on the preview button to see how your animated GIF looks like in a browser… you can also see the file information about the image at the bottom
and now when you are happy with the setting click the save button
alright that’s How to make a GIF animation in Photoshop, click here if you wanna learn more about how i created this image
