Learning how to match perspective in Photoshop is one of the most important aspects of compositing and if you don’t get it right from the beginning, your composite will not look realistic
in this tutorial, you will learn how to match perspective and scale the right way, you will learn the different types of perspectives and how to use them to combine and manipulate objects realistically.
I prepared a few examples for you today to demonstrate a few different scenarios and show you the different types of perspectives, make sure to download the tutorial images from the resources section above and follow along.
1 – Find and Match Horizon lines
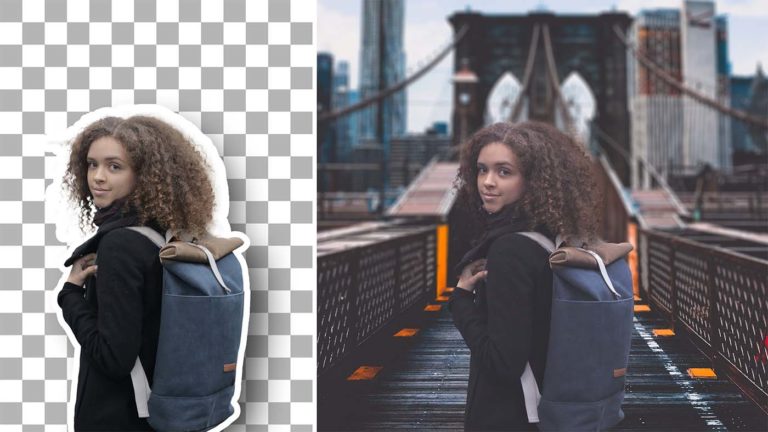
in this first example, we have the simple composite and we want to match the perspective of the subject with the background, So to make this composite look realistic, we have to match something that is called the horizon line.

A horizon line essentially is where the sky and the ground meet together, so if you look at the subject, you will see that the subject’s horizon line is way down, and to match its perspective and scale with the background, we simply need to move the subject and align its horizon line with the horizon line of the background
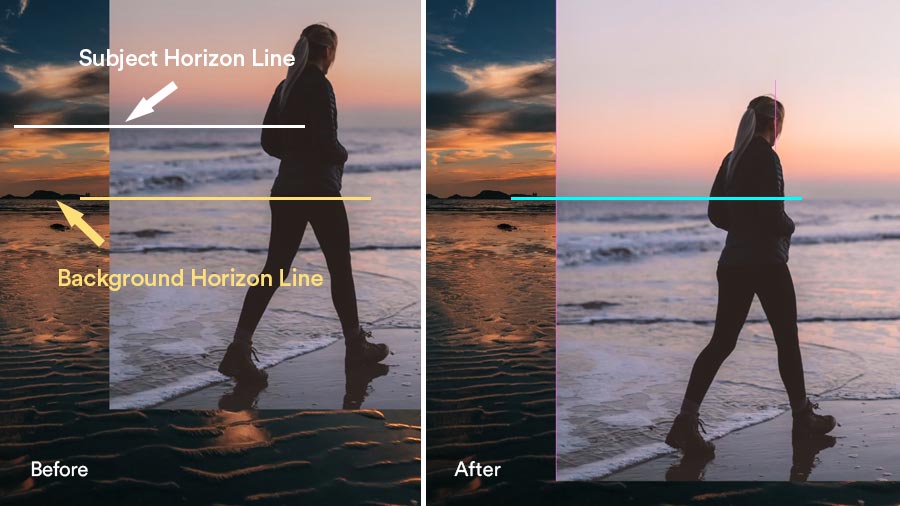
as you can see now, the subject is placed where it needs to be, and is now matching better with the background and it’s looking realistic.
if we drag it to the top, the subject is going to look like a giant. And also if we drag it to the bottom, it’s going to look really small.

So that’s the most basic way to match perspective in a composite, but there are a few more types of perspectives you need to know about
2 – Find and Match Vanishing Points
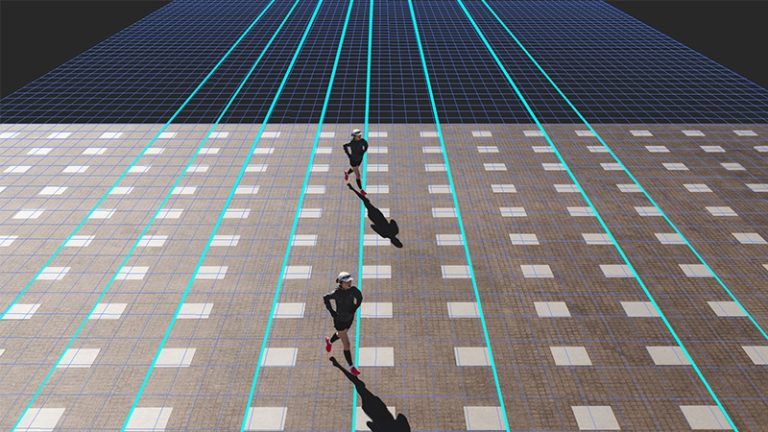
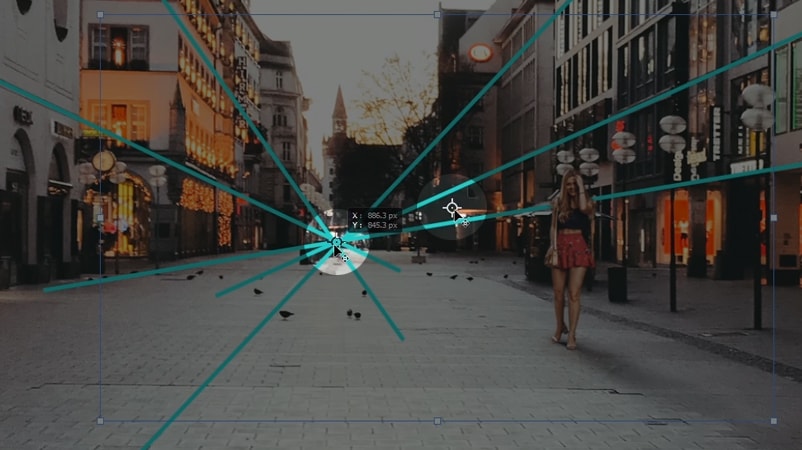
in this next example image, we have what’s called the one-point perspective
it’s called a one-point perspective because if you follow the leading lines in the buildings and in the street using the line tool, you’ll find that all the lines will meet at one point.
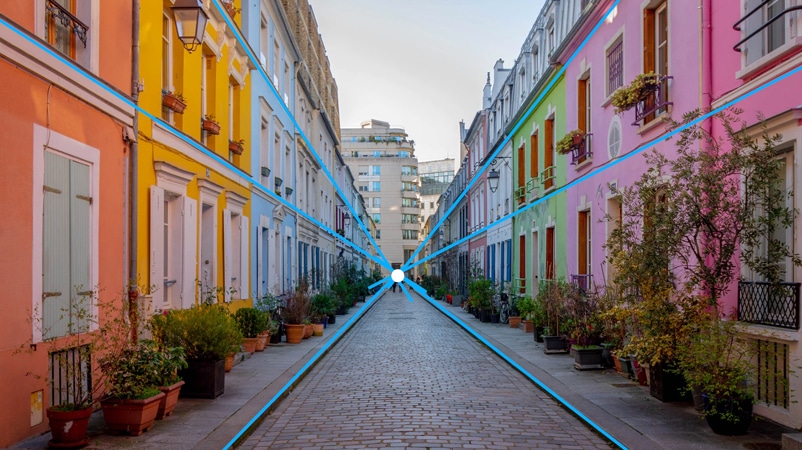
That point is called the vanishing point and the horizon line will be also be in that point.
So if you want to know how to put an image in perspective in photoshop and you can’t see the horizon line, you can use this technique to find the vanishing point and the horizon line and match it with your subject.
ok, now that you know what a one-point perspective is, let me show you how you can use it to match your subject with your background and do perspective transform in photoshop
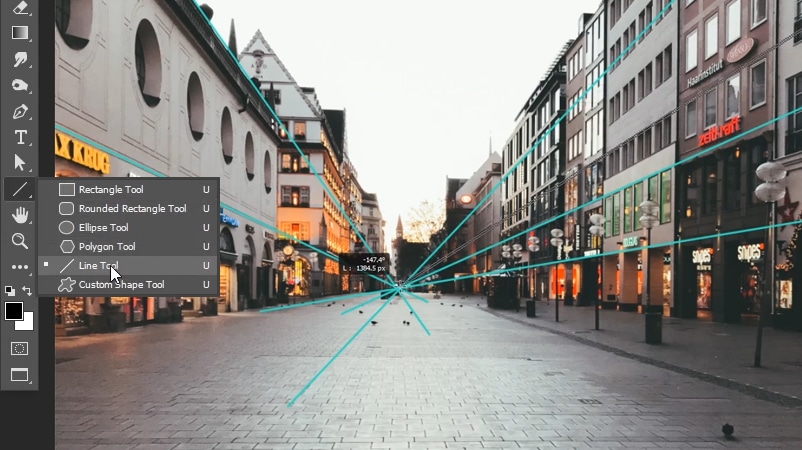
You can use the line tool to find the vanishing point, it is underneath the rectangle tool, and you’re going to simply drow some lines and follow the leading lines in the walls to find the vanishing point of your background image
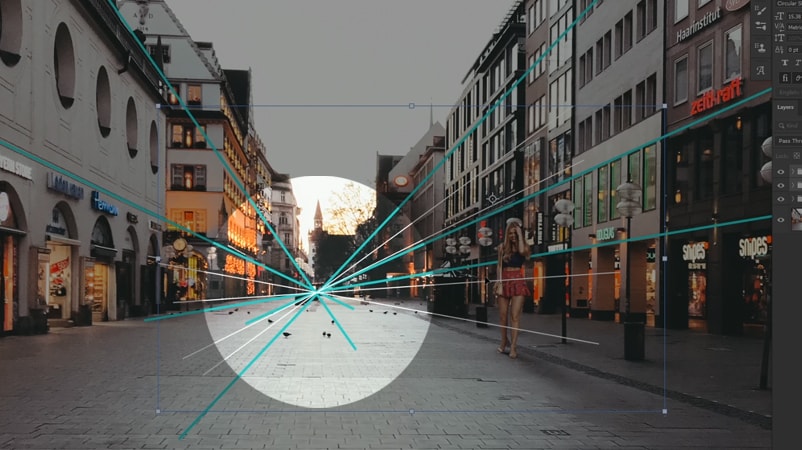
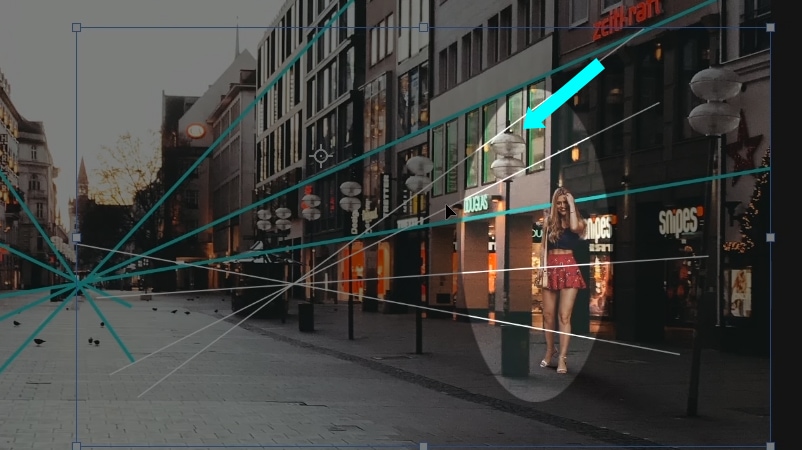
in this example, we also have the subject extracted from the background and we are going to do the same thing to find it’s vanishing point

Now that we know where are the vanishing points of both the subject and the background, let’s match the perspective of this subject with the background
first, you need to select both the subject and the lines you used to find the vanishing point, in my case I have them in a group
And now, all you need to do is match the vanishing point of the subject, which is the one with the white lines to the vanishing point of the background image
you can use the arrow keys to get them to match it exactly, And you can also use the shift key to move the subject left and right and keep the subject locked with the horizon line of the background.
Once you do this correctly, your subject will be in perspective, and the horizon line should be matching now
and when you follow this rule, your perspective will always be matching and your composite will look much more realistic, but you don’t have to follow this rule exactly how it is all the time.
Sometimes there will be room for error and in this case, even when i matched the vanishing points together, I can still feel that the subject is still a little bit big, Because in the original subject layer, the image was cropped out and I did not find much information to get an accurate vanishing point.
So in cases like this, you’re just going to analyze your background image and scale your subject based on the objects around it, So in this case, if I hold shift and move my subject to the right, You can see that it’s still a little bit big. And I know that because I’m comparing it to the street lamp and also the door of the store to the right
so we can still scale this subject down a little bit, And, and now when we compare the subject with the objects around it, it looks much better now.
So in this case, i had to move the vanishing point of the subject a little bit down and that’s okay, the vanishing points don’t need to be exactly aligned all the time.
3 – Scale Your Subject in Perspective
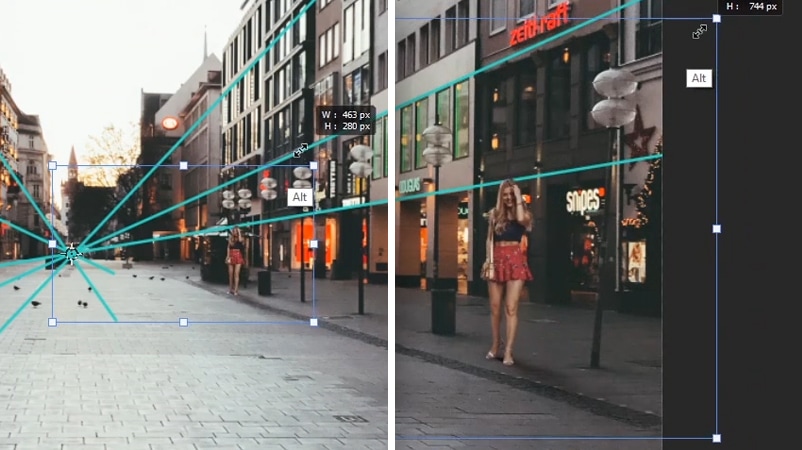
So now that we matched the scale by aligning the horizon lines, we can also match the perspective and scale our subject based on the vanishing point of the background.
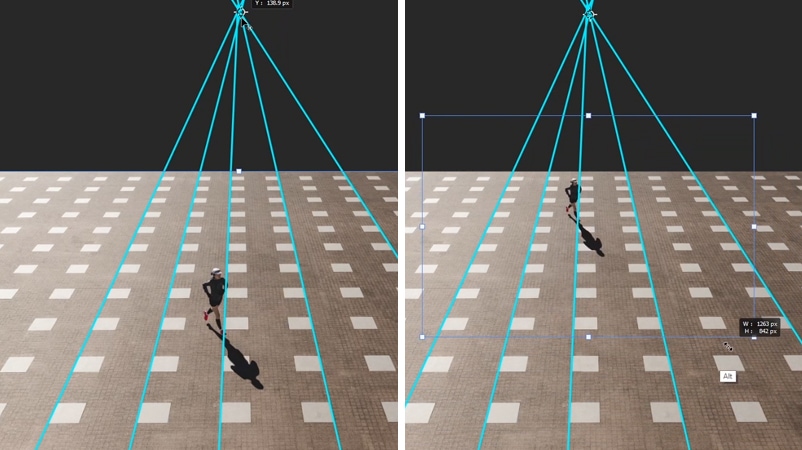
When you click on ctrl/cmd + T to transform the subject, you’ll see that there is an anchor point in the middle and you can move this anchor point wherever you want, and to scale the subject in perspective, you’re going to move that anchor point of the subject and align it with the vanishing point of the background.
And now if you hold alt or option when you’re scaling, you’ll see that the subject is scaling based on that vanishing point of the background image, And it’s following the perspective.
As you can see, when I scale the subject and compare it with the street lamp in the front, you will see that the perspective is still matching with the street lamps in the foreground even when i make the subject very small or very big.
It will always follow that perspective and it’s going to look right, no matter how much you scale it.
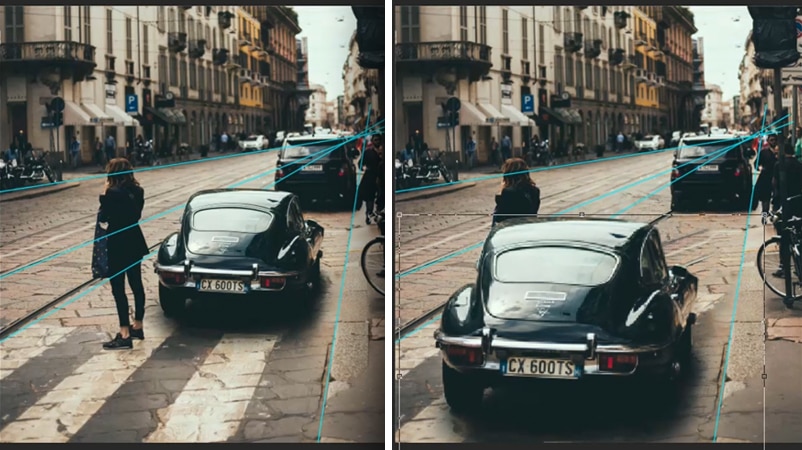
Here’s another example where you can use this technique to manipulate existing objects and scale them in perspective.
in this example, I extracted the car in the foreground along with its shadow, And I have them both in a group, and I also drew some lines to find the vanishing point.
Now if I click on Control + T to transform the car group and move the anchor point to the vanishing point, I can scale the car in perspective and make it look like it is in front of the girl.
And we don’t have to use this technique on street images, We can also use them in architectural images like in this next example,
for this example, I also have my subject extracted from the background and I also drew the lines to find the vanishing point. (how many times did i say vanishing point in this tutorial? 😄 )
So now if I scale my subject in perspective again, I can make it look like it is far away or closer to the camera.
And you’ll be able to see the scale better when we have some objects around the subject. So I’m going to make two copies of my subject, I’m going to scale them both in perspective and put one in the back, and one in the front
Now if I take another copy of the subject, and this time, im not going to scale it in perspective
You will see that if i drag it to the top, it’s going to look much bigger than it needs to be, And the same goes if I drag it to the front, you’ll see that the subject will look so small.
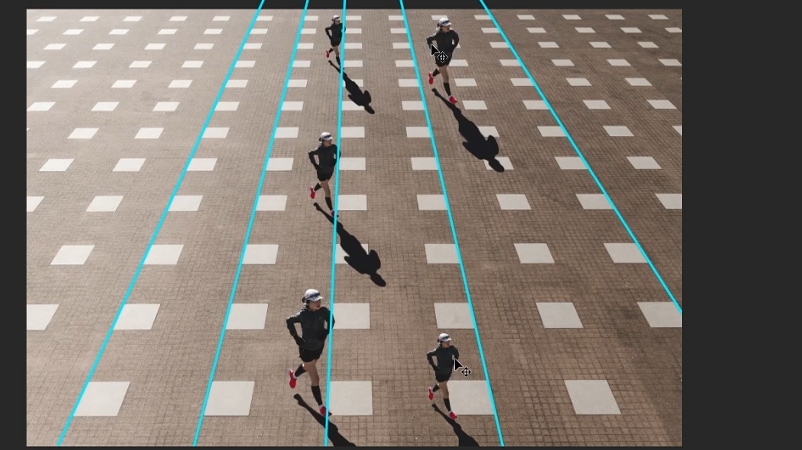
So always use this technique to scale your subject in perspective and make it look more realistic.
ok, now that I’ve shown you the different ways to match and scale your subject in perspective, there are also two other types of perspective,
and those are the two-point perspective and the three-point perspective, And basically, these will follow the same rules of the previous examples
but this time you have multiple vanishing points and you can scale your objects based on different vanishing points.
I have an in-depth article on my website where I talk about Photoshop compositing in-depth and I also talked about the different types of perspective, so make sure to check it out
Enroll in My Photoshop Compositing Course
you can also Enroll in my Photoshop Compositing course and learn how to apply the skills you just learned in a real world project along with other color and luminosity matching techniques
And that’s pretty much it for this tutorial.
When you understand this concept and use the technique that i showed you today, your compositing will look much more realistic
Thank you so much for reading the article and i will see you in the next one ✌