In this video, I’m gonna show you how to replace sky in photoshop, how to match the color and luminosity, and we are gonna dive into more advanced selection techniques to remove complex skies I’m gonna show you 3 different techniques with 3 different image scenarios to select and replace the sky
- Masterclass
Learn how to match any subject with any background
Discover the secret Techniques to creating realistic composites in photoshop
Hey guys and welcome to another photoshop tutorial, this is rabii from retutstudio.com and in this video, I’m gonna show you 3 different techniques with 3 different image scenarios to select and replace the sky
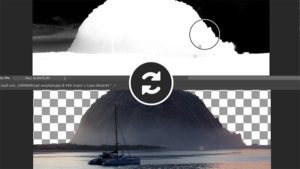
So We are gonna start with the first example here, we have a landscape image and let’s say you are making a composite and you wanna replace the sky,
So the easiest way to remove the background of this type of image is by using something like the quick selection tool, and I’m just gonna use it to maks a selection around the mountain here and because we have a contrast between the mountains and the sky, it gonna automatically detect the edges and finish the selection for us
Now you can hit q on your keyboard to enter the quick mask mode and that’s gonna give you a better view of your selection, the red area is the area that is not selected and you can see here that some of the trees were missing by the selection and that’s ok, we can fix that later
So I’m just gonna hit q again to go back to the selection, and I’m gonna hold alt and click on the layer mask icon to create an inverted layer mask, you can see that I have my background that I’m gonna use underneath my image and right now the color and the luminosity are not matching, I’m gonna fix that in a little bit, but first we need to refine the layer mask a little bit more
So I’m gonna create a solid color underneath the image so we can see the mask a little bit better, and we are gonna need to remove the fringing on this area
So what we can now is first making sure the layer mask is selected, and in the properties panel, click on the select and mask button, and from here it’s very simple you are gonna take the refine edge tool and you gonna paint on the edge to restore some of the background and remove that fringe, we also need to clean this area on the left side and we are gonna do the same thing and this time with a smaller brush size
Alright it looks like the layer mask is clean enough, now we need to apply the changes, so I’m gonna make sure the output is set to layer mask and I’m gonna click ok
So now let’s turn the background image back on again, and we are gonna need to match them together, so because the mountains in the background are further away, they need to be much lighter
So let’s fix the luminosity first by creating a levels adj layer on top of it, and I’m just gonna make the darks less dark, then brighten the midtones a little bit, so you need to pay attention to the edges of the mountains here, there is a little bit of fringing from the original background and we need to match that, so I’m gonna keep on increasing the light until it matches
Alright that looks good, now we need to match the color and I’m gonna add a color balance adj layer and basically I need to add more cyan and blue, we need to do that also in the shadows, and in the highlight, I’m gonna keep it subtle
So because I was focusing too much on the mountains now the sky is blown out so I’m just gonna take the brush tool and with a white foreground selected I’m gonna restore some of the details in the clouds, alright so this is before, and this is after
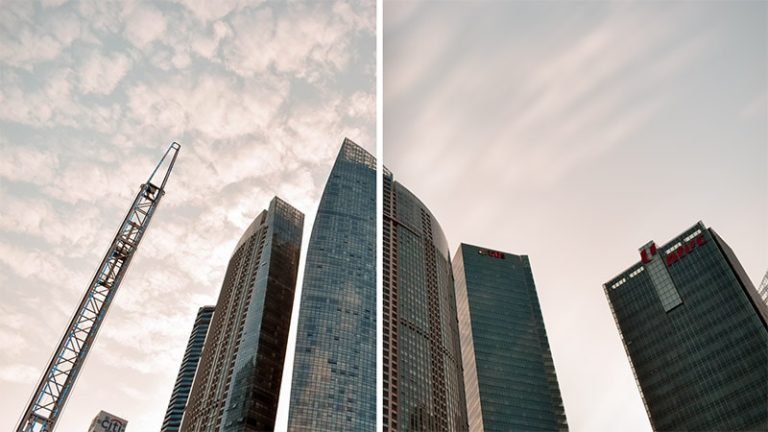
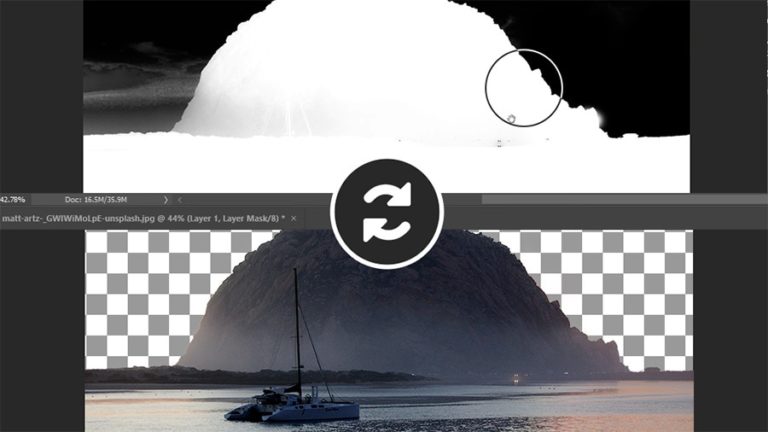
Alright so let’s move on to the next example, and this time we have an image that is a little bit more complicated, so if I were to use the quick selection tool and try to make a selection of the sky, and then I’m gonna hit q to see the selection you will see that some parts of the buildings are not selected and it’s gonna be hard to select those areas
So I will cancel that and deselect and gonna show you a better way to make an accurate selection and that’s by using blend if, so to access blend if, double click on the layer to bring the layer style dialogue box and you will see blend if at the bottom
So looking at our image we can see there is a lot of orange in the background and there is a good contrast between the building and the sky, and we can use that to make a selection, so in the blend, if options we are gonna change it from grey to red, and now you are gonna drag the right slider to the left side to hide that orange from the image and by doing so we are basically removing the background
You don’t have to worry about this are here in the sea, we can always bring that back with a layer mask, we need to focus on the edges of the buildings and be careful not to destroy it, you can also hold alt to split the slider and it will make a transition and makes the selection smoother
You have the preview checkbox to see the before and after, and I’m gonna try to remove as much as I could from the background without destroying the edges of the buildings
I think that looks good for now, I’m gonna click ok, and right of the bat we pretty much replaced the sky, there are still some areas we need to restore like the orange areas of the buildings and the sea
So we need to convert this into a selection in order to create a layer mask, and let me show a cool trick to do that, first, I’m gonna duplicate the foreground image, and then I’m gonna right-click on it and choose to convert to a smart object, and by doing so you will see that the thumbnail has changed and now it has transparency
So now we can hold alt and click on the thumbnail to load It as a selection, and we no longer need this layer so I’m gonna turn it off and then I’m gonna add a layer mask to the original layer, and that’s gonna apply the selection to the layer mask
We can also alt-click to see the layer mask, and you can clearly see now that the layer mask is not perfect, so we need to do a few things to refine the mask, I’m just gonna double click on the layer and remove the blend if changes because we have a layer mask now,
ill go back to the layer mask view, and I’m gonna take the brush tool and then change the blending mode to overlay, and now I’ll start painting with black and a low flow, as you can see I’m removing the background and the tower is still intact, and that’s because the overlay blending mode will not remove 100% white
So now we can use this technique to refine the mask and remove any unwanted areas,
so I’m just gonna go really quick around these and remove the clouds from the sky
At this point, there is no need to keep painting with brush tool I can just take the lasso tool and make a selection to the rest of the sky, and then I’m gonna fill it with black to hide it
Alright we are gonna do the same thing for the buildings, I’m gonna take the brush tool, change the blending mode back to normal, and then I’m gonna paint with white to restore the image
I’m not gonna spend too much time on it to keep this tutorial short, but you get the idea, use the overlay brush technique to refine the mask and get a perfect selection
So that’s basically it, we used blend if to target the oranges in the sky and remove it, and then we refined the selection even further with a layer mask, now, we had to use two different methods to remove the sky and I did that on purpose to show different possibilities, but sometimes it’s gonna be a lot easier to remove the background with just blend if, when you have a clear sky and a good contrast
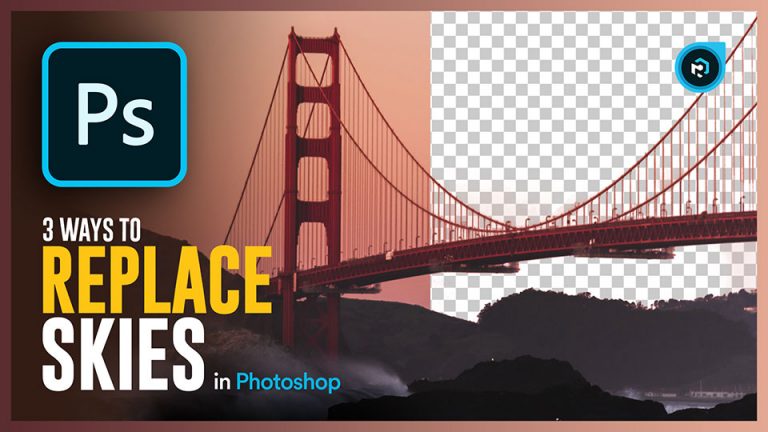
Alright so let’s move on to the last example, and this time we have a much more complex sky and there is no way we can remove the sky with the quick selection tool or even blend if, so we are gonna use a different technique to approach this image, so make sure the layer is selected. Then go to select, color range
So first we need a better view of the selection, we can change that in the selection preview and I’m gonna choose grayscale, I’m gonna also uncheck localized color clusters, and that’s gonna make sure to limit the range of the colors we select
Now you can use the eyedropper to click on an area that you wanna select and also you can use shift to add to that selection, but I want you to pay close attention to the bridge, if you increase the range too much you are gonna destroy some parts of the bridge, so I’m gonna try to select as much I can of the sky and be careful not to destroy the bridge lines
You also have the fuzziness slider to control the details a little bit more, and again if I go too far I’m gonna destroy the details, so I’m gonna keep the fizziness and the range low, we will still have some areas that are not completely white but that’s ok we can still modify it later in the layer mask
So I’m gonna click ok, that gonna convert it into a selection, and now we can just create a layer mask to apply that selection, and so far we have a pretty good selection already but we can still make it better and also match luminosity and color
I’m gonna alt-click on the layer mask, and we are gonna need to enhance the contrast to hide the background completely and restore some of the bridge details, so what we can do here instead of applying levels to the whole image because it’s not gonna work,
instead, I’m gonna take the lasso and select only this area of the bridge, and now I can click on Ctrl + l to bring levels and we can increase the contrast only to this area, I can make the whites whiter to enhance the bridge and the darks darker to hide the sky
So this is not gonna work much for the sky because we don’t have much detail and you are seeing this bending because the fuzziness was low, so we can also use the overlay brush technique and remove any unwanted area, so I’m gonna quickly go through the sky with the brush tool and remove it
And also we don’t have to stress so much about having a perfect mask as long as the two images are matching, right now you can see there a little bit of fringing at the edges and it means that the background is dark and we need to match the luminosity, so I’m gonna select the background layer and create a levels adj layer on top of it, and we just need to lighten the midtones a little bit, and you can see by turning it on and off that looks much better
I’m gonna take my brush tool again and remove this part of the sky also, now this part of the bridge still needs a little bit of work we need to enhance the contrast a little bit more, and if I’m gonna use the brush tool its not gonna work, and let me show how it looks when I turn off the layer mask, its gonna destroy so much detail, so I’m gonna take my lasso tool again and select this part of the bridge, and I’m gonna use levels again to enhance the contrast, so that’s the before and after
I’m gonna also select all this here at the bottom, and I’m gonna fill it with white, and with my background color set to white, ill click on ctrl backspace to fill with white
ok so that’s all of the sky pretty much removed, I wanna add one last adj layer to match the color between the foreground and the background, so I’m gonna add a color balance adj layer, and I’m just gonna increase yellow and red
And you can how these two adj layers help match the background with the foreground
Alright, guys, those are the techniques I pretty much use for all my sky replacements and compositing projects, if you know of any other technique make sure to tell us about it in the comment section or if you have any question, ill be happy to answer,
also if you wanna master photoshop compositing, consider visiting The Academy and check out my courses, where I go in-depth teaching Photoshop and Compositing
and make sure to subscribe to my YouTube Channel if you haven’t already and turn on the notifications so you don’t miss out on the new tutorials.