
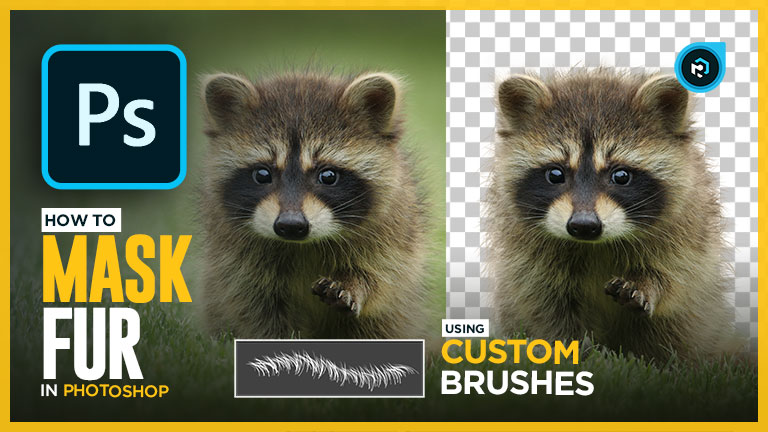
in this video, I’m going show you best way to cut out fur in photoshop, you will learn how to mask hair on subjects that are difficult to select using the normal selection tools by creating a custom fur brush to manually paint the fur back.
so let me show you how to remove the background on this particular image
- Masterclass
Learn how to match any subject with any background
Discover the secret Techniques to creating realistic composites in photoshop
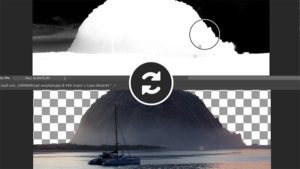
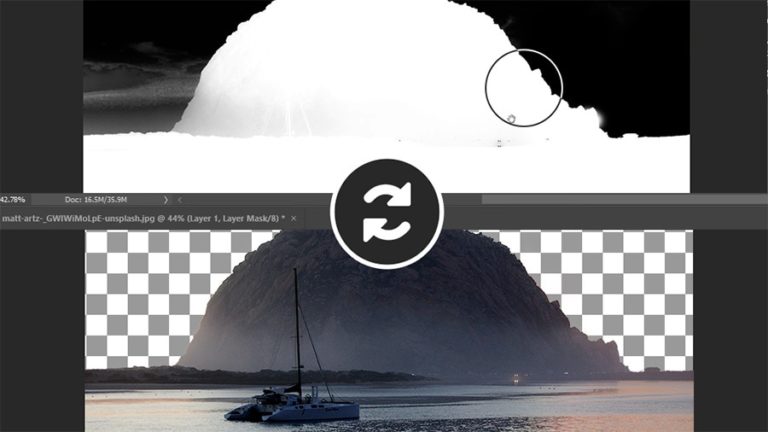
So we have an image of a raccoon and we want to remove the background and mask out this fur, and you can see that some of the fur is out of focus and when you have a subject that is blurry at the edges especially hair it kinda gets hard to select, so let me show you how to remove the background on this particular image
We are just gonna use the quick selection tool as a start to make a rough selection around the subject and you don’t need to care too much about the hair for now, because we are gonna be using refine edge for that,
so if you wanna exclude some areas you can hold alt, and the plus Is gonna become a minus and then paint on that area to exclude it from the selection
And on in area like this, it’s gonna also be difficult to select his ears so you can hit q to enter the quick mask mode, and the red area is the area that is not selected so we are just gonna take the brush tool and paint with white to reveal it
Alright so the selection is good enough I’m just gonna hit q again to go back to the selection, and also select the quick selection tool and then I’m gonna click on the select and mask button, so we are gonna use select and mask to mask the fur and on the right-hand side you have the view mode if you wanna change it to something like onion skin or black and white, I like to use overlay so I’m gonna select that
And then on the left-hand side, I’m gonna take the refine edge tool which is this one, and using this tool you can paint on the edges and photoshop is gonna automatically attempt to detect the edges of the fur and select it for you,
you can see that the selection is not perfect and some of the fur was not selected properly and that’s gonna happen when your subject is out of focus
So I’m just gonna accept the change and before I click ok I’m gonna change the output to layer mask and click ok, it’s gonna create a layer mask for us and I also have my background image underneath the layer so I’m gonna turn it on
So the refine edge tool did an ok job for detecting the edges, but we are gonna need to refine this selection a little more in order for the edges to look better, let me just add a levels adj layer to show you the edges better
I chose a similar image to my background to easily blend the two images together but if you are gonna use a different background image, you are gonna need to paint that fur manually and that’s what I’m going to show you in a little bit
But before I do that I wanna clean the layer mask a little bit, so I’m gonna hold alt and click on the layer mask and I wanna clean the edges a little bit and fore that I’m gonna use the brush tool and change the blending mode to overlay, change the color to black and I’m just gonna paint on the edges to remove that fringing coming from the background, and the overlay blending mode is gonna help you clean the edge without destroying so much of the detail and it’s ok if it does, we are gonna repaint the edge with a custom hair brush
Alright so let’s create the custom brush, and for that, I’m gonna create a new document with the dimension of 500 x 500.
Ok im gonna take the brush tool and im gonna make it hard, in fact, im gonna choose a brush with the pen pressure enabled and im going to choose a smaller brush size, something right about this size, and I also need to change the blending mode back to normal
And on a new layer what im going to do is make a stroke just like this with the brush and make it a little bit curved
to create something that looks like a hair, you can also increase the smoothing to help you paint a smoother stroke,
im using a graphics tablet but if you don’t have one you can always use my brush and I’ll provide the link for you in the description to download it
So I like this one and im gonna save it as a brush preset, you can do that by going to edit, define brush preset, and its gonna give you a preview and im gonna rename it to hair brush, so this brush we just created is gonna automatically be selected, im gonna delete this one now and show you what we can do with it
So this is what it looks like when I paint with it and we are gonna need to modify some settings to and make it looks like realistic hair, so let’s go back to the document and im gonna create a new layer, then we need to open up the brush settings panel and from here we are gonna be able to do a lot of things to the brush
So the first thing im gonna do is check shape dynamics, and then increase the size jitter and you are gonna be able to see the changes live in this preview window, and this basically is gonna make different and random sizes of the brush when you paint, next one is angle jitter and that’s gonna rotate the brush and make it a little bit more random to break the repetition
I’m gonna keep mine low like so and that gonna be it for shape dynamics settings, next one is scattering and from here you are gonna be able to add spacing horizontally or vertically, but in this case, we don’t wanna add too much scattering so about 30% is gonna be ok
I’m gonna also add transfer, and what’s nice about transfer is that the individual brush strokes will have different opacity levels and that’s gonna make it look more realistic, and the same thing for flow as well and you can control that with pen pressure if you want to, if you have a tablet
Ok so another option you have in scattering is that you can increase the count of the brush strokes from here, but personally, i like to have it all the way to zero so i can build up the effect and have more control, in fact, im gonna click on brush tip shape and increase the spacing a little bit,
Ok that’s looking good, the last thing im gonna check is build up and let me show you one last thing in shape dynamics, so in the angle jitter i can change the control to direction, and now what will happen is that the brush stroke will follow the direction of your mouse and this can be very helpful to follow the curved edges of whatever you are masking
Ok so we are done modifying the brush settings, that is how it looks like, and we can save all the settings we did to a brush preset that we can use in the future, and you can do that by clicking here and choose new brush preset, im gonna rename this one to hair brush 2 and you can also capture the brush size, the color in the swatch, and even the opacity and flow and photoshop is gonna remember these setting the next time you use this brush
Im gonna click ok now and im gonna right-click with my brush tool and you will see the new brush preset we just created at the bottom
Alright so let’s start painting the fur and im going to select the layer mask, and using the brush tool am gonna set the foreground color to white so we can start revealing some of that fur back, what you can also do to match the hair direction is if you go to brush tip shape you can change the angle from here whenever you need to and you can also flip it x or y by checking these boxes
So im just gonna start painting here with a small brush size to add small hair and fix the edge, and before i paint more hair, i wanna make a copy of the original layer, and im gonna also delete the layer mask because im gonna convert it smart object so i can keep the resolution quality when i resize it down, so now i can just alt click on the original layer mask and drag it to the smart object layer to make a copy of it
So you can see in the layer mask view im trying to fix the edge by filling these gaps with a small brush size, so now that we did that we can paint with a bigger brush to add a little bit more variation in size
if you feel like the angle of the brush is a bit too much for this image you can always change that in the brush settings and save it as a new preset and you can even make other brushes with less curved strokes to add more variation to the fur
So right here in the ears we are gonna need to paint with the opposite direction and a smaller brush size so im gonna change the angle of the brush and also uncheck flip x
Alright so im gonna take my time to paint the fur at the edge all the way and i will get back when im done
Ok so i finished painting the fur and this is how the layer mask looks like now, so this is before, and after, im gonna delete the layer mask of the original image because we are gonna be needing it to blend the two images together, so as you can see the background is out of focus and the edges of my subject was a little bit out of focus as well,
So what i would like to do is feather the edge of my layer mask a little bit to match it with the background, so what we can do is select the layer mask, and in the mask properties we can increase the feather to blur the edges of the layer mask, and this is non-destructive, means we can always go back and change the value
Alright so let’s blend the two images together and im going to select both layers and scale them down, and now that i did that im gonna need to decrease the feather a little bit
So now i’ll turn on my background layer and im going to try to align it with the background image, and now we can just create an inverted layer mask using alt or option, and then take the brush tool, im gonna choose a normal soft one, and then im gonna start revealing the background here by painting with white, you can also reduce the flow to blend the grass together a little better
Ok now im gonna create a hue saturation adj layer on top of that and create a clipping mask, and im going to increase the saturation a little bit, then im gonna add a levels adj layer and make the image a little bit darker, and what i can also do is add a level adj and clip it to the subject and make the subject also darker, and lastly i’ll add a color balance adj layer and im gonna add a little bit of green to match it better with the background
Alright, so that’s how you can use the power of custom brushes to manually mask your subject, and you can use this technique for a lot of different hair types, i hope you guys learned something new in this video,
Check out my tutorial on how to add stars to a sky by creating a custom star brush
please share your thoughts in the comments below, and i’ll be happy to answer your questions
If you enjoyed this tutorial and you wanna support, consider checking out my courses at the Academy, every purchase you make help me create content for you here, so thank you guys so much for watching and i’ll see you in the next video


2 thoughts on “The Best Way To Mask Fur in Photoshop”
very good tutorial, clear and well explained.
thank you